Spring4实战学习笔记
《Spring4实战 第4版》2016年4月新出版的,之前的第三版看起来还是不错的,所以看到新版就直接买下来。
英文版源码地址:Spring in Action, Fourth Edition Covers Spring 4

1.IOC装配Bean
参考【Spring实战4 2.2】,作者提倡无XML配置化。
1.1接口只有一个现实类
可以自动装配
public interface CompactDisc {void play();
}
import org.springframework.stereotype.Component;@Component
public class SgtPeppers implements CompactDisc {private String title = "Sgt. Pepper's Lonely Hearts Club Band";private String artist = "http://blog.csdn.net/unix21";public void play() {System.out.println("【非常醒目SgtPeppers 】>>>>>>>>>>>>>>>>>Playing " + title + " by " + artist);}}import org.springframework.context.annotation.ComponentScan;
import org.springframework.context.annotation.Configuration;@Configuration
@ComponentScan
public class CDPlayerConfig {
}单元测试
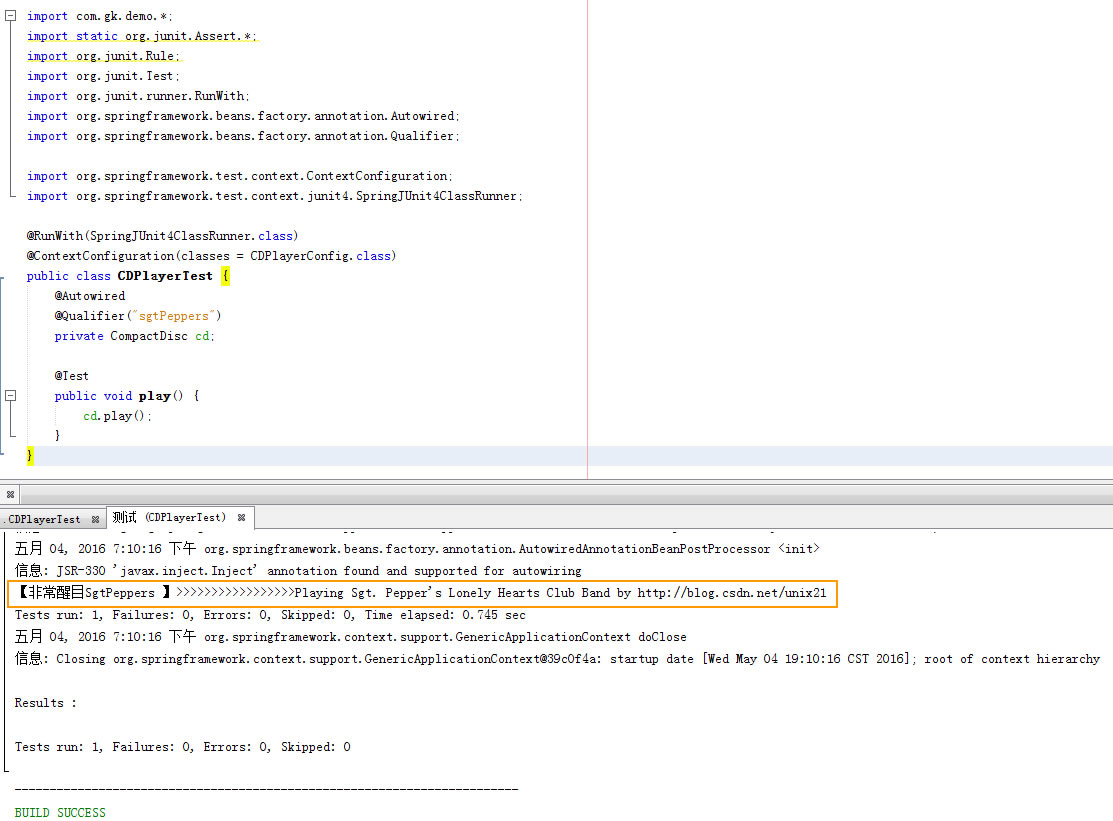
import static org.junit.Assert.*;
import org.junit.Rule;
import org.junit.Test;
import org.junit.runner.RunWith;
import org.springframework.beans.factory.annotation.Autowired;
import org.springframework.beans.factory.annotation.Qualifier;import org.springframework.test.context.ContextConfiguration;
import org.springframework.test.context.junit4.SpringJUnit4ClassRunner;@RunWith(SpringJUnit4ClassRunner.class)
@ContextConfiguration(classes = CDPlayerConfig.class)
public class CDPlayerTest {@Autowiredprivate CompactDisc cd;@Testpublic void play() {cd.play();}
}
1.2 接口有多个实现类
【参考 Spring实战4 3.3】
故意再写一个实现类
import org.springframework.stereotype.Component;@Component
public class SgtPeppersNew implements CompactDisc {private String title = "Sgt. Pepper's Lonely Hearts Club Band";private String artist = "http://blog.csdn.net/unix21";public void play() {System.out.println("【非常醒目 SgtPeppersNew】>>>>>>>>>>>>>>>>>Playing " + title + " by " + artist);}}
如果这个时候运行肯定会报错NoUniqueBeanDefinitionException: No qualifying bean of type
解决方法有两种
第一种 在实现类上 标识首选的bean,使用@Primary
import org.springframework.context.annotation.Primary;
import org.springframework.stereotype.Component;@Component
@Primary
public class SgtPeppers implements CompactDisc {private String title = "Sgt. Pepper's Lonely Hearts Club Band";private String artist = "http://blog.csdn.net/unix21";public void play() {System.out.println("【非常醒目SgtPeppers 】>>>>>>>>>>>>>>>>>Playing " + title + " by " + artist);}}
但是这种方法不方便精确定义。
第二种 使用@Qualifier注解
import static org.junit.Assert.*;
import org.junit.Rule;
import org.junit.Test;
import org.junit.runner.RunWith;
import org.springframework.beans.factory.annotation.Autowired;
import org.springframework.beans.factory.annotation.Qualifier;import org.springframework.test.context.ContextConfiguration;
import org.springframework.test.context.junit4.SpringJUnit4ClassRunner;@RunWith(SpringJUnit4ClassRunner.class)
@ContextConfiguration(classes = CDPlayerConfig.class)
public class CDPlayerTest {@Autowired@Qualifier("sgtPeppersNew") private CompactDisc cd;@Testpublic void play() {cd.play();}
}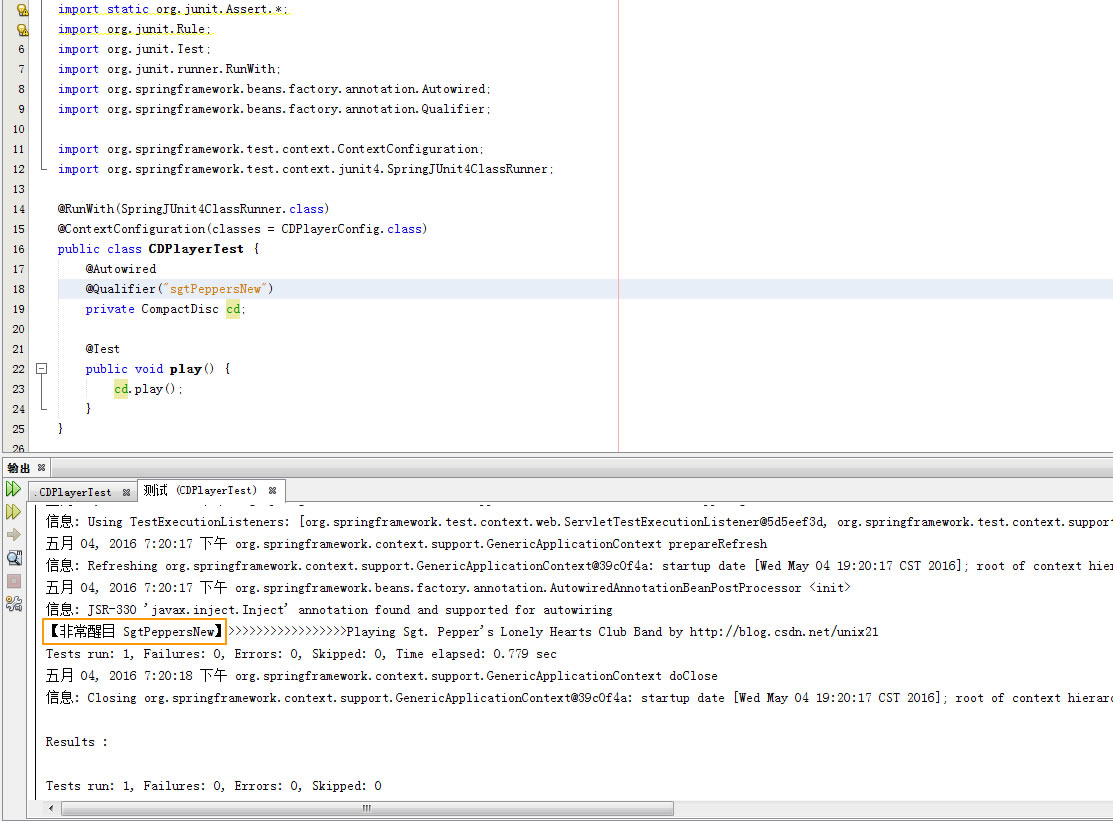
需要注意的是bean id的首字母是类名小写。
spring @Qualifier注解
1.3 为组件扫描的bean命名
【参考 Spring实战4 2.2.2】
import org.springframework.stereotype.Component;@Component("spn")
public class SgtPeppersNew implements CompactDisc {
@Autowired@Qualifier("spn") private CompactDisc cd;
也可以使用@Named效果是一样的,这是java依赖注入规范
import javax.inject.Named;@Named("spn")
public class SgtPeppersNew implements CompactDisc {
1.4 设定组件扫描的指定包
【参考 Spring实战4 2.2.3】
如果@ComponentScan默认不设置只扫描配置类所在的包作为基础包。
@Configuration
@ComponentScan("blog.csdn.net.unix21")
public class CDPlayerConfigTest {
设置@ComponentScan的value属性就可以指明包名称。
如果想更清晰的表明设置的是基础包
@ComponentScan(basePackages="指定包")
指定多个
@ComponentScan(basePackages={"指定包1","指定包2"})
也可以将其指定为包中所包含的类或者接口
@ComponentScan(basePackages={"XXX.class","XX.class"})
1.5 自动装配
【参考 Spring实战4 2.2.4】
声明自动装配需要@Autowired注解
1.5.1 在构造方法上使用自动装配
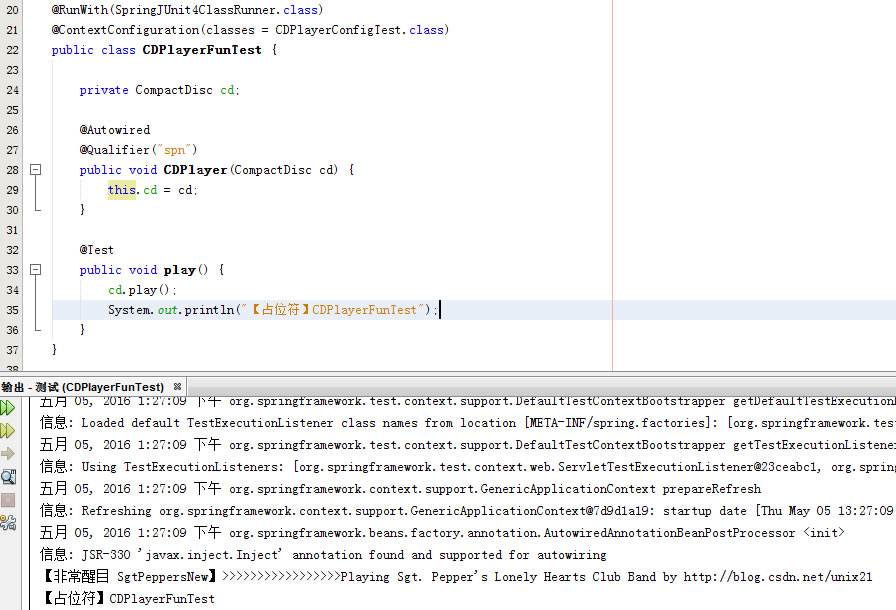
@RunWith(SpringJUnit4ClassRunner.class)
@ContextConfiguration(classes = CDPlayerConfigTest.class)
public class CDPlayerFunTest {private CompactDisc cd;@Autowired@Qualifier("spn")public void CDPlayer(CompactDisc cd) {this.cd = cd;}@Testpublic void play() {cd.play();System.out.println("【占位符】CDPlayerFunTest");}
}
另一种写法
@Component
public class CDPlayer implements MediaPlayer {private CompactDisc cd;@Autowiredpublic CDPlayer(@Qualifier("spn")CompactDisc cd) {this.cd = cd;}public void play() {cd.play();}}
1.5.2 在属性Setter方法上使用自动装配
@Component
public class CDPlayer implements MediaPlayer {private CompactDisc cd;@Autowired@Qualifier("spn")public void setCompactDisc(CompactDisc cd) {this.cd = cd;}public void play() {cd.play();}
}
避免异常声明 @Autowired(required = false),如果没有匹配的bean,Spring会让这个bean处于未装配转态,但是需要谨慎对待这个设置,代码需要做null检查。
@Autowired是Spring特有的注解,可以替换为@Inject,@Inject来源自Jave依赖注入规范。
1.6 创建自定义的限定符
【参考 Spring实战4 3.3.2】
@Component
@Qualifier("cold")
public class IceCream implements CompactDisc {private String title = "Sgt. Pepper's Lonely Hearts Club Band";private String artist = "The Beatles";public void play() {System.out.println("【非常醒目 IceCream】>>>>>>>>>>>>>>>>>>>>>>>>>>>>>>>>Playing " + title + " by " + artist);}
}
测试用例
@RunWith(SpringJUnit4ClassRunner.class)
@ContextConfiguration(classes=CDPlayerConfigTest.class)
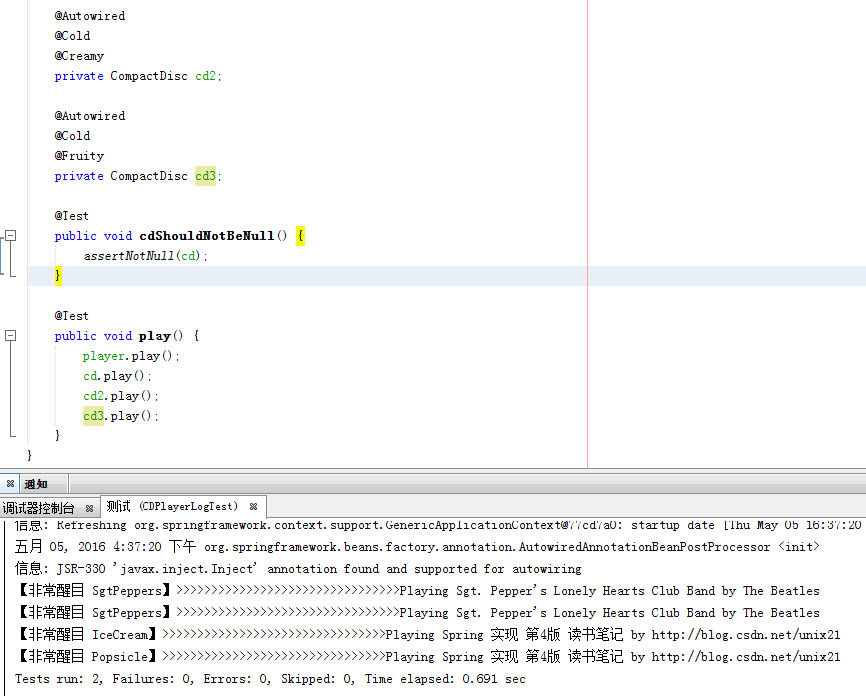
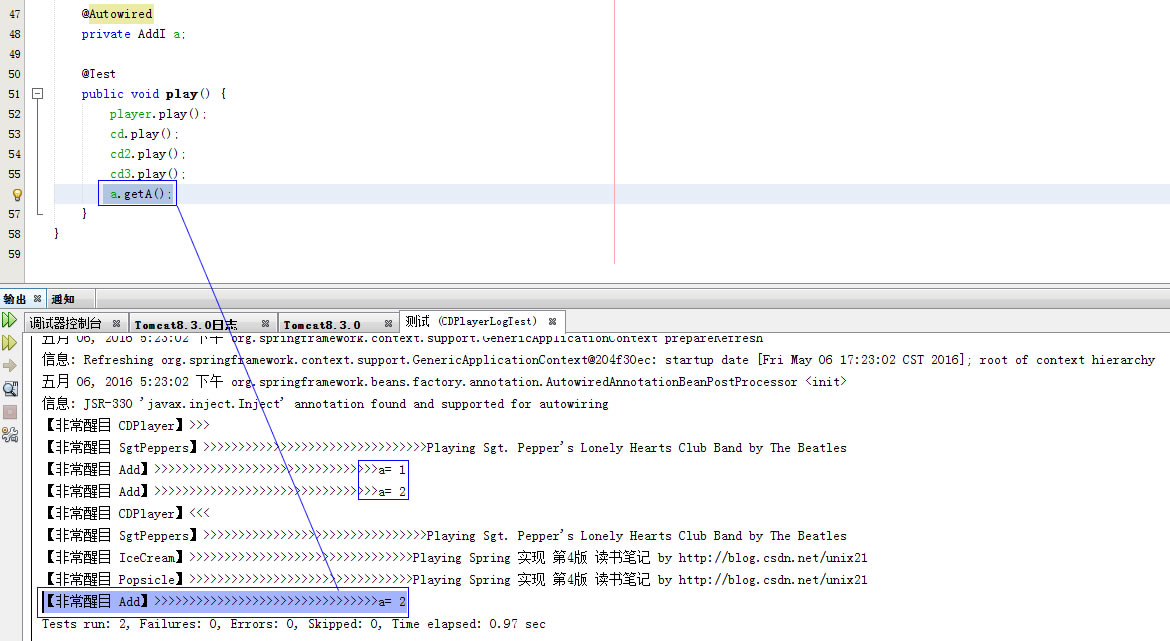
public class CDPlayerLogTest {@Autowiredprivate MediaPlayer player;@Autowired@Qualifier("sp")private CompactDisc cd;@Autowired@Qualifier("cold")private CompactDisc cd2;@Testpublic void cdShouldNotBeNull() {assertNotNull(cd);}@Testpublic void play() {player.play();cd.play();cd2.play();}
}
好处:这样做的好处限定符不耦合类名,所以可以随意重构类名。
问题:重复的限定符出现在多个类上这是不允许的,因为Java不允许同一个条目上重复出现相同类型的多个注解。
1.7 使用自定义限定符注解
针对上述问题可以创建自定义的限定符注解。
@Retention(RetentionPolicy.RUNTIME) // 注解会在class字节码文件中存在,在运行时可以通过反射获取到
@Target({ElementType.CONSTRUCTOR,ElementType.FIELD,ElementType.METHOD,ElementType.TYPE})//定义注解的作用目标**作用范围字段、枚举的常量/方法
@Qualifier
public @interface Cold {}
@Retention(RetentionPolicy.RUNTIME) // 注解会在class字节码文件中存在,在运行时可以通过反射获取到
@Target({ElementType.CONSTRUCTOR,ElementType.FIELD,ElementType.METHOD,ElementType.TYPE})//定义注解的作用目标**作用范围字段、枚举的常量/方法
@Qualifier
public @interface Creamy {}@Retention(RetentionPolicy.RUNTIME) // 注解会在class字节码文件中存在,在运行时可以通过反射获取到
@Target({ElementType.CONSTRUCTOR,ElementType.FIELD,ElementType.METHOD,ElementType.TYPE})//定义注解的作用目标**作用范围字段、枚举的常量/方法
@Qualifier
public @interface Fruity {}@Component
@Cold
@Creamy
public class IceCream implements CompactDisc {private String title = "Spring 实现 第4版 读书笔记";private String artist = "http://blog.csdn.net/unix21";public void play() {System.out.println("【非常醒目 IceCream】>>>>>>>>>>>>>>>>>>>>>>>>>>>>>>>>Playing " + title + " by " + artist);}
}@Component
@Cold
@Fruity
public class Popsicle implements CompactDisc {private String title = "Spring 实现 第4版 读书笔记";private String artist = "http://blog.csdn.net/unix21";public void play() {System.out.println("【非常醒目 Popsicle】>>>>>>>>>>>>>>>>>>>>>>>>>>>>>>>>Playing " + title + " by " + artist);}
}@RunWith(SpringJUnit4ClassRunner.class)
@ContextConfiguration(classes = CDPlayerConfigTest.class)
public class CDPlayerLogTest {@Autowiredprivate MediaPlayer player;@Autowired@Qualifier("sp")private CompactDisc cd;@Autowired@Cold@Creamyprivate CompactDisc cd2;@Autowired@Cold@Fruityprivate CompactDisc cd3;@Testpublic void cdShouldNotBeNull() {assertNotNull(cd);}@Testpublic void play() {player.play();cd.play();cd2.play();cd3.play();}
}
1.8 bean的作用域
Spring定义了多重作用域,singleton单例,prototype原型等
参考:spring中scope作用域
singleton单例:整个应用中,只创建bean的一个实例,默认Spring上下文中所有的bean都是单例。
prototype原型:每次注入或者通过Spring应用上下文获取的时候,都会创建一个新的bean实例。
@Component
public class Add implements AddI {public  int a=0;public  void Add() {a++;}public  void getA() {System.out.println("【非常醒目 Add】>>>>>>>>>>>>>>>>>>>>>>>>>>>>>>>>a= " +a+"");}
}
public interface AddI {
void Add();void getA();
}@Component
public class CDPlayer implements MediaPlayer {@Autowired@Qualifier("sp")private CompactDisc cd;@Autowiredprivate AddI a;public void play() {System.out.println("【非常醒目 CDPlayer】>>>");cd.play();a.Add();a.getA();a.Add();a.getA();System.out.println("【非常醒目 CDPlayer】<<<");}
}测试用例
@RunWith(SpringJUnit4ClassRunner.class)
@ContextConfiguration(classes = CDPlayerConfigTest.class)
public class CDPlayerLogTest {@Autowiredprivate MediaPlayer player;@Autowired@Qualifier("sp")private CompactDisc cd;@Autowired@Cold@Creamyprivate CompactDisc cd2;@Autowired@Cold@Fruityprivate CompactDisc cd3;@Testpublic void cdShouldNotBeNull() {assertNotNull(cd);}@Autowiredprivate AddI a;@Testpublic void play() {player.play();cd.play();cd2.play();cd3.play();a.getA();}
}
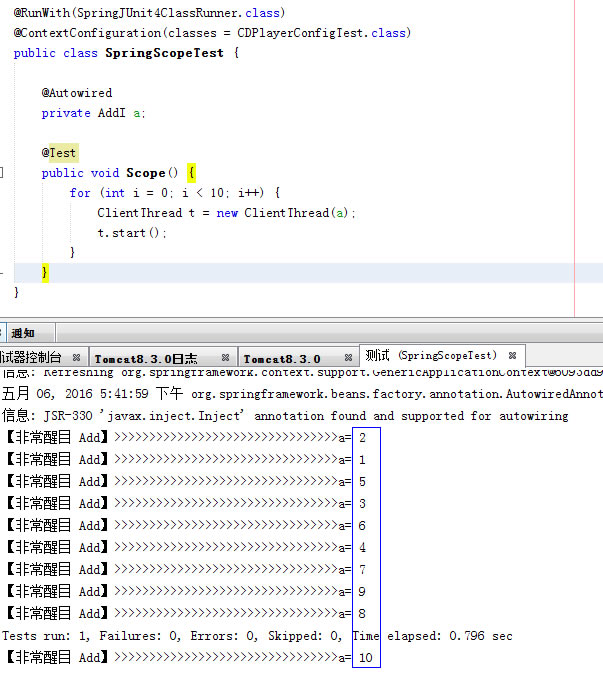
再写一个多线程
public class ClientThread extends Thread {@Autowiredprivate AddI a;@Autowiredpublic ClientThread(AddI a) {this.a = a;}public void run() {a.Add();a.getA();}
}
调用多线程
@RunWith(SpringJUnit4ClassRunner.class)
@ContextConfiguration(classes = CDPlayerConfigTest.class)
public class SpringScopeTest {@Autowiredprivate AddI a;@Testpublic void Scope() {for (int i = 0; i < 10; i++) {ClientThread t = new ClientThread(a);t.start();}}
}
改为SCOPE_PROTOTYPE
@Component
@Scope(ConfigurableBeanFactory.SCOPE_PROTOTYPE)
//@Scope(ConfigurableBeanFactory.SCOPE_SINGLETON)
public class Add implements AddI {public  int a=0;public  void Add() {a++;}public  void getA() {System.out.println("【非常醒目 Add】>>>>>>>>>>>>>>>>>>>>>>>>>>>>>>>>a= " +a+"");}
}
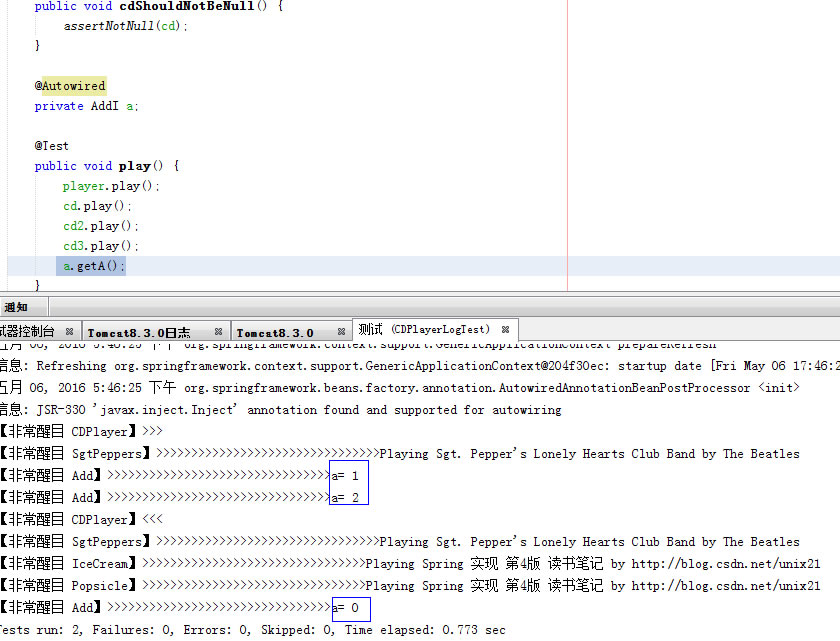
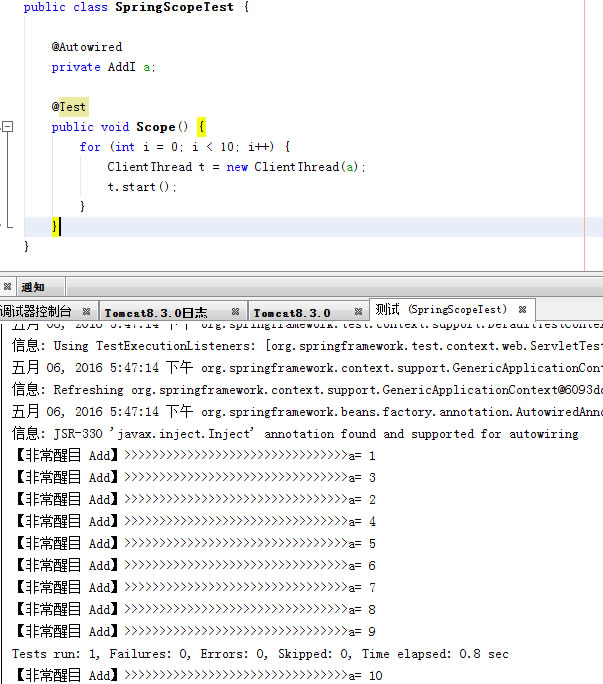
看到差异了吧。
补充说明:@Repository、@Service、@Controller 和 @Component将类标识为Bean,都是一样的,用在不同的地方而已。
2.AOP切面编程
定义接口
public interface PerformanceI {public void perform();
}
实现类
import org.springframework.stereotype.Component;@Component
public class Performance implements PerformanceI{public void perform(){System.out.println("【非常醒目  Performance perform 调用中】 By http://blog.csdn.net/unix21");   }
}
定义切面
import org.aspectj.lang.annotation.After;
import org.aspectj.lang.annotation.AfterThrowing;
import org.aspectj.lang.annotation.Aspect;
import org.aspectj.lang.annotation.Before;@Aspect
public class MyAspect {@Before("execution(* com.demo.PerformanceI.perform(..))")public void before(){System.out.println("【非常醒目 [方法调用前] 】");}@After("execution(* com.demo.PerformanceI.perform(..))")public void after(){System.out.println("【非常醒目 [方法调用后] 】");}@AfterThrowing("execution(* com.demo.PerformanceI.perform(..))")public void afterThrowing(){System.out.println("【非常醒目 [方法异常后] 】");}
}
配置文件
import com.demo.*;
import org.springframework.context.annotation.Bean;
import org.springframework.context.annotation.ComponentScan;
import org.springframework.context.annotation.Configuration;
import org.springframework.context.annotation.EnableAspectJAutoProxy;@Configuration
@EnableAspectJAutoProxy
@ComponentScan("com.demo")
public class AppConfig {@Beanpublic MyAspect myAspect() {return new MyAspect();}}
测试用例
import org.junit.Test;
import org.junit.runner.RunWith;
import org.springframework.beans.factory.annotation.Autowired;
import org.springframework.test.context.ContextConfiguration;
import org.springframework.test.context.junit4.SpringJUnit4ClassRunner;@RunWith(SpringJUnit4ClassRunner.class)
@ContextConfiguration(classes = AppConfig.class)
public class MyTest {@Autowiredprivate PerformanceI p1;@Testpublic void play() {p1.perform();}
}
运行:
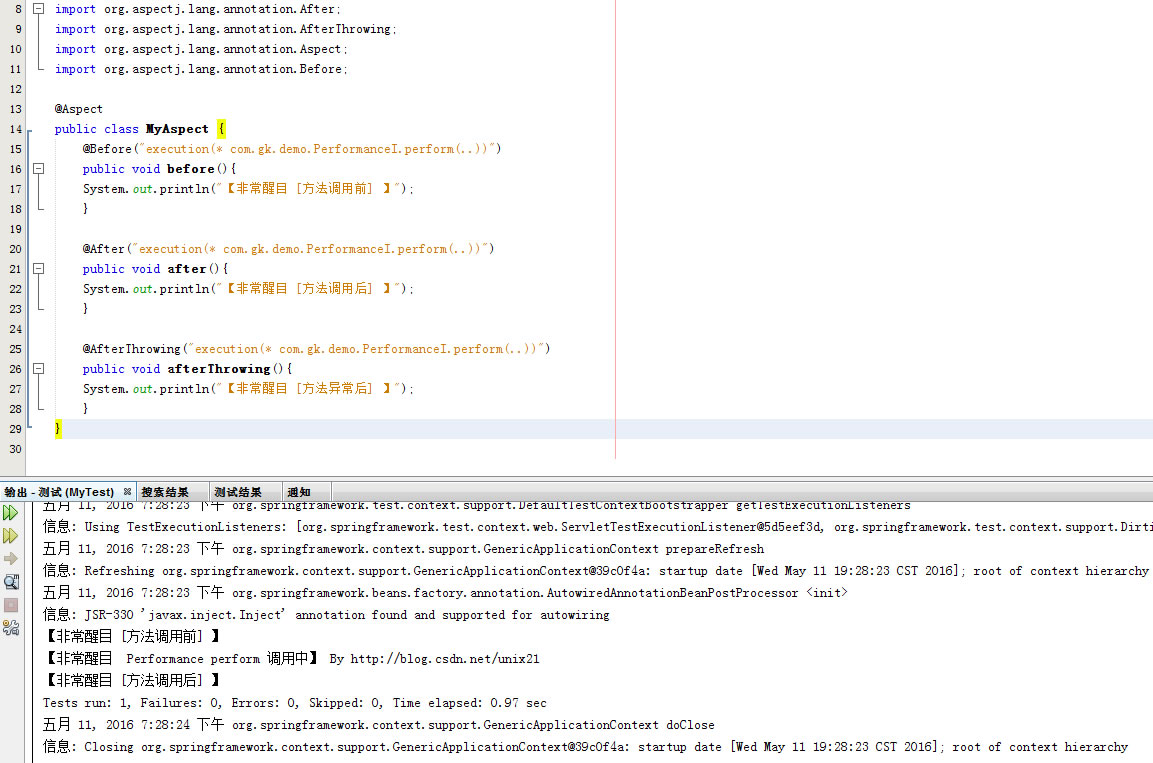
实现了方法调用前后的AOP效果。
这个Spring官方参考做的不错:http://docs.spring.io/spring/docs/4.2.5.RELEASE/javadoc-api/
这里选不同的版本:http://docs.spring.io/spring/docs/

3.Spring MVC
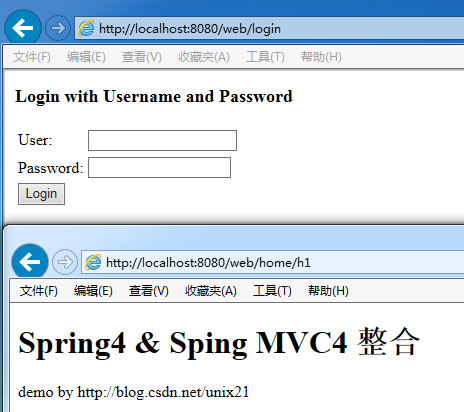
DispatcherServlet是Spring MVC的核心,每当应用接受一个HTTP请求,由DispatcherServlet负责将请求分发给应用的其他组件。
在旧版本中,DispatcherServlet之类的servlet一般在web.xml文件中配置;但是Spring 3.1引入了注解就无需再使用web.xml文件。
import org.springframework.web.servlet.support.AbstractAnnotationConfigDispatcherServletInitializer;public class SpitterWebInitializer extends AbstractAnnotationConfigDispatcherServletInitializer {@Overrideprotected Class<?>[] getRootConfigClasses() {return new Class<?>[]{RootConfig.class};}@Overrideprotected Class<?>[] getServletConfigClasses() {return new Class<?>[]{WebConfig.class};}@Overrideprotected String[] getServletMappings() {return new String[]{"/"};}}AbstractAnnotationConfigDispatcherServletInitializer这个类负责配置DispatcherServlet、初始化Spring MVC容器和Spring容器。
正如可以通过多种方式配置DispatcherServlet一样,也可以通过多种方式启动Spring MVC特性。原来我们一般在xml文件中使用<mvc:annotation-driven>元素启动注解驱动的Spring MVC特性。这里我们使用JavaConfig配置,最简单的Spring MVC配置类代码如下:
import org.springframework.context.annotation.Bean;
import org.springframework.context.annotation.ComponentScan;
import org.springframework.context.annotation.Configuration;
import org.springframework.web.servlet.ViewResolver;
import org.springframework.web.servlet.config.annotation.DefaultServletHandlerConfigurer;
import org.springframework.web.servlet.config.annotation.EnableWebMvc;
import org.springframework.web.servlet.config.annotation.WebMvcConfigurerAdapter;
import org.springframework.web.servlet.view.InternalResourceViewResolver;@Configuration
@EnableWebMvc
@ComponentScan("com.xxx.controller")
public class WebConfig extends WebMvcConfigurerAdapter{@Beanpublic ViewResolver viewResolver() { //配置JSP视图解析器InternalResourceViewResolver resolver = new InternalResourceViewResolver();resolver.setPrefix("/WEB-INF/views/");resolver.setSuffix(".jsp");//可以在JSP页面中通过${}访问beansresolver.setExposeContextBeansAsAttributes(true);return resolver;}@Overridepublic void configureDefaultServletHandling(DefaultServletHandlerConfigurer configurer) {configurer.enable(); //配置静态文件处理}
}
@Configuration表示这是Java配置类;@EnableWebMvc注解用于启动Spring MVC特性。
通过@ComponentScan注解指定bean的自动发现机制作用的范围,被@Controller等注解修饰的web的bean将被发现并加载到spring mvc应用容器,这样就不需要在配置类中显式定义任何控制器bean了。
通过@Bean注解添加一个ViewResolverbean,具体来说是InternalResourceViewResolver。
RootConfig的配置就非常简单了,唯一需要注意的是,它在设置扫描机制的时候,将之前WebConfig设置过的那个包排除了;也就是说,这两个扫描机制作用的范围正交。RootConfig的代码如下:
import org.springframework.context.annotation.ComponentScan;
import org.springframework.context.annotation.Configuration;
import org.springframework.context.annotation.FilterType;
import org.springframework.web.servlet.config.annotation.EnableWebMvc;@Configuration
@ComponentScan(basePackages = {"com.xxx.*"},excludeFilters = {@ComponentScan.Filter(type = FilterType.ANNOTATION, value = EnableWebMvc.class)})
public class RootConfig {
}
写一个控制器,定义之前的IOC对象PerformanceI
@Controller
public class HomeController {@Autowiredprivate PerformanceI p1;@RequestMapping(value = "/home", method = RequestMethod.GET)public String home() {p1.perform();return "home";}
}
在WEB-INF/views下新增模板文件home.jsp
<%@page contentType="text/html" pageEncoding="UTF-8"%>
<!DOCTYPE html>
<html><head><meta http-equiv="Content-Type" content="text/html; charset=UTF-8"><title>JSP Page</title></head><body><h1>Spring4 & Sping MVC4 </h1><p>demo by http://blog.csdn.net/unix21</p></body>
</html>
下面这个是【第5章】的翻译 https://segmentfault.com/a/1190000004343063?_ea=575820
4.Spring4整合MyBatis3
说明:《Spring实战(第4版)》并没有提到MyBatis的整合,这个是我自己写的,写一起只为查看方便。
新建MybatisConfig文件
import javax.sql.DataSource;
import org.mybatis.spring.SqlSessionFactoryBean;
import org.mybatis.spring.mapper.MapperScannerConfigurer;
import org.springframework.context.annotation.Bean;
import org.springframework.context.annotation.Configuration;
import org.springframework.jdbc.datasource.DataSourceTransactionManager;
import org.springframework.jdbc.datasource.DriverManagerDataSource;
import org.springframework.transaction.PlatformTransactionManager;
import org.springframework.transaction.annotation.EnableTransactionManagement;@Configuration
@EnableTransactionManagement
public class MybatisConfig {@Beanpublic DataSource dataSource() {DriverManagerDataSource dataSource = new DriverManagerDataSource();dataSource.setUsername("admin");dataSource.setPassword("admin");dataSource.setDriverClassName("com.microsoft.sqlserver.jdbc.SQLServerDriver");//如果其他数据库换对应的驱动即可dataSource.setUrl("jdbc:sqlserver://blog.csdn.net.unix21:3499;DatabaseName=testdb");return dataSource;}@BeanMapperScannerConfigurer mpperScannnerConfigurer() {MapperScannerConfigurer msc = new MapperScannerConfigurer();msc.setSqlSessionFactoryBeanName("sqlSessionFactory");msc.setBasePackage("com.unix.mapper");//自动扫描mapper包return msc;}@Bean(name = "sqlSessionFactory")SqlSessionFactoryBean sqlSessionFactory(DataSource dataSource) {SqlSessionFactoryBean ssfb = new SqlSessionFactoryBean();ssfb.setDataSource(dataSource);ssfb.setTypeAliasesPackage("com.unix.bean");//自动扫描bean包return ssfb;}@BeanPlatformTransactionManager transactionManager(DataSource dataSource) {DataSourceTransactionManager transactionManager = new DataSourceTransactionManager();transactionManager.setDataSource(dataSource);return transactionManager;}
}
新增一个mapper接口
public interface  SchoolMapper {@Select("select * from School where id =#{id}")School findById(@Param("id") int id);@Select("select * from School where Name like '${name}%'")List<School> findByName(@Param("name") String name);
}
测试用例
@RunWith(SpringJUnit4ClassRunner.class)
@ContextConfiguration(classes = MybatisConfig.class)
//@TransactionConfiguration(defaultRollback=true)
public class SchoolTest {@Autowiredprivate SchoolMapper shoolDao;@Testpublic void findById(){School shool = shoolDao.findById(1);Assert.assertNotNull(shool);System.out.println(shool.getName());       }@Testpublic void findByName(){List<School> result = shoolDao.findByName("苏州中学");Assert.assertNotNull(result);for (School s : result) {System.out.println(s.getName());}        }
}
5.Spring4使用Redis
redis在日常开发中已经成为了标配了,在spring4中使用redis非常简单,无需自己去写一个jedis的工厂方法连接池之类的代码,因为Spring已经写好了,你只需要引用spring-data-redis包即可
<dependency><groupId>org.springframework.data</groupId><artifactId>spring-data-redis</artifactId><version>1.7.1.RELEASE</version></dependency>
Redis配置
@Configuration
public class RedisConfig {@Beanpublic RedisConnectionFactory redisCF() {JedisConnectionFactory cf = new JedisConnectionFactory();cf.setHostName("127.0.0.1");//服务器IPcf.setPort(6379);//端口cf.setPassword("密码");return cf;}@Beanpublic RedisTemplate<String, String> redisTemplate(RedisConnectionFactory cf) {RedisTemplate<String, String> redis = new RedisTemplate<String, String>();redis.setConnectionFactory(cf);return redis;}@Beanpublic StringRedisTemplate stringRedisTemplate(RedisConnectionFactory cf) {StringRedisTemplate redis = new StringRedisTemplate();redis.setConnectionFactory(cf);return redis;}
}
测试用例
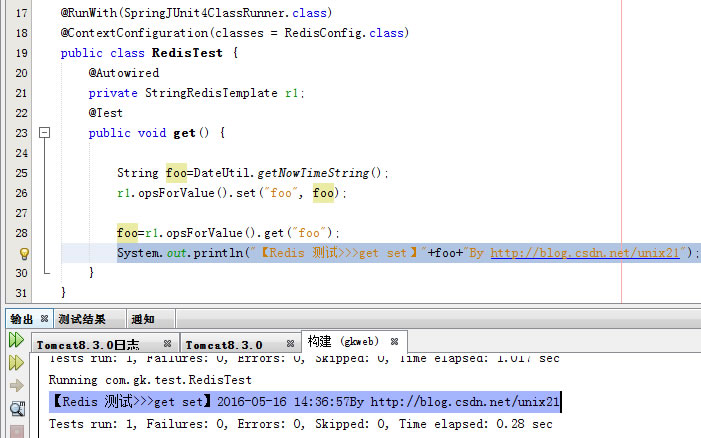
@RunWith(SpringJUnit4ClassRunner.class)
@ContextConfiguration(classes = RedisConfig.class)
public class RedisTest {@Autowiredprivate StringRedisTemplate r1;@Testpublic void get() {String foo=DateUtil.getNowTimeString();r1.opsForValue().set("foo", foo);foo=r1.opsForValue().get("foo");System.out.println("【Redis 测试>>>get set】"+foo+"By http://blog.csdn.net/unix21");}
}
6.Spring Security
import org.springframework.security.web.context.AbstractSecurityWebApplicationInitializer;public class SecurityWebInitializer extends AbstractSecurityWebApplicationInitializer {
}
@Configuration
@EnableWebMvcSecurity
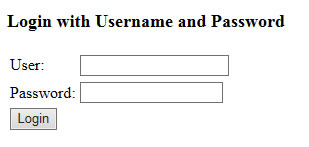
public class SecuredConfig extends WebSecurityConfigurerAdapter {@Overrideprotected void configure(HttpSecurity http) throws Exception {http.authorizeRequests().anyRequest().authenticated().and().formLogin().and().httpBasic();}}这个时候访问任何页面都会跳转到系统自带的登陆页面
基于内存的用户存储:
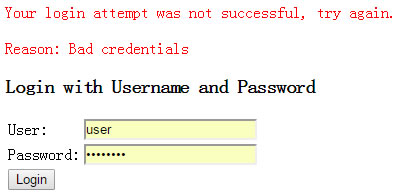
//基于内存的用户@Overrideprotected void configure(AuthenticationManagerBuilder auth) throws Exception {auth.inMemoryAuthentication().withUser("user1").password("pass1").roles("USER").and().withUser("user2").password("pass2").roles("USER","ADMIN");}故意输错用户名密码就进不去
验证 指定页面+指定权限
@Overrideprotected void configure(HttpSecurity http) throws Exception {http.authorizeRequests().antMatchers("/news").hasRole("USER").and().formLogin().and().httpBasic();}我们设定/news需要User角色的用户可以看,其他页面随便看
我们用user2登陆,由于没权限返回403

只有用user1登陆才可以看到页面内容。
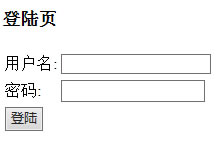
自定义登陆页
现实开发中不肯能用Spring提供的简易登陆页,除非是一个很小的内部系统。
@Configuration
@EnableWebMvcSecurity
public class SecuredConfig extends WebSecurityConfigurerAdapter {@Overrideprotected void configure(HttpSecurity http) throws Exception {http.authorizeRequests().antMatchers("/news/*").hasRole("USER")  .and().formLogin().loginPage("/login").defaultSuccessUrl("/").failureUrl("/login?error").permitAll().and().httpBasic();}
.antMatchers("/news/*").hasRole("USER") :匹配 /news/以及/news/ 开头的所有页面 需要USER权限
.loginPage("/login") :自定义登陆页
.defaultSuccessUrl("/") :默认成功页,如果没有权限则跳转到该页面
.failureUrl("/login?error") :默认失败页面
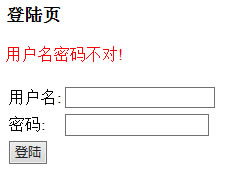
// 1. /login 登录页面的常规显示// 2. /login?error 登录验证失败的展示// 3. /login?logout 注销登录的处理@RequestMapping(value = "/login", method = RequestMethod.GET)public ModelAndView login(@RequestParam(value = "error", required = false) String error,@RequestParam(value = "logout", required = false) String logout) {ModelAndView model = new ModelAndView();if (error != null) {model.addObject("error", "用户名密码不对!");}if (logout != null) {model.addObject("msg", "You've been logged out successfully.");}model.setViewName("login");return model;}
login.jsp
<%@page contentType="text/html" pageEncoding="UTF-8"%>
<html><head><title>登陆</title></head><body onload='document.f.username.focus();'><h3>登陆页</h3>        <c:if test="${not empty error}"><div  style="color: red">${error}</div></c:if><c:if test="${not empty msg}"><div>${msg}</div></c:if><form name='f' action='/gkweb/login' method='POST'><table><tr><td>用户名:</td><td><input type='text' name='username' value=''></td></tr><tr><td>密码:</td><td><input type='password' name='password'/></td></tr><tr><td colspan='2'><input name="submit" type="submit" value="登陆"/></td></tr>               </table><input type="hidden" name="${_csrf.parameterName}"value="${_csrf.token}" /></form></body>
</html>
此处参考:http://www.mkyong.com/spring-security/spring-security-form-login-example/
配置多个页面权限控制
.antMatchers("/news/*","/user/*").hasRole("USER")写法二
.antMatchers("/news/*").hasRole("USER")
.antMatchers("/user/*").hasRole("USER")可以将任意多的antMatchers(),anyRequest()连接起来,但是这些规则会按给定的顺序发挥作用,所以需要将最为具体的请求路径放在最前面,而最不具体的路径anyRequest()放在后面,不然不具体的就会覆盖掉具体的。
@Overrideprotected void configure(HttpSecurity http) throws Exception {http.authorizeRequests().antMatchers("/", "/home").permitAll().anyRequest().authenticated().and().formLogin().loginPage("/login").defaultSuccessUrl("/helloadmin").permitAll().and().logout().permitAll();}对URL进行权限配置,使得"/", "/home"不需要登录就可以访问,其他需要登录。登录的地址是'/login',当登录成功后将跳转到/helloadmin页面,并且登录、登出页面都是不需要登录就可以访问的。
参考:使用Spring Security进行权限验证
.httpBasic()
支持弹窗就是windows自带的认证框进行认证。由于不好扩展这个基本没什么用,可以不用。
.rememberMe()
记住我的状态
.rememberMe().key("web").tokenValiditySeconds(1209600);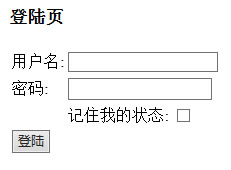
.logout()
注销功能
@Overrideprotected void configure(HttpSecurity http) throws Exception {http.authorizeRequests().antMatchers("/news/*").hasRole("USER").and().formLogin().loginPage("/login").defaultSuccessUrl("/").failureUrl("/login?error").usernameParameter("username").passwordParameter("password").and().logout().logoutSuccessUrl("/login?logout").and().rememberMe().key("gkweb").tokenValiditySeconds(1209600);}
注销就是页面给用户一个链接或者按钮
1.使用jstl声明退出路径
引用jar包
<dependency><groupId>jstl</groupId><artifactId>jstl</artifactId><version>1.2</version></dependency><%@ taglib uri="http://java.sun.com/jsp/jstl/core" prefix="c" %><c:url var="logoutUrl" value="/logout"/>
<form action="${logoutUrl}"method="post">
<input type="submit"value="Log out" />
<input type="hidden"name="${_csrf.parameterName}"value="${_csrf.token}"/>
</form>
2.硬编码退出路径
<form action="${pageContext.request.contextPath}/logout" method="post"><input type="submit" value="Logout" /><input type="hidden"name="${_csrf.parameterName}"value="${_csrf.token}"/>
</form>
3.链接退出
<script>function formSubmit() {document.getElementById("logoutForm").submit();}</script><form action="${pageContext.request.contextPath}/logout" method="post" id="logoutForm"><c:if test="${pageContext.request.userPrincipal.name != null}"><h2>Welcome : ${pageContext.request.userPrincipal.name} | <a href="javascript:formSubmit()"> 退出1-链接</a></h2></c:if><input type="submit" value="退出1-按钮" /><input type="hidden" name="${_csrf.parameterName}" value="${_csrf.token}"/></form><c:url var="logoutUrl" value="/logout"/><form action="${logoutUrl}" method="post"><c:if test="${pageContext.request.userPrincipal.name != null}"><h2>Welcome : ${pageContext.request.userPrincipal.name} | <a href="javascript:formSubmit()"> 退出2-链接</a></h2></c:if><input type="submit" value="退出2-按钮" /><input type="hidden" name="${_csrf.parameterName}" value="${_csrf.token}"/></form>自定义的用户服务
实际开发肯定是需要去数据库或者其他地方查询用户账号密码等
@Overrideprotected void configure(AuthenticationManagerBuilder auth) throws Exception {auth.userDetailsService(new CustomUserDetailsService(userDao));
}
注意:CustomUserDetailsService需要的bean一定要从userDetailsService调用CustomUserDetailsService的构造器传递过去,
而不能直接在CustomUserDetailsService使用@Autowired注解出来。
CustomUserDetailsService集成的接口UserDetailsService无需自己重新定义,参考 泛型推断类型不符合上限
public class CustomUserDetailsService implements UserDetailsService {private final UserMapper userDao;public CustomUserDetailsService(UserMapper u) {this.userDao = u;}@Overridepublic UserDetails loadUserByUsername(String username) throws UsernameNotFoundException {       UserBean user = userDao.findByName(username);        if (user == null) {throw new UsernameNotFoundException("没有找到对应用户");}List<SimpleGrantedAuthority> authorities = new ArrayList<>();authorities.add(new SimpleGrantedAuthority(user.getUtype().toString()));return new org.springframework.security.core.userdetails.User(user.getUserName(), user.getPassword(), authorities);}
}
关于Spring的单例问题
也就是@Component、@Repository、@Service 需要说明的是加上这几个注解都是等效的,都会变成单例。
一般ServiceImpl会加上。
使用的时候
@Autowired
private 接口 变量
这样在使用的时候回自动绑定加上@Service的实现类。
特别需要注意的是,这个实现类不可以有成员变量,否则不安全,因为没有成员变量,只是通过函数参数传值,所以是安全的。
而javabean一般都必须有成员变量,所以是不能@Service,建议直接new一下使用即可。
@Component和@Bean都是用来注册Bean并装配到Spring容器中,但是Bean比Component的自定义性更强。可以实现一些Component实现不了的自定义加载类。
为什么dao层和service层用单例,而action用多例
使用单例和多例的判断条件是会不会对类中公共属性进行修改,如果有修改则用多例。
action中一般会有前端对应的属性,如果是单例访问,所有访问公用一个action中的成员变量和方法,如果多个请求同时对一个属性进行修改,则会出现数据出错;而service中公共属性顶多是dao层中的引用,dao层中公共属性是对数据库包装类或自定义的类的引用,这个引用通常在项目加载启动时就已经实例化了,访问只是使用,并未涉及属性修改,单例模式可节省系统资源。
总结:Action要接收request的参数,因为参数不同所以用多例;
Dao中唯一的状态就是连接数据库, 但是这个恰好对大家都是相同的, 所以是单例
Service, 业务逻辑里面的成员变量都是Dao, 既然Dao是无状态的, 那么Service也可以认为是无状态的
相关文章:

vmstat 命令
2019独角兽企业重金招聘Python工程师标准>>> 1.用法 vmstat [-a] [-n] [-S unit] [delay [ count]] vmstat [-s] [-n] [-S unit] vmstat [-m] [-n] [delay [ count]] vmstat [-d] [-n] [delay [ count]] vmstat [-p disk partition] [-n] [delay [ count]] vmstat […

【CTF】实验吧 疑惑的汉字
考察的是当铺密码: 王夫 井工 夫口 由中人 井中 夫夫 由中大:67 84 70 123 82 77 125 当铺密码就是一种将中文和数字进行转化的密码,算法相当简单:当前汉字有多少笔画出头,就是转化成数字几。
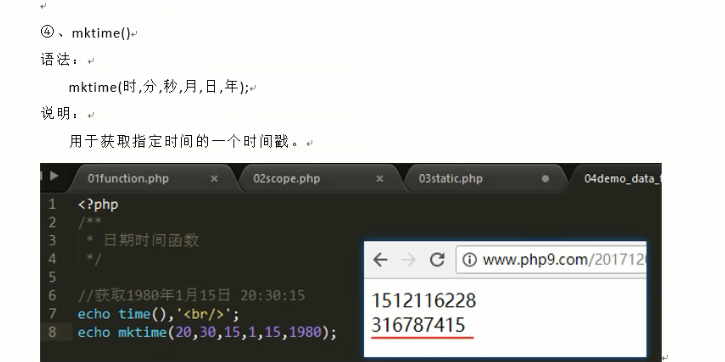
Date PHP
转载于:https://www.cnblogs.com/liuliang389897172/p/10087895.html

Java多线程的11种创建方式以及纠正网上流传很久的一个谬误
创建线程比较传统的方式是继承Thread类和实现Runnable,也可以用内部类,Lambda表达式,线程池,FutureTask等。 经常面试会问到继承Thread类和实现Runnable的区别,然后网上会流传如下这样的说法,这是错误的。…

【CTF】实验吧 古典密码
一共是35个字符分成5*7或者7*5 最终选择5行7列 首先变动第一行的位置,然后根据第一行变动的位置,依次变动下面的行 OCU{CFT ELXOUYD ECTNGAH OHRNFIE NM}IOTA CTF{COU LTYOUEX CHANGET HEINFOR MATION} CTF{COULTYOUEXCHANGETHEINFORMATION}

对比React Native、dcloud、LuaView三个框架技术(内部)
转载自:http://www.jianshu.com/p/ee1cdb33db8d主要对比React Native和5SDK(就是dcloud的SDK)两个: 开发语言:三个都是用其他语言来统一开发IOS、android应用的框架技术,其中,React Native是使用…
spring boot 临时文件过期
2019独角兽企业重金招聘Python工程师标准>>> 第一种方案:-Djava.io.tmpdir /xxx 第二种方案: 线上的系统中不能上传文件了,出现如下错误: org.springframework.web.multipart.MultipartException: Could not parse mu…

ASP.NET MVC+Bootstrap个人博客之打造清新分页Helper(三)
0. 没有找到一款中意的分页插件,又不想使用现成的(丑到爆),所以自己动手造一个吧 先看下效果(其实也不咋滴...): 有点另类,分页直接是在后台拼接好html,然后发送到前台的: 1. 分页容器: <di…

支撑Java框架的基础技术:泛型,反射,动态代理,cglib
以Spring为例要想看明白他的源码需要彻底理解Java的一些基础技术泛型,反射同时对于一些高级技术例如动态代理,cglib和字节码技术也需要掌握,下面就按章节来一一说清楚这些技术的核心部分,最后手写一个简单的Spring框架。 一.静态代…

【CTF】实验吧 困在栅栏里的凯撒
题目先提到栅栏,再提到凯撒,按照顺序先栅栏解码,再凯撒解码。 一般密码的开头不是flag就是key或者ctf 所以选择“6栏”,在进行凯撒解码 在所有组合中,发现CTF即为flag

经典算法书籍推荐以及算法书排行【算法四库全书】
经典算法书籍推荐以及算法书排行【算法四库全书】 作者:霞落满天 https://linuxstyle.blog.csdn.net/ https://blog.csdn.net/21aspnet 行文方式:类似《四库全书》截取经典算法书目录和精华篇章 版权说明:本文于2019年5月5日首发于CS…

【CTF】实验吧 Fair-Play
它的标题就是题解的提示:Play-Fair Playfair解密算法首先将密钥填写在一个5*5的矩阵中(去Q留Z),矩阵中其它未用到的字母按顺序填在矩阵剩余位置中,根据替换矩阵由密文得到明文。 对密文解密规则如下: 1 若c…
【DAY23】JVM与反射的学习笔记
JVM:-----------------1.JVM: java virtual machine.2.class file *.class3.ClassLoader4.runtime data area运行时数据区。1.Method area : 方法区.(shared)供所有线程共享.2.heap(shared):供所有线程共享.3.java stack(栈区)独占的。4.native method stack(本地方法栈)独占5.…
BZOJ2281:[SDOI2011]黑白棋(博弈论,组合数学,DP)
Description 小A和小B又想到了一个新的游戏。这个游戏是在一个1*n的棋盘上进行的,棋盘上有k个棋子,一半是黑色,一半是白色。最左边是白色棋子,最右边是黑色棋子,相邻的棋子颜色不同。小A可以移动白色棋子,小…
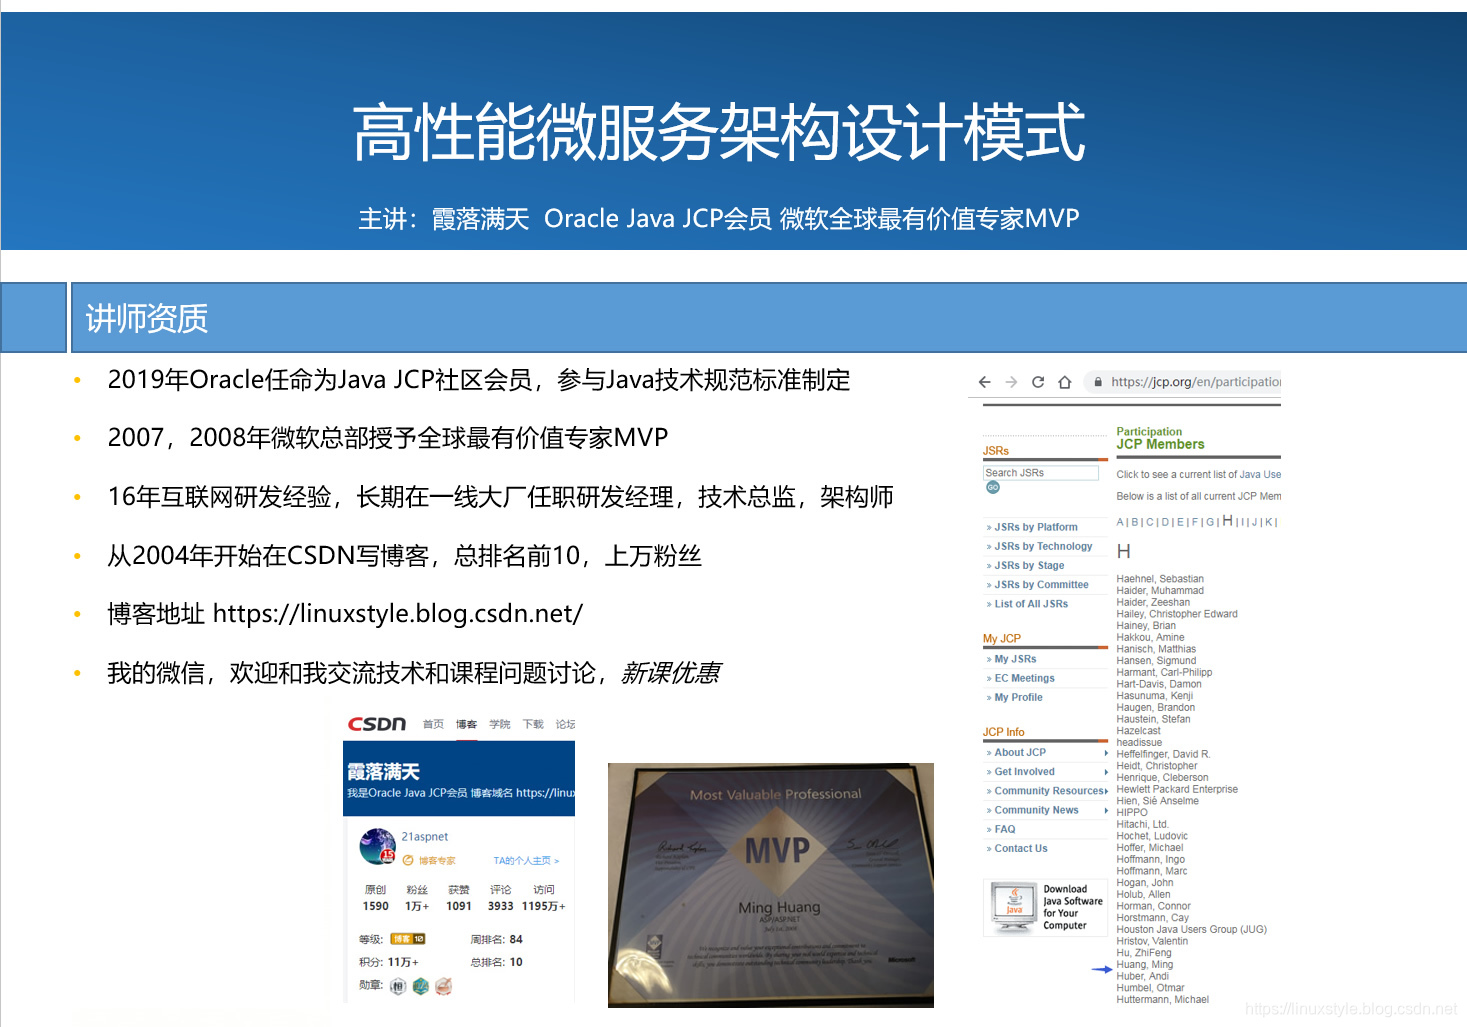
高性能微服务架构设计模式@霞落满天
高性能微服务架构设计模式 主讲:霞落满天 现在企业开发都是微服务架构,但是有很多问题,比如分布式定义,分布式的微服务怎么拆分,什么时候拆分,怎么做到高性能,中台怎么设计,读写分…
【数据结构】顺序栈的实现(C语言)
栈的基本概念及其描述 栈是一种特殊的线性表,规定它的插入运算和删除运算均在线性表的同一端进行,进行插入操作和删除操作的那一端称为栈顶,另一端称为栈底。 栈的插入操作和删除操作分别称为进栈和出栈。 FILO(First In Last …
iOS绘制图片与文字
2019独角兽企业重金招聘Python工程师标准>>> #####绘制图片与文字 #####1.绘制图片,直接代码说明 加载图片 #pragma mark - 小黄人 -(void) drawImage:(CGRect) rect{UIImage *image[UIImage imageNamed:"黄人"];//图片有可能显示不全…
php-fpm慢执行日志
vim /usr/local/php-fpm/etc/php-fpm.d/www.conf//加入如下内容request_slowlog_timeout 1slowlog /usr/local/php-fpm/var/log/www-slow.log 测试:/usr/local/php-fpm/sbin/php-fpm -t/etc/init.d/php-fpm reloadls ../../var/log/ //生成日志php-fpm.log www-sl…
spring springboot springcloud常用注解
SpringBootApplication 组合注解,用在启动类上,源码: Retention(RetentionPolicy.RUNTIME) SpringBootConfiguration EnableAutoConfiguration ComponentScan public interface SpringBootApplication SpringBootConfiguration Configurat…
解决eclipse ctrl+鼠标左键不能用
选择【Window】菜单 Preferences ——>General——>Editors——>Text Editors——>Hyperlinking 把勾都点上,然后确定KEY 值为 crtl
【数据结构】顺序队列的实现(C语言)
队列的基本概念及其描述 队列是一种特殊的线性表,它的特殊性在于队列的插入和删除操作分别在表的两端进行。 插入的那一端称为队尾,删除的那一端称为队首。队列的插入操作和删除操作分别称为进队和出队。 先进先出(First In First Out&…
ethereumjs/ethereumjs-vm-2-API文档
https://github.com/ethereumjs/ethereumjs-vm/blob/master/docs/index.md vm.runBlockchain Processes blocks and adds them to the blockchain 处理区块并将其添加到区块链中 Parameters输入参数 blockchain Blockchain A blockchain that to process 一个处理的区块链cb Fu…

qt 拖拽 修改大小(二)
最近项目需要实现windows下橡皮筋的效果,所以对此做了一些了解,特此记录。 首先windows系统是支持橡皮筋效果的,需要使用win32方 法:SystemParametersInfo(SPI_SETDRAGFULLWINDOWS, showFullWindow, NULL, 0);showFullWindow是一个…
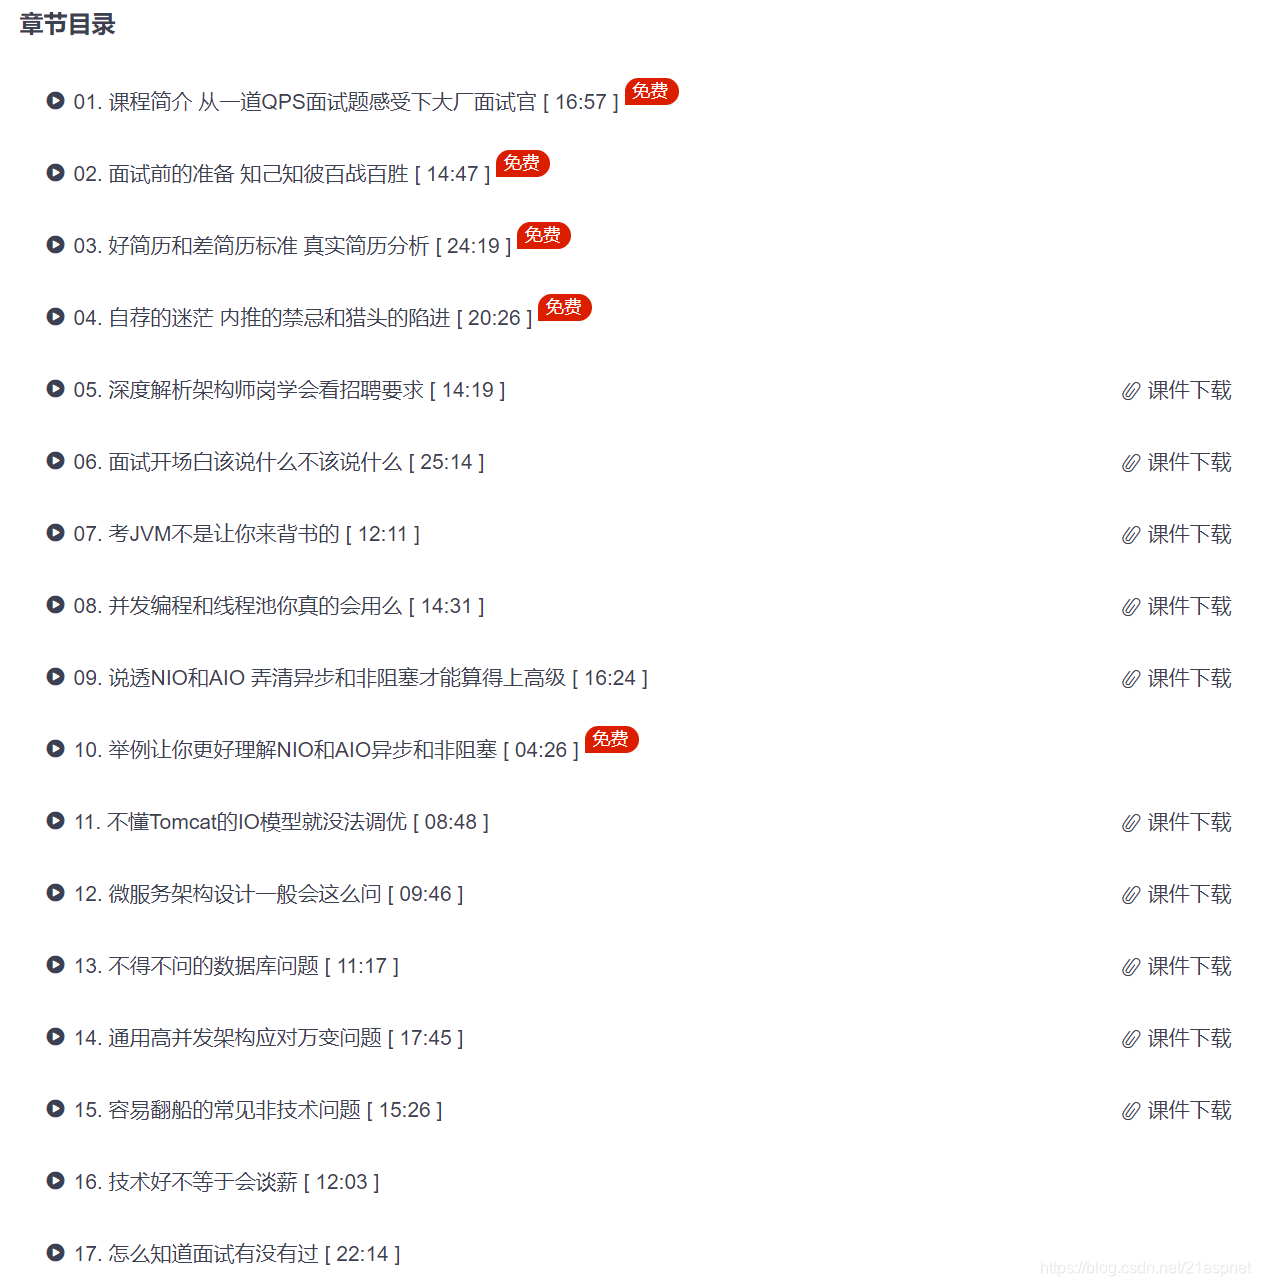
互联网大厂技术面试内幕@霞落满天
很多求职者往往并非因为技术不好,而是没有掌握面试的技巧导致不能把握机会,本课程的目的就是本课程先通过比较真实的好简历和不好的简历让大家明白自己的简历有哪些问题,事实上简历是大厂的敲门砖,非常重要,很多人得不…
【数据结构】顺序表的应用(1)(C语言)
问题: 1.将顺序表(a1,a2,…,an)重新排列以a1为界的两部分:a1前面的值均比a1小,a1后面的值均比a1大(这里假设数据元素的类型具有可比性,不妨设为整型)。 头文件与该头文件一样:【数据结构】顺序…
比特币寒冬中,你更应该关注企业区块链!
公众对区块链的认识也许限于比特币或以太坊,但很多却不知道 Hyperledger(超级账本)。Hyperledger Fabric,是由 IBM 带头发起的一个联盟链项目,2015 年末移交给 Linux 基金会,成为开源项目。Linux 基金会孵化…
JVM XMX设置多大比较好,Docke容器里该怎么设置JVM呢@无界编程
XMX是JVM的最大堆内存大小,XMS是JVM的初始堆内存大小。 不管是工作还是面试经常遇到一个问题就是XMX到底设置多大比较好? 网上的答案大多是说XMX和XMS设置为一样大,但是没有说到底XMX设置多大比较好。 如果设置为和操作系统一样大内存会怎么样? 这篇文章就带你搞清楚这…
【数据结构】顺序表的应用(2)(C语言)
问题: 2.有顺序表A和B,其元素均按从小到大的升序排列,编写一个算法,将它们合并成一个顺序表C,要求C的元素也按从小到大的升序排列。 头文件与该头文件一样:【数据结构】顺序表的实现(C语言&am…
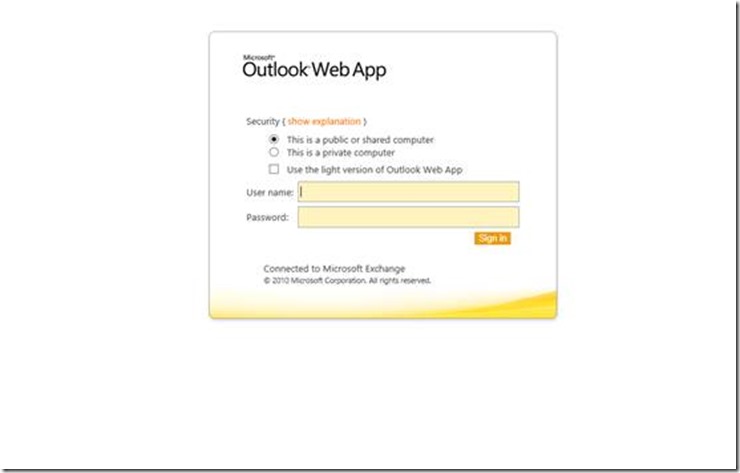
OWA登录页面显示为英文而不是中文
-----提供AD\Exchange\Lync\Sharepoint\CRM\SC\O365等微软产品实施及外包,QQ:185426445.电话18666943750故障描述:WIN10操作系统使用IE登录OWA的时候,界面语言为英文,WIN10操作系统为中文系统,区域语言都是设置为中文&…
java B2B2C springmvc mybatis多租户电子商城系统-Spring Cloud Feign
1、什么是Feign? 愿意了解源码的朋友直接企鹅求求:二一四七七七五六三三 Feign 的英文表意为“假装,伪装,变形”, 是一个http请求调用的轻量级框架,可以以Java接口注解的方式调用Http请求,而不用…