【OpenCV 】计算物体的凸包/创建包围轮廓的矩形和圆形边界框/createTrackbar添加滑动条/
目录
topic 1:模板匹配
topic 2:图像中寻找轮廓
topic 3:计算物体的凸包
topic 4:轮廓创建可倾斜的边界框和椭圆
topic 5:轮廓矩
topic 6:为程序界面添加滑动条
3.1 目标
3.2 代码实例1
3.3 代码实例2
3.4 实例3运行结果
3.5 运行结果
topic 1:模板匹配
topic 2:图像中寻找轮廓
topic 3:计算物体的凸包
topic 4:轮廓创建可倾斜的边界框和椭圆
topic 5:轮廓矩
topic 6:为程序界面添加滑动条
目录
3.1 目标
使用OpenCV函数 convexHull
3.2 代码实例1
//src = imread("C:\\Users\\guoqi\\Desktop\\ch7\\4.jpg", 1);
#include "opencv2/highgui/highgui.hpp"
#include "opencv2/imgproc/imgproc.hpp"
#include <iostream>
#include <stdio.h>
#include <stdlib.h>
using namespace cv;
using namespace std;
Mat src; Mat src_gray;
int thresh = 100;
int max_thresh = 255;
RNG rng(12345);
/// Function header
void thresh_callback(int, void*);
/** @function main */
int main(int argc, char** argv)
{/// 加载源图像src = imread("C:\\Users\\guoqi\\Desktop\\ch7\\15.jpg", 1);
/// 转成灰度图并进行模糊降噪cvtColor(src, src_gray, CV_BGR2GRAY);blur(src_gray, src_gray, Size(3, 3));
/// 创建窗体char* source_window = "Source";namedWindow(source_window, CV_WINDOW_AUTOSIZE);imshow(source_window, src);
createTrackbar(" Threshold:", "Source", &thresh, max_thresh, thresh_callback);thresh_callback(0, 0);
waitKey(0);return(0);
}
/** @function thresh_callback */
void thresh_callback(int, void*)
{Mat src_copy = src.clone();Mat threshold_output;vector<vector<Point> > contours;vector<Vec4i> hierarchy;
/// 对图像进行二值化threshold(src_gray, threshold_output, thresh, 255, THRESH_BINARY);
/// 寻找轮廓findContours(threshold_output, contours, hierarchy, CV_RETR_TREE, CV_CHAIN_APPROX_SIMPLE, Point(0, 0));
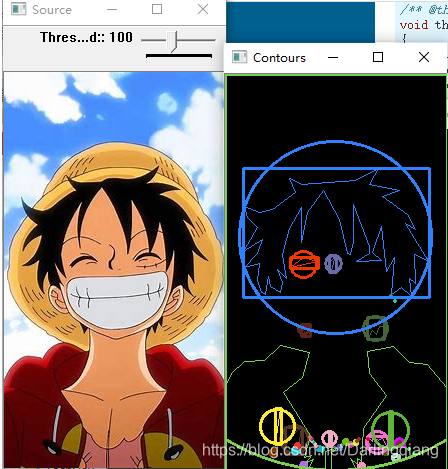
/// 对每个轮廓计算其凸包vector<vector<Point> >hull(contours.size());for (int i = 0; i < contours.size(); i++){convexHull(Mat(contours[i]), hull[i], false);}
/// 绘出轮廓及其凸包Mat drawing = Mat::zeros(threshold_output.size(), CV_8UC3);for (int i = 0; i< contours.size(); i++){Scalar color = Scalar(rng.uniform(0, 255), rng.uniform(0, 255), rng.uniform(0, 255));drawContours(drawing, contours, i, color, 1, 8, vector<Vec4i>(), 0, Point());drawContours(drawing, hull, i, color, 1, 8, vector<Vec4i>(), 0, Point());}
/// 把结果显示在窗体namedWindow("Hull demo", CV_WINDOW_AUTOSIZE);imshow("Hull demo", drawing);
}3.3 代码实例2
//src = imread("C:\\Users\\guoqi\\Desktop\\ch7\\4.jpg", 1);
#include "opencv2/highgui/highgui.hpp"
#include "opencv2/imgproc/imgproc.hpp"
#include <iostream>
#include <stdio.h>
#include <stdlib.h>
using namespace cv;
using namespace std;
Mat src; Mat src_gray;
int thresh = 100;
int max_thresh = 255;
RNG rng(12345);
/// 函数声明
void thresh_callback(int, void*);
/** @主函数 */
int main(int argc, char** argv)
{/// 载入原图像, 返回3通道图像src = imread("C:\\Users\\guoqi\\Desktop\\ch7\\15.jpg", 1);
/// 转化成灰度图像并进行平滑cvtColor(src, src_gray, CV_BGR2GRAY);blur(src_gray, src_gray, Size(3, 3));
/// 创建窗口char* source_window = "Source";namedWindow(source_window, CV_WINDOW_AUTOSIZE);imshow(source_window, src);
createTrackbar(" Threshold:", "Source", &thresh, max_thresh, thresh_callback);thresh_callback(0, 0);
waitKey(0);return(0);
}
/** @thresh_callback 函数 */
void thresh_callback(int, void*)
{Mat threshold_output;vector<vector<Point> > contours;vector<Vec4i> hierarchy;
/// 使用Threshold检测边缘threshold(src_gray, threshold_output, thresh, 255, THRESH_BINARY);/// 找到轮廓findContours(threshold_output, contours, hierarchy, CV_RETR_TREE, CV_CHAIN_APPROX_SIMPLE, Point(0, 0));
/// 多边形逼近轮廓 + 获取矩形和圆形边界框vector<vector<Point> > contours_poly(contours.size());vector<Rect> boundRect(contours.size());vector<Point2f>center(contours.size());vector<float>radius(contours.size());
for (int i = 0; i < contours.size(); i++){approxPolyDP(Mat(contours[i]), contours_poly[i], 3, true);boundRect[i] = boundingRect(Mat(contours_poly[i]));minEnclosingCircle(contours_poly[i], center[i], radius[i]);}
/// 画多边形轮廓 + 包围的矩形框 + 圆形框Mat drawing = Mat::zeros(threshold_output.size(), CV_8UC3);for (int i = 0; i< contours.size(); i++){Scalar color = Scalar(rng.uniform(0, 255), rng.uniform(0, 255), rng.uniform(0, 255));drawContours(drawing, contours_poly, i, color, 1, 8, vector<Vec4i>(), 0, Point());rectangle(drawing, boundRect[i].tl(), boundRect[i].br(), color, 2, 8, 0);circle(drawing, center[i], (int)radius[i], color, 2, 8, 0);}
/// 显示在一个窗口namedWindow("Contours", CV_WINDOW_AUTOSIZE);imshow("Contours", drawing);
}3.4 实例3运行结果
//src = imread("C:\\Users\\guoqi\\Desktop\\ch7\\4.jpg", 1);#include "opencv2/highgui/highgui.hpp"
#include "opencv2/imgproc/imgproc.hpp"
#include <iostream>
#include <stdio.h>
#include <stdlib.h>using namespace cv;
using namespace std;Mat src; Mat src_gray;
int thresh = 100;
int max_thresh = 255;
RNG rng(12345);/// 函数声明
void thresh_callback(int, void*);/** @主函数 */
int main(int argc, char** argv)
{/// 读入原图像, 返回3通道图像数据src = imread("C:\\Users\\guoqi\\Desktop\\ch7\\15.jpg", 1);/// 把原图像转化成灰度图像并进行平滑cvtColor(src, src_gray, CV_BGR2GRAY);blur(src_gray, src_gray, Size(3, 3));/// 创建新窗口char* source_window = "Source";namedWindow(source_window, CV_WINDOW_AUTOSIZE);imshow(source_window, src);createTrackbar(" Canny thresh:", "Source", &thresh, max_thresh, thresh_callback);thresh_callback(0, 0);waitKey(0);return(0);
}/** @thresh_callback 函数 */
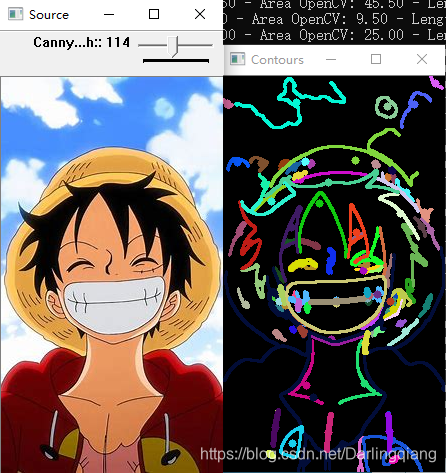
void thresh_callback(int, void*)
{Mat canny_output;vector<vector<Point> > contours;vector<Vec4i> hierarchy;/// 使用Canndy检测边缘Canny(src_gray, canny_output, thresh, thresh * 2, 3);/// 找到轮廓findContours(canny_output, contours, hierarchy, CV_RETR_TREE, CV_CHAIN_APPROX_SIMPLE, Point(0, 0));/// 计算矩vector<Moments> mu(contours.size());for (int i = 0; i < contours.size(); i++){mu[i] = moments(contours[i], false);}/// 计算中心矩:vector<Point2f> mc(contours.size());for (int i = 0; i < contours.size(); i++){mc[i] = Point2f(mu[i].m10 / mu[i].m00, mu[i].m01 / mu[i].m00);}/// 绘制轮廓Mat drawing = Mat::zeros(canny_output.size(), CV_8UC3);for (int i = 0; i< contours.size(); i++){Scalar color = Scalar(rng.uniform(0, 255), rng.uniform(0, 255), rng.uniform(0, 255));drawContours(drawing, contours, i, color, 2, 8, hierarchy, 0, Point());circle(drawing, mc[i], 4, color, -1, 8, 0);}/// 显示到窗口中namedWindow("Contours", CV_WINDOW_AUTOSIZE);imshow("Contours", drawing);/// 通过m00计算轮廓面积并且和OpenCV函数比较printf("\t Info: Area and Contour Length \n");for (int i = 0; i< contours.size(); i++){printf(" * Contour[%d] - Area (M_00) = %.2f - Area OpenCV: %.2f - Length: %.2f \n", i, mu[i].m00, contourArea(contours[i]), arcLength(contours[i], true));Scalar color = Scalar(rng.uniform(0, 255), rng.uniform(0, 255), rng.uniform(0, 255));drawContours(drawing, contours, i, color, 2, 8, hierarchy, 0, Point());circle(drawing, mc[i], 4, color, -1, 8, 0);}
}3.5 运行结果
实例1运行结果

实例2运行结果
实例3运行结果
相关文章:
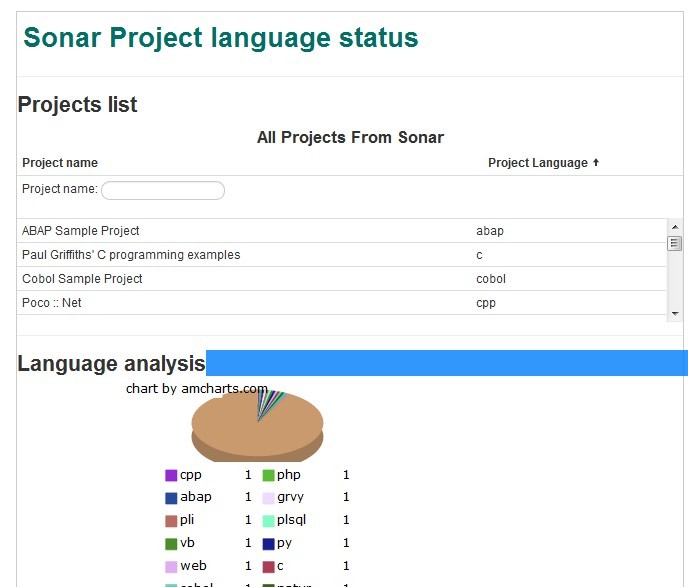
开源:Angularjs示例--Sonar中项目使用语言分布图
在博客中介绍google的Angularjs 客户端PM模式框架很久了,今天发布一个关于AngularJs使用是简单示例SonarLanguage(示例位于Github:https://github.com/greengerong/SonarLanguage)。本项目只是一个全为客户端的示例项目。项目的初始是我想看看在公司的项…

adaptiveThreshold 阈值化的实现
#include "opencv2/imgproc/imgproc.hpp" #include "opencv2/highgui/highgui.hpp" int main( ) {// 图像读取及判断cv::Mat srcImage cv::imread("..\\images\\hand1.jpg");if( !srcImage.data ) return 1;// 灰度转换cv::Mat srcGray;cv::cvt…
hashMap传入参数,table长度为多少
前言 我的所有文章同步更新与Github--Java-Notes,想了解JVM,HashMap源码分析,spring相关,剑指offer题解(Java版),可以点个star。可以看我的github主页,每天都在更新哟。 邀请您跟我一同完成 rep…

【OpenCV】图像/视频相似度测量PSNR( Peak signal-to-noise ratio) and SSIM,视频/图片转换
目录 1 目标 2 原理 2.1 图像比较 - PSNR and SSIM 3 代码 3.1如何读取一个视频流(摄像头或者视频文件)? 3 运行效果 视频/图片转换: 如何用OpenCV创建一个视频文件用OpenCV能创建什么样的视频文件如何释放视频文件当中的某个颜色通道…

struts2提交list
2019独角兽企业重金招聘Python工程师标准>>> Action: private List<User> users; jsp: <input type"text" name"users[0].name" value"aaa" /> <input type"text" name"users[1].name" value&q…
双阈值法的实现
#include "opencv2/imgproc/imgproc.hpp" #include "opencv2/highgui/highgui.hpp" int main( ) {// 图像读取及判断cv::Mat srcImage cv::imread("..\\images\\hand1.jpg");if( !srcImage.data ) return 1;// 灰度转换cv::Mat srcGray;cv::cvt…
设计模式 小记
观察者模式 1.被观察者是单例模式。 生成这模式 1.Director中对于Builder的引用不一定是Strong,根据情况也有可能是Copy。 2.Director 聚合 Builder, 所以Builder本身可以单独拿出来使用。 转载于:https://juejin.im/post/5ca8c24df265da3094116c18
【MATLAB】————matlab raw图转bmp实现
image_path [layer_3_list_folder,\,layer_3_list_name]; img_raw_path fopen(image_path,r);%%打开图像 img_raw fread(img_raw_path,[Width,Height],uint16);% uchar为无符号字符型 mg_raw uint8(img_raw);%%unit8表示无符号整数,范围0-255,u…
人工手动冷备不完全恢复介绍(purge表不完全恢复)
不完全恢复不完全恢复的基本类型:1)基于时间点 (until time): 使整个数据库恢复到过去的一个时间点前2)基于scn (until change): 使整个数据库恢复到过去的某个SCN前3)基于cancel (u…
半阈值法的实现
#include "opencv2/imgproc/imgproc.hpp" #include "opencv2/highgui/highgui.hpp" #include <iostream> using namespace std; using namespace cv; int main( ) {// 读取源图像及判断cv::Mat srcImage cv::imread("..\\images\\hand1.jpg&q…

novaclient的api调用流程与开发
novaclient的api调用流程与开发 2015年07月05日 19:27:17 qiushanjushi 阅读数:3915 http://blog.csdn.net/tpiperatgod/article/details/18375387?utm_sourcetuicool 另一个地址:http://neuromancer.sinaapp.com/?p64 从nova client的入口查看 cat /u…
【C++】 保存内容到文件工具
1. c 输出到文件 // save mean distance between center and descriptorsstd::string filename configuration_.debug_output_path() "ref_max_mean_distance.txt";FILE* fp fopen(filename.c_str(), "w");try {if (fp nullptr) {return error::Failed…

你知道实习对你有多重要吗?
大学生就业一直是个永恒不变的话题,在过去几年中,每次临近毕业季,我们肯定会一次次的听到“史上最难就业季”之说。而每一年的数据也会不断突破前一年的数字。在国新办举行的新闻发布会上,人力资源社会保障部部长尹蔚民提到…
灰度直方图的实现
#include <opencv2\opencv.hpp> int main() {// 图像源获取及判断 cv::Mat Image, ImageGray;Image cv::imread("..\\images\\flower3.jpg"); if(Image.empty()) return -1;cv::imshow("Image",Image);// 转换为灰度图像cv::cvtColor(Image,Image…
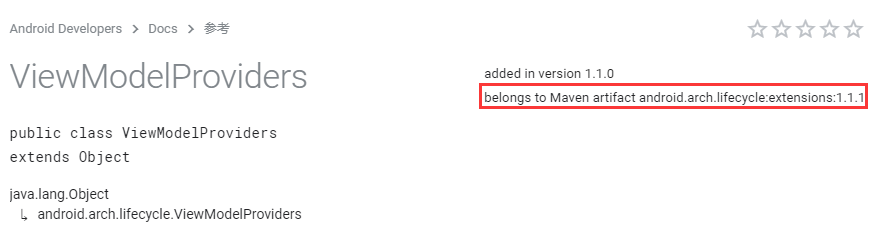
Android笔记之ViewModel的使用示例
依赖 implementation android.arch.lifecycle:extensions:1.1.1 implementation com.squareup.retrofit2:retrofit:2.5.0 implementation com.squareup.retrofit2:converter-gson:2.5.0 implementation com.squareup.retrofit2:adapter-rxjava2:2.5.0 implementation io.reacti…
vscode配置记录
vscode配置记录 按照官网教程安装好vs:实际上只需要配置launch.json的”program“如下所示 "configurations": [{"name": "(gdb) Launch","type": "cppdbg","request": "launch","program":…
unity 2d 游戏优化之路 遇坑记录
情景说明: unity 出的Android包,在目前一些主流机型跑都没有问题,但是在 小米3 这种比较老的机器上跑,报如下错误 GLSL compilation failed, no infolog provided 起先,我们一直以为是在低端机器上某个特定的GLSL 在这…
自定义直方图实现
#include <opencv2/opencv.hpp> int main() {// 图像获取及判断cv::Mat srcImage cv::imread("..\\images\\flower3.jpg");if( !srcImage.data ) return 1;cv::imshow("srcImage",srcImage);// 灰度转换 cv::Mat srcGray;cv::cvtColor(srcImage,sr…
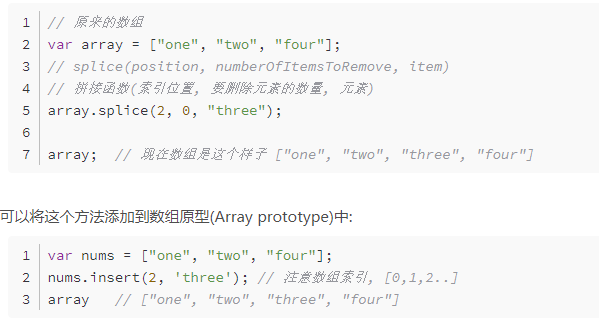
js数组指定位置添加删除
示例参考:http://www.w3school.com.cn/jsref/jsref_splice.asp转载于:https://www.cnblogs.com/CarryYou-lky/p/10669859.html
【C++】对象实例化/成员函数/成员变量的内存管理
文章目录1. 对象实例化的内存管理总结2.C成员函数在内存中的存储方式3.C类的实例化对象的大小之sizeof()实例一:实例二:实例三:实例四:实例五:实例六:实例七:实例八:实例九ÿ…
HTML form 标签的 enctype 属性
1. enctype 的定义和用法 enctype 属性规定在发送到服务器之前应该如何对表单数据进行编码。 默认地,表单数据会编码为 "application/x-www-form-urlencoded"。 就是说,在发送到服务器之前,所有字符都会进行编码(空格转…
灰度直方图均衡化实现
#include <opencv2/opencv.hpp> int main() {cv::Mat srcImage cv::imread("..\\images\\flower3.jpg");if( !srcImage.data ) return 1;cv::Mat srcGray;cv::cvtColor(srcImage, srcGray, CV_BGR2GRAY);cv::imshow("srcGray", srcGray);// 直方图均…
oracle汉化包下载地址
2019独角兽企业重金招聘Python工程师标准>>> https://www.allroundautomations.com/bodyplsqldevreg.html 转载于:https://my.oschina.net/u/3141521/blog/3034655
【C++】C/C++ 中 static 的用法全局变量与局部变量
C/C 中 static 的用法全局变量与局部变量 目录 1. 什么是static? 1.1 static 的引入 1.2 静态数据的存储 2. 在 C/C 中static的作用 2.1 总的来说 2.2 静态变量与普通变量 2.3 静态局部变量有以下特点: 实例 3. static 用法 3.1 在 C 中 3.2 静态类相关…

浅谈C/C++中的static和extern关键字
一.C语言中的static关键字 在C语言中,static可以用来修饰局部变量,全局变量以及函数。在不同的情况下static的作用不尽相同。 (1)修饰局部变量 一般情况下,对于局部变量是存放在栈区的,并且局部变量的生命周期在该语句块执行结束时…
彩色直方图均衡化实现
#include <opencv2/opencv.hpp> int main() {// 图像获取及验证cv::Mat srcImage cv::imread("..\\images\\flower3.jpg");if( !srcImage.data ) return 1;// 存储彩色直方图及图像通道向量cv::Mat colorHeqImage; std::vector<cv::Mat> BGR_plane; …
二、python小功能记录——监听鼠标事件
1.原文链接 #-*- coding:utf-8 -*- from pynput.mouse import Button, Controller## ## 控制鼠标 ## # 读鼠标坐标 mouse Controller() print(The current pointer position is {0}.format(mouse.position)) # 设置鼠标坐标 mouse.position (10, 20) print(No…
【Smart_Point】C/C++ 中智能指针
C11智能指针 目录 C11智能指针 1.1 C11智能指针介绍 1.2 为什么要使用智能指针 1.2.1 auto_ptr(C98的方案,C11已经抛弃)采用所有权模式。 1.2.2 unique_ptr 1.2.3 shared_ptr 1.2.4 weak_ptr 1.3 share_ptr和weak_ptr的核心实现 1.…

Linux 虚拟内存和物理内存的理解【转】
转自:http://www.cnblogs.com/dyllove98/archive/2013/06/12/3132940.html 首先,让我们看下虚拟内存: 第一层理解 1. 每个进程都有自己独立的4G内存空间,各个进程的内存空间具有类似的结构 2. 一个新进程建立的时候,…
直方图变换——查找
#include <opencv2/core/core.hpp> #include <opencv2/imgproc/imgproc.hpp> #include <opencv2/highgui/highgui.hpp> int main() {// 图像获取及验证cv::Mat srcImage cv::imread("..\\images\\flower3.jpg");if( !srcImage.data ) return 1;//…