2019独角兽企业重金招聘Python工程师标准>>> 
最近自己独立弄一个activiti项目,写一下整合过程:
环境:jdk1.7 tomcat7.0 maven3.5 eclipse mysql5.5
--我的工程结构,怎么创建一个maven项目就不在这里写了:

--首先见表
CREATE TABLE `t_user` (
`USER_ID` int(11) NOT NULL auto_increment,
`USER_NAME` char(30) NOT NULL,
`USER_PASSWORD` char(10) NOT NULL,
`USER_EMAIL` char(30) NOT NULL,
PRIMARY KEY (`USER_ID`),
KEY `IDX_NAME` (`USER_NAME`)
) ENGINE=InnoDB AUTO_INCREMENT=11 DEFAULT CHARSET=utf8;
--随便插入几条数据
INSERT INTO t_user (USER_ID, USER_NAME, USER_PASSWORD, USER_EMAIL) VALUES (1, 'aa', '1234567', 'ff@qq.com');
INSERT INTO t_user (USER_ID, USER_NAME, USER_PASSWORD, USER_EMAIL) VALUES (2, 'cc', '1234567', 'ff@qq.com');
INSERT INTO t_user (USER_ID, USER_NAME, USER_PASSWORD, USER_EMAIL) VALUES (3, 'dd', '1234567', 'fff@qq.com');
INSERT INTO t_user (USER_ID, USER_NAME, USER_PASSWORD, USER_EMAIL) VALUES (4, 'ee', '1234567', 'ff@qq.com');
INSERT INTO t_user (USER_ID, USER_NAME, USER_PASSWORD, USER_EMAIL) VALUES (5, 'artaahur', '1234567', 'ff@qq.com');
INSERT INTO t_user (USER_ID, USER_NAME, USER_PASSWORD, USER_EMAIL) VALUES (6, 'vvvv', '1234567', 'ff@qq.com');
INSERT INTO t_user (USER_ID, USER_NAME, USER_PASSWORD, USER_EMAIL) VALUES (7, 'ffff', '1234567', 'ff@qq.com');
INSERT INTO t_user (USER_ID, USER_NAME, USER_PASSWORD, USER_EMAIL) VALUES (8, 'aaaa', '1234567', 'ff@qq.com');
INSERT INTO t_user (USER_ID, USER_NAME, USER_PASSWORD, USER_EMAIL) VALUES (9, 'aaaaa', '1234567', 'ff@qq.com');
INSERT INTO t_user (USER_ID, USER_NAME, USER_PASSWORD, USER_EMAIL) VALUES (10, 'vvvvvv', '1234567', 'ff@qq.com');
---上面数据库的操作到这里就够了。
-----pom文件----
<project xmlns="http://maven.apache.org/POM/4.0.0"xmlns:xsi="http://www.w3.org/2001/XMLSchema-instance"xsi:schemaLocation="http://maven.apache.org/POM/4.0.0http://maven.apache.org/xsd/maven-4.0.0.xsd"><modelVersion>4.0.0</modelVersion><groupId>com.simple.activiti.demo</groupId><artifactId>activiti</artifactId><version>1.0.0-SNAPSHOT</version><dependencies><!-- activiti begin --><dependency><groupId>org.activiti</groupId><artifactId>activiti-engine</artifactId><version>5.15.1</version></dependency><dependency><groupId>org.activiti</groupId><artifactId>activiti-spring</artifactId><version>5.15.1</version></dependency><dependency><groupId>org.activiti</groupId><artifactId>activiti-bpmn-model</artifactId><version>5.15.1</version></dependency><dependency><groupId>org.activiti</groupId><artifactId>activiti-bpmn-layout</artifactId><version>5.15.1</version></dependency><dependency><groupId>org.activiti</groupId><artifactId>activiti-bpmn-converter</artifactId><version>5.15.1</version></dependency><dependency><groupId>org.activiti</groupId><artifactId>activiti-process-validation</artifactId><version>5.15.1</version></dependency><!-- activiti end --><!-- mysql驱动包 --><dependency><groupId>mysql</groupId><artifactId>mysql-connector-java</artifactId><version>5.1.29</version></dependency><!-- spring begin --><dependency><groupId>org.springframework</groupId><artifactId>spring-core</artifactId><version>3.2.2.RELEASE</version></dependency><dependency><groupId>org.springframework</groupId><artifactId>spring-beans</artifactId><version>3.2.2.RELEASE</version></dependency><!--spring单元测试依赖 --><dependency><groupId>org.springframework</groupId><artifactId>spring-test</artifactId><version>3.2.2.RELEASE</version></dependency><dependency><groupId>commons-dbcp</groupId><artifactId>commons-dbcp</artifactId><version>1.4</version></dependency><dependency><groupId>org.springframework</groupId><artifactId>spring-context</artifactId><version>3.2.2.RELEASE</version></dependency><dependency><groupId>org.springframework</groupId><artifactId>spring-context-support</artifactId><version>3.2.2.RELEASE</version></dependency><dependency><groupId>org.springframework</groupId><artifactId>spring-tx</artifactId><version>3.2.2.RELEASE</version></dependency><dependency><groupId>org.springframework</groupId><artifactId>spring-orm</artifactId><version>3.2.2.RELEASE</version></dependency><dependency><groupId>org.springframework</groupId><artifactId>spring-aop</artifactId><version>3.2.2.RELEASE</version></dependency><dependency><groupId>org.springframework</groupId><artifactId>spring-aspects</artifactId><version>3.2.2.RELEASE</version></dependency><!-- spring end --><!-- springmvc begin --><dependency><groupId>org.springframework</groupId><artifactId>spring-jdbc</artifactId><version>3.2.2.RELEASE</version></dependency><dependency><groupId>org.springframework</groupId><artifactId>spring-web</artifactId><version>3.2.2.RELEASE</version></dependency><dependency><groupId>org.springframework</groupId><artifactId>spring-webmvc</artifactId><version>3.2.2.RELEASE</version></dependency><!-- springmvc end --><dependency><groupId>org.mybatis</groupId><artifactId>mybatis</artifactId><version>3.2.5</version></dependency><!-- mybatis/spring包 --><dependency><groupId>org.mybatis</groupId><artifactId>mybatis-spring</artifactId><version>1.2.0</version></dependency><!-- junit相关 --><dependency><groupId>junit</groupId><artifactId>junit</artifactId><version>4.11</version></dependency><!-- log manger begin --><dependency><groupId>org.slf4j</groupId><artifactId>slf4j-api</artifactId><version>1.7.6</version></dependency><dependency><groupId>joda-time</groupId><artifactId>joda-time</artifactId><version>2.1</version></dependency><dependency><groupId>org.slf4j</groupId><artifactId>jcl-over-slf4j</artifactId><version>1.7.6</version></dependency><dependency><groupId>org.slf4j</groupId><artifactId>slf4j-log4j12</artifactId><version>1.7.6</version></dependency><!-- log manger end --><dependency><groupId>org.apache.commons</groupId><artifactId>commons-lang3</artifactId><version>3.1</version></dependency><dependency><groupId>javax.annotation</groupId><artifactId>javax.annotation-api</artifactId><version>1.2</version></dependency><dependency><groupId>commons-io</groupId><artifactId>commons-io</artifactId><version>2.4</version></dependency><!-- spring MVC 在转换为web项目后添加的begin --><!-- javaee-api包 注意和项目使用的JDK版本对应 --><dependency><groupId>javax</groupId><artifactId>javaee-api</artifactId><version>7.0</version><scope>provided</scope></dependency><!-- javaee-web-api包 注意和项目使用的JDK版本对应 --><dependency><groupId>javax</groupId><artifactId>javaee-web-api</artifactId><version>7.0</version><scope>provided</scope></dependency><!-- spring MVC end --></dependencies>
</project>
-----整合springMvc之前,先整合activiti和spring+mybatis

------mybatis-cfg.xml
<?xml version="1.0" encoding="UTF-8"?>
<!DOCTYPE configuration PUBLIC "-//mybatis.org//DTD Config 3.0//EN" "http://mybatis.org/dtd/mybatis-3-config.dtd">
<configuration>
</configuration>
-------spring-activiti.xml包涵spring配置和activiti配置
<beans xmlns="http://www.springframework.org/schema/beans" xmlns:context="http://www.springframework.org/schema/context" xmlns:tx="http://www.springframework.org/schema/tx" xmlns:xsi="http://www.w3.org/2001/XMLSchema-instance"xsi:schemaLocation="http://www.springframework.org/schema/beanshttp://www.springframework.org/schema/beans/spring-beans.xsdhttp://www.springframework.org/schema/contexthttp://www.springframework.org/schema/context/spring-context-2.5.xsdhttp://www.springframework.org/schema/txhttp://www.springframework.org/schema/tx/spring-tx-3.0.xsd"><!-- spring 整合mybaitis begin --><!-- 引入jdbc配置文件 --><!-- <bean id="propertyConfigurer" class="org.springframework.beans.factory.config.PropertyPlaceholderConfigurer"> --><!-- <property name="locations"> --><!-- <list> --><!-- <value>classpath:properties/*.properties</value> --><!-- 要是有多个配置文件,只需在这里继续添加即可 --><!-- </list> --><!-- </property> --><!-- </bean> --><!-- ProcessEngineConfiguration processEngineConfiguration = ProcessEngineConfiguration.createStandaloneProcessEngineConfiguration();//连接数据库的配置processEngineConfiguration.setJdbcDriver("com.mysql.jdbc.Driver");processEngineConfiguration.setJdbcUrl("jdbc:mysql://localhost:3306/itcast0711activiti?useUnicode=true&characterEncoding=utf8");processEngineConfiguration.setJdbcUsername("root");processEngineConfiguration.setJdbcPassword("root");/**public static final String DB_SCHEMA_UPDATE_FALSE = "false";不能自动创建表,需要表存在public static final String DB_SCHEMA_UPDATE_CREATE_DROP = "create-drop";先删除表再创建表public static final String DB_SCHEMA_UPDATE_TRUE = "true";如果表不存在,自动创建表*/processEngineConfiguration.setDatabaseSchemaUpdate(ProcessEngineConfiguration.DB_SCHEMA_UPDATE_TRUE);--><bean id="dataSource" class="org.springframework.jdbc.datasource.SimpleDriverDataSource"><!-- 连接数据的配置 --><property name="driverClass" value="com.mysql.jdbc.Driver"></property><property name="url" value="jdbc:mysql://localhost:3306/activiti?useUnicode=true&characterEncoding=utf8"></property><property name="username" value="root"></property><property name="password" value="root"></property><!-- 使用properties来配置 --><!-- <property name="driverClassName"> --><!-- <value>${jdbc_driverClassName}</value> --><!-- </property> --><!-- <property name="url"> --><!-- <value>${jdbc_url}</value> --><!-- </property> --><!-- <property name="username"> --><!-- <value>${jdbc_username}</value> --><!-- </property> --><!-- <property name="password"> --><!-- <value>${jdbc_password}</value> --><!-- </property> --></bean><!-- 配置数据源事务管理器 --><bean id="transactionManager" class="org.springframework.jdbc.datasource.DataSourceTransactionManager"><property name="dataSource" ref="dataSource"/><!-- 引用上面的数据源 --></bean><!-- 自动扫描了所有的XxxxMapper.xml对应的mapper接口文件,这样就不用一个一个手动配置Mpper的映射了,只要Mapper接口类和Mapper映射文件对应起来就可以了。 --><bean class="org.mybatis.spring.mapper.MapperScannerConfigurer"><property name="basePackage" value="com.travesky.bluesky.activiti.dao" /></bean><!-- 配置Mybatis的文件 ,mapperLocations配置**Mapper.xml文件位置,configLocation配置mybatis-config文件位置--><bean id="sqlSessionFactory" class="org.mybatis.spring.SqlSessionFactoryBean"><property name="dataSource" ref="dataSource" /><property name="mapperLocations" value="classpath*:com/travesky/bluesky/activiti/mapper/**/*.xml"/><property name="configLocation" value="classpath:mybatis/mybatis-cfg.xml" /></bean><!-- 自动扫描注解的bean --><context:component-scan base-package="com.travesky.bluesky.activiti.service" /><!-- spring 整合mybaitis end --><!-- activiti begin --><!-- 配置流程引擎配置类 注意:这是用 org.activiti.spring.SpringProcessEngineConfiguration 这个类--><bean id="processEngineConfiguration" class="org.activiti.spring.SpringProcessEngineConfiguration"><property name="dataSource" ref="dataSource"/><property name="transactionManager" ref="transactionManager" /><property name="databaseSchemaUpdate" value="true" /><property name="jobExecutorActivate" value="false" /><property name="createDiagramOnDeploy" value="true" /><!-- 是否生成流程定义图片 --><!-- 生成流程图的字体不设置会乱码 --><property name="activityFontName" value="宋体"/><property name="labelFontName" value="宋体"/></bean><!-- 配置流程引擎工厂 --><bean id="processEngine" class="org.activiti.spring.ProcessEngineFactoryBean"><property name="processEngineConfiguration" ref="processEngineConfiguration" /></bean><!-- 配置注入一些服务 --><bean id="repositoryService" factory-bean="processEngine" factory-method="getRepositoryService"/><bean id="runtimeService" factory-bean="processEngine" factory-method="getRuntimeService"/><bean id="taskService" factory-bean="processEngine" factory-method="getTaskService" /><bean id="historyService" factory-bean="processEngine" factory-method="getHistoryService" /><bean id="managementService" factory-bean="processEngine" factory-method="getManagementService" /><!-- activiti end -->
</beans>
-----log4j.properties配置
log4j.rootLogger=DEBUG,Console,Stdout#Console
log4j.appender.Console=org.apache.log4j.ConsoleAppender
log4j.appender.Console.layout=org.apache.log4j.PatternLayout
log4j.appender.Console.layout.ConversionPattern=%d [%t] %-5p [%c] - %m%nlog4j.logger.java.sql.ResultSet=INFO
log4j.logger.org.apache=INFO
log4j.logger.java.sql.Connection=DEBUG
log4j.logger.java.sql.Statement=DEBUG
log4j.logger.java.sql.PreparedStatement=DEBUGlog4j.appender.Stdout = org.apache.log4j.DailyRollingFileAppender
log4j.appender.Stdout.File = D://logs/bpmnTest.log
log4j.appender.Stdout.Append = true
log4j.appender.Stdout.Threshold = DEBUG
log4j.appender.Stdout.layout = org.apache.log4j.PatternLayout
log4j.appender.Stdout.layout.ConversionPattern = %-d{yyyy-MM-dd HH:mm:ss} [ %t:%r ] - [ %p ] %m%n
----下面创建实体类
package com.travesky.bluesky.activiti.domain;/*** * @author Ancan**/
public class User {private Integer userId;private String userName;private String userPassword;private String userEmail;public Integer getUserId() {return userId;}public void setUserId(Integer userId) {this.userId = userId;}public String getUserName() {return userName;}public void setUserName(String userName) {this.userName = userName;}public String getUserPassword() {return userPassword;}public void setUserPassword(String userPassword) {this.userPassword = userPassword;}public String getUserEmail() {return userEmail;}public void setUserEmail(String userEmail) {this.userEmail = userEmail;}@Overridepublic String toString() {return "User [userId=" + userId + ", userName=" + userName + ", userPassword=" + userPassword + ", userEmail=" + userEmail + "]";}
}
--创建mybatis的mapper映射文件

<?xml version="1.0" encoding="UTF-8"?>
<!DOCTYPE mapper PUBLIC "-//mybatis.org//DTD Mapper 3.0//EN" "http://mybatis.org/dtd/mybatis-3-mapper.dtd">
<mapper namespace="com.travesky.bluesky.activiti.dao.UserDao"><!--设置domain类和数据库中表的字段一一对应,注意数据库字段和domain类中的字段名称不致,此处一定要!--><resultMap id="BaseResultMap" type="com.travesky.bluesky.activiti.domain.User"><id column="USER_ID" property="userId" jdbcType="INTEGER" /><result column="USER_NAME" property="userName" jdbcType="CHAR" /><result column="USER_PASSWORD" property="userPassword" jdbcType="CHAR" /><result column="USER_EMAIL" property="userEmail" jdbcType="CHAR" /></resultMap><!-- 查询单条记录 --><select id="selectUserById" parameterType="int" resultMap="BaseResultMap">SELECT * FROM t_user WHERE USER_ID = #{userId}</select>
</mapper>
---创建mapper映射的实体类

package com.travesky.bluesky.activiti.dao;import com.travesky.bluesky.activiti.domain.User;/**** @author Ancan**/
public interface UserDao {public User selectUserById(Integer userId);
}
----创建service

--userService
package com.travesky.bluesky.activiti.service;import com.travesky.bluesky.activiti.domain.User;public interface UserService {User selectUserById(Integer userId);
}
----UserServiceImpl
package com.travesky.bluesky.activiti.service.impl;import org.springframework.beans.factory.annotation.Autowired;
import org.springframework.stereotype.Service;import com.travesky.bluesky.activiti.dao.UserDao;
import com.travesky.bluesky.activiti.domain.User;
import com.travesky.bluesky.activiti.service.UserService;@Service
public class UserServiceImpl implements UserService {@Autowiredprivate UserDao userDao;public User selectUserById(Integer userId) {return userDao.selectUserById(userId);}
}
-----上面已经整合完成,下面进行测试
--测试目录结构

------BaseTestCase
package com.simple.activiti.test;import org.junit.Test;
import org.junit.runner.RunWith;
import org.springframework.test.context.ContextConfiguration;
import org.springframework.test.context.junit4.AbstractTransactionalJUnit4SpringContextTests;
import org.springframework.test.context.junit4.SpringJUnit4ClassRunner;
import org.springframework.test.context.transaction.TransactionConfiguration;
import org.springframework.transaction.annotation.Transactional;/*** 加载activiti的23张表的运行例子** @author AnCan**/
@RunWith(SpringJUnit4ClassRunner.class)
@ContextConfiguration({ "classpath:spring-activiti.xml" })
@TransactionConfiguration(transactionManager = "transactionManager", defaultRollback = false)
@Transactional
public class BaseTestCase extends AbstractTransactionalJUnit4SpringContextTests {@Test/*** 运行此方法,加载activiti的数据库表信息*/public void test() {System.out.println("test");}
}
------UserserviceTest
package com.simple.activiti.test.user;import org.apache.log4j.Logger;
import org.junit.Test;
import org.springframework.beans.factory.annotation.Autowired;import com.simple.activiti.test.BaseTestCase;
import com.travesky.bluesky.activiti.domain.User;
import com.travesky.bluesky.activiti.service.UserService;public class UserserviceTest extends BaseTestCase {@Autowiredprivate UserService userService;Logger logger = Logger.getLogger(UserserviceTest.class);@Testpublic void selectUserByIdTest() {User user = userService.selectUserById(10);logger.debug("查找结果" + user);}
}

------BpmDefinitionTest---- 主要测试动态流程图和流程文件的生成其中遇到问题请参照的相关记录
package com.simple.activiti.test.bpm;import java.io.File;
import java.io.IOException;
import java.io.InputStream;
import java.util.ArrayList;
import java.util.List;import javax.annotation.Resource;import org.activiti.bpmn.BpmnAutoLayout;
import org.activiti.bpmn.model.BpmnModel;
import org.activiti.bpmn.model.EndEvent;
import org.activiti.bpmn.model.ExclusiveGateway;
import org.activiti.bpmn.model.FlowElement;
import org.activiti.bpmn.model.ImplementationType;
import org.activiti.bpmn.model.Process;
import org.activiti.bpmn.model.SequenceFlow;
import org.activiti.bpmn.model.ServiceTask;
import org.activiti.bpmn.model.StartEvent;
import org.activiti.bpmn.model.UserTask;
import org.activiti.engine.ProcessEngine;
import org.activiti.engine.RepositoryService;
import org.activiti.engine.RuntimeService;
import org.activiti.engine.TaskService;
import org.activiti.engine.impl.persistence.entity.ProcessDefinitionEntity;
import org.activiti.engine.repository.Deployment;
import org.activiti.engine.repository.ProcessDefinition;
import org.activiti.engine.runtime.ProcessInstance;
import org.activiti.engine.task.Task;
import org.apache.commons.io.FileUtils;
import org.junit.Assert;
import org.junit.Test;import com.simple.activiti.test.BaseTestCase;public class BpmDefinitionTest extends BaseTestCase {@Resourceprivate RepositoryService repositoryService;@Resourceprivate RuntimeService runtimeService;@ResourceTaskService taskService;@Testpublic void testDeploy() throws IOException {InputStream is = readXmlFile();Assert.assertNotNull(is);//发布流程Deployment deployment = repositoryService.createDeployment().addInputStream("bpmn20.xml", is).name("holidayRequest").deploy();Assert.assertNotNull(deployment);System.out.println("deployId:" + deployment.getId());//查询流程定义ProcessDefinition processDefinition = repositoryService.createProcessDefinitionQuery().deploymentId(deployment.getId()).singleResult();Long businessKey = new Double(1000000 * Math.random()).longValue();//启动流程runtimeService.startProcessInstanceById(processDefinition.getId(), businessKey.toString());//查询任务实例List<Task> taskList = taskService.createTaskQuery().processDefinitionId(processDefinition.getId()).list();Assert.assertNotNull(taskList == null);Assert.assertTrue(taskList.size() > 0);for (Task task : taskList) {System.out.println("task name is " + task.getName() + " ,task key is " + task.getTaskDefinitionKey());}}public InputStream readXmlFile() throws IOException {String filePath = "holidayRequest.bpmn";return Class.class.getClass().getResource("/" + filePath).openStream();}@Testpublic void testDynamicDeploy() throws Exception {//创建bpmn模型BpmnModel model = new BpmnModel();org.activiti.bpmn.model.Process process = new org.activiti.bpmn.model.Process();model.addProcess(process);process.setId("my-process");//创建bpmn元素process.addFlowElement(createStartEvent());process.addFlowElement(createUserTask("task1", "First task", "fred"));process.addFlowElement(createUserTask("task2", "Second task", "john"));process.addFlowElement(createEndEvent());process.addFlowElement(createSequenceFlow("start", "task1"));process.addFlowElement(createSequenceFlow("task1", "task2"));process.addFlowElement(createSequenceFlow("task2", "end"));// 2.生成BPMN自动布局new BpmnAutoLayout(model).execute();// 3. 部署这个BPMN模型Deployment deployment = repositoryService.createDeployment().addBpmnModel("dynamic-model.bpmn", model).name("Dynamic process deployment").deploy();// 4. 启动流程实例ProcessInstance processInstance = runtimeService.startProcessInstanceByKey("my-process");// 5 发起任务List<Task> tasks = taskService.createTaskQuery().processInstanceId(processInstance.getId()).list();Assert.assertEquals(1, tasks.size());Assert.assertEquals("First task", tasks.get(0).getName());Assert.assertEquals("fred", tasks.get(0).getAssignee());// 6. 保存bpmn流程图 InputStream processDiagram = repositoryService.getProcessDiagram(processInstance.getProcessDefinitionId());FileUtils.copyInputStreamToFile(processDiagram, new File("target/diagram.png"));// 7. 保存为bpmn.xml的xml类型文件InputStream processBpmn = repositoryService.getResourceAsStream(deployment.getId(), "dynamic-model.bpmn");FileUtils.copyInputStreamToFile(processBpmn, new File("target/process.bpmn20.xml"));}@Testpublic void testDynamicDeploy2() throws Exception {System.out.println(".........start...");// 1. Build up the model from scratchBpmnModel model = new BpmnModel();org.activiti.bpmn.model.Process process = new org.activiti.bpmn.model.Process();model.addProcess(process);final String PROCESSID = "process8888888888";final String PROCESSNAME = "测试0100000";process.setId(PROCESSID);process.setName(PROCESSNAME);process.addFlowElement(createStartEvent());process.addFlowElement(createUserTask("task1", "节点01", "candidateGroup1"));process.addFlowElement(createExclusiveGateway("createExclusiveGateway1"));process.addFlowElement(createUserTask("task2", "节点02", "candidateGroup2"));process.addFlowElement(createExclusiveGateway("createExclusiveGateway2"));process.addFlowElement(createUserTask("task3", "节点03", "candidateGroup3"));process.addFlowElement(createExclusiveGateway("createExclusiveGateway3"));process.addFlowElement(createUserTask("task4", "节点04", "candidateGroup4"));process.addFlowElement(createEndEvent());process.addFlowElement(createSequenceFlow("startEvent", "task1", "", ""));process.addFlowElement(createSequenceFlow("task1", "task2", "", ""));//process.addFlowElement(createSequenceFlow("task2", "createExclusiveGateway1"));process.addFlowElement(createSequenceFlow("createExclusiveGateway1", "task1", "不通过", "${pass=='2'}"));process.addFlowElement(createSequenceFlow("createExclusiveGateway1", "task3", "通过", "${pass=='1'}"));process.addFlowElement(createSequenceFlow("task3", "createExclusiveGateway2"));process.addFlowElement(createSequenceFlow("createExclusiveGateway2", "task2", "不通过", "${pass=='2'}"));process.addFlowElement(createSequenceFlow("createExclusiveGateway2", "task4", "通过", "${pass=='1'}"));process.addFlowElement(createSequenceFlow("task4", "createExclusiveGateway3"));process.addFlowElement(createSequenceFlow("createExclusiveGateway3", "task3", "不通过", "${pass=='2'}"));process.addFlowElement(createSequenceFlow("createExclusiveGateway3", "end", "通过", "${pass=='1'}"));try {// 2. Generate graphical informationnew BpmnAutoLayout(model).execute();} catch (Exception e) {e.printStackTrace();}// 3. Deploy the process to the engineDeployment deployment = repositoryService.createDeployment().addBpmnModel(PROCESSID + ".bpmn", model).name(PROCESSID + "_deployment").deploy();// 4. Start a process instanceProcessInstance processInstance = runtimeService.startProcessInstanceByKey(PROCESSID);// 5. Check if task is availableList<Task> tasks = taskService.createTaskQuery().processInstanceId(processInstance.getId()).list();Assert.assertEquals(1, tasks.size());// 6. Save process diagram to a fileInputStream processDiagram = repositoryService.getProcessDiagram(processInstance.getProcessDefinitionId());FileUtils.copyInputStreamToFile(processDiagram, new File("target/" + PROCESSID + ".png"));// 7. Save resulting BPMN xml to a fileInputStream processBpmn = repositoryService.getResourceAsStream(deployment.getId(), PROCESSID + ".bpmn");FileUtils.copyInputStreamToFile(processBpmn, new File("target/" + PROCESSID + ".bpmn.xml"));System.out.println(".........end...");}//创建taskprotected UserTask createUserTask(String id, String name, String assignee) {UserTask userTask = new UserTask();userTask.setName(name);userTask.setId(id);userTask.setAssignee(assignee);List<String> candidateUsers = new ArrayList<String>();candidateUsers.add("xiaoli");candidateUsers.add("xiaoli1");candidateUsers.add("xiaoli2");candidateUsers.add("xiaoli3");userTask.setCandidateUsers(candidateUsers);return userTask;}//创建箭头protected SequenceFlow createSequenceFlow(String from, String to) {SequenceFlow flow = new SequenceFlow();flow.setSourceRef(from);flow.setTargetRef(to);return flow;}protected StartEvent createStartEvent() {StartEvent startEvent = new StartEvent();startEvent.setId("start");return startEvent;}/*** 排他网关*/protected static ExclusiveGateway createExclusiveGateway(String id) {ExclusiveGateway exclusiveGateway = new ExclusiveGateway();exclusiveGateway.setId(id);return exclusiveGateway;}protected EndEvent createEndEvent() {EndEvent endEvent = new EndEvent();endEvent.setId("end");return endEvent;}/* 连线 */protected static SequenceFlow createSequenceFlow(String from, String to, String name, String conditionExpression) {SequenceFlow flow = new SequenceFlow();flow.setSourceRef(from);flow.setTargetRef(to);flow.setName(name);if (null != conditionExpression && !"".equals(conditionExpression)) {flow.setConditionExpression(conditionExpression);}return flow;}protected FlowElement createServiceTask(String name) {ServiceTask stask = new ServiceTask();stask.setId("sid");stask.setName(name);stask.setImplementation("activitiTest.PrintVariables");String implementationType = ImplementationType.IMPLEMENTATION_TYPE_DELEGATEEXPRESSION;stask.setImplementationType(implementationType);return stask;}
}

-------右键运行测试方法,完成测试。没有配置activiti的数据库,在运行完后会自动创建表。
到这里配置好spring+activiti+mybatis+mysql!!!!!!!!!!!!!!!!!!!!!!!!!!!!!!!!!!!!!!!!!!!!!!!!!!!!!!!!!!!!!!!!!!!!!!!!!!
=====================================================
这里开始添加spirngMVC,并转换maven工程为web项目
接上面的工程接着说,此时要加spingMVC之前,工程得再稍微转换下
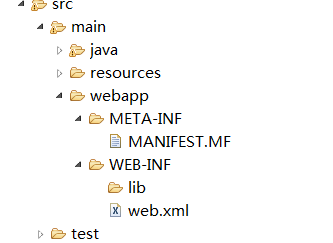
此时webapp下的结果还没有显示出来,因为此时我们还没有配置此的项目为web项目
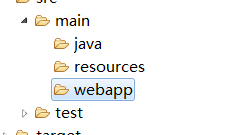
再次进去Properties配置,如下图所示:如果没有显示如下,那就先把dynamic web module的√给去掉,然后重新再打开 这个
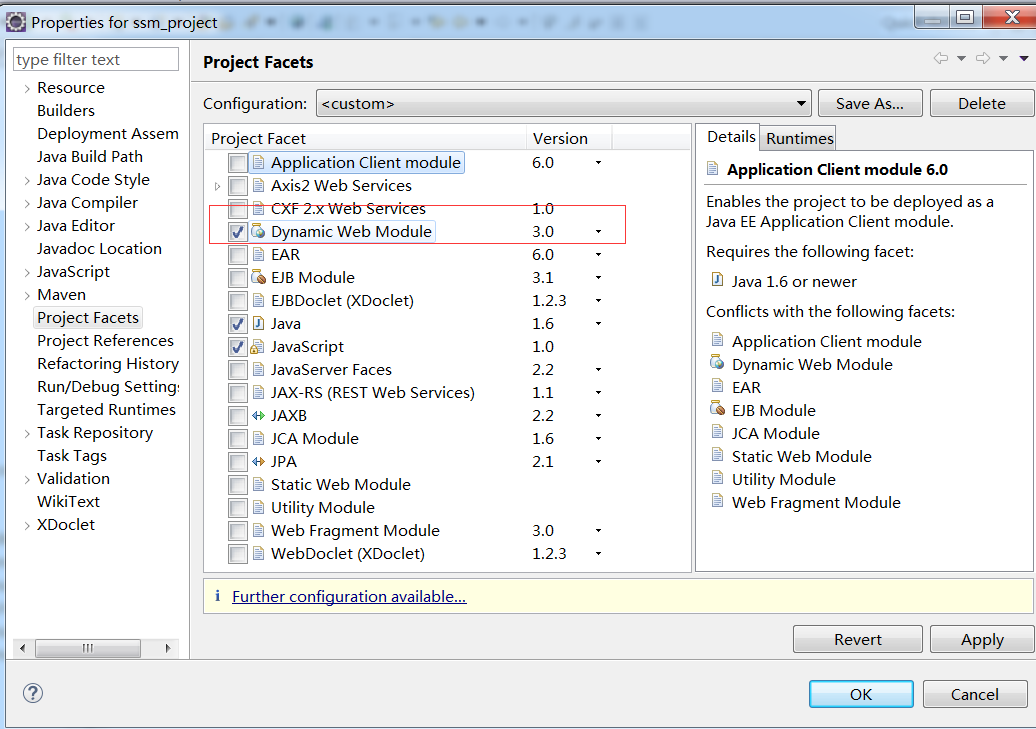
进入,然后输入如下内容
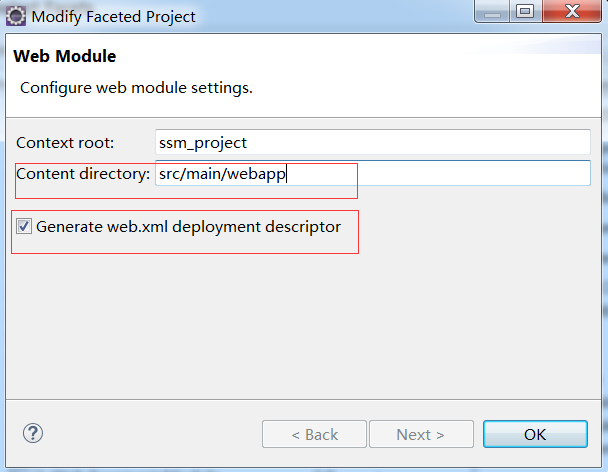
确定OK之后,webapp下面就会自动生成一些文件,如下
--------配置SpringMVC
--pom文件需要新增两个配置,上面我已经做了解释,在贴一下
<!-- spring MVC 在转换为web项目后添加的begin -->
<!-- javaee-api包 注意和项目使用的JDK版本对应 -->
<dependency><groupId>javax</groupId><artifactId>javaee-api</artifactId><version>7.0</version><scope>provided</scope>
</dependency><!-- javaee-web-api包 注意和项目使用的JDK版本对应 -->
<dependency><groupId>javax</groupId><artifactId>javaee-web-api</artifactId><version>7.0</version><scope>provided</scope>
</dependency>
----- 在src/main/resource中添加springmvc文件夹,然后添加文件spring-mvc.xml,内容如下:
<?xml version="1.0" encoding="UTF-8"?>
<beans xmlns="http://www.springframework.org/schema/beans"xmlns:p="http://www.springframework.org/schema/p"xmlns:xsi="http://www.w3.org/2001/XMLSchema-instance"xmlns:context="http://www.springframework.org/schema/context"xmlns:mvc="http://www.springframework.org/schema/mvc"xsi:schemaLocation=" http://www.springframework.org/schema/beanshttp://www.springframework.org/schema/beans/spring-beans-3.2.xsdhttp://www.springframework.org/schema/contexthttp://www.springframework.org/schema/context/spring-context-3.2.xsdhttp://www.springframework.org/schema/mvchttp://www.springframework.org/schema/mvc/spring-mvc-3.2.xsd"><!-- 扫描controller(controller层注入) --><context:component-scan base-package="com.travesky.bluesky.activiti.controller"/><!-- 对模型视图添加前后缀 --><bean id="viewResolver" class="org.springframework.web.servlet.view.InternalResourceViewResolver" p:prefix="/WEB-INF/view/" p:suffix=".jsp"/>
</beans>
-----配置web,xml

----web.xml
<?xml version="1.0" encoding="UTF-8"?>
<web-app id="WebApp_ID" version="3.0"xmlns="http://java.sun.com/xml/ns/javaee"xmlns:xsi="http://www.w3.org/2001/XMLSchema-instance"xsi:schemaLocation="http://java.sun.com/xml/ns/javaeehttp://java.sun.com/xml/ns/javaee/web-app_3_0.xsd"><display-name>activiti</display-name><!-- 起始欢迎界面 --><welcome-file-list><welcome-file>index.jsp</welcome-file></welcome-file-list><listener><listener-class>org.springframework.web.context.ContextLoaderListener</listener-class></listener><!-- 读取spring配置文件 --><context-param><param-name>contextConfigLocation</param-name><param-value>classpath:spring-activiti.xml</param-value></context-param><!-- 设计路径变量值 --><context-param><param-name>webAppRootKey</param-name><param-value>springmvc.root</param-value></context-param><!-- Spring字符集过滤器 --><filter><filter-name>SpringEncodingFilter</filter-name><filter-class>org.springframework.web.filter.CharacterEncodingFilter</filter-class><init-param><param-name>encoding</param-name><param-value>UTF-8</param-value></init-param><init-param><param-name>forceEncoding</param-name><param-value>true</param-value></init-param></filter><filter-mapping><filter-name>SpringEncodingFilter</filter-name><url-pattern>/*</url-pattern></filter-mapping><!-- 日志记录 --><listener><listener-class>org.springframework.web.util.Log4jConfigListener</listener-class></listener><context-param><!-- 日志配置文件路径 --><param-name>log4jConfigLocation</param-name><param-value>classpath:log4j.properties</param-value></context-param><context-param><!-- 日志页面的刷新间隔 --><param-name>log4jRefreshInterval</param-name><param-value>6000</param-value></context-param><!-- springMVC核心配置 --><servlet><servlet-name>dispatcherServlet</servlet-name><servlet-class>org.springframework.web.servlet.DispatcherServlet</servlet-class><init-param><param-name>contextConfigLocation</param-name><!--spingMVC的配置路径 --><param-value>classpath:springmvc/spring-mvc.xml</param-value></init-param><load-on-startup>1</load-on-startup></servlet><!-- 拦截设置 --><servlet-mapping><servlet-name>dispatcherServlet</servlet-name><url-pattern>/</url-pattern></servlet-mapping><!-- 错误跳转页面 --><error-page><!-- 路径不正确 --><error-code>404</error-code><location>/WEB-INF/errorpage/404.jsp</location></error-page><error-page><!-- 没有访问权限,访问被禁止 --><error-code>405</error-code><location>/WEB-INF/errorpage/405.jsp</location></error-page><error-page><!-- 内部错误 --><error-code>500</error-code><location>/WEB-INF/errorpage/500.jsp</location></error-page>
</web-app>
------
添加index.jsp
在src/main/webapp/WEB-INF下新建一个文件夹view,添加一个index.jsp,内容如下:
<%@ page language="java" contentType="text/html; charset=UTF-8" pageEncoding="UTF-8"%>
<html>
<body><h2>Hello World!</h2>${user.userId}<br> ${user.userName}<br> ${user.userPassword}<br> ${user.userEmail}<br>
</body>
</html>
-----最后就是controller的书写了

package com.travesky.bluesky.activiti.controller;import javax.annotation.Resource;import org.springframework.stereotype.Controller;
import org.springframework.web.servlet.ModelAndView;
import org.springframework.web.bind.annotation.RequestMapping;import com.travesky.bluesky.activiti.domain.User;
import com.travesky.bluesky.activiti.service.UserService;/**** @author Ancan**/
@Controller
public class UserController {@Resourceprivate UserService userService;@RequestMapping("/")public ModelAndView getIndex() {ModelAndView mav = new ModelAndView("index");User user = userService.selectUserById(1);mav.addObject("user", user);return mav;}
}
-----到这里,已经全部整合完毕,但是,由于是maven项目,在转换成web项目后,我们要添加jar的依赖到项目
--右键项目,properties---》deployment Assembly-->点击add,添加jar包如下图


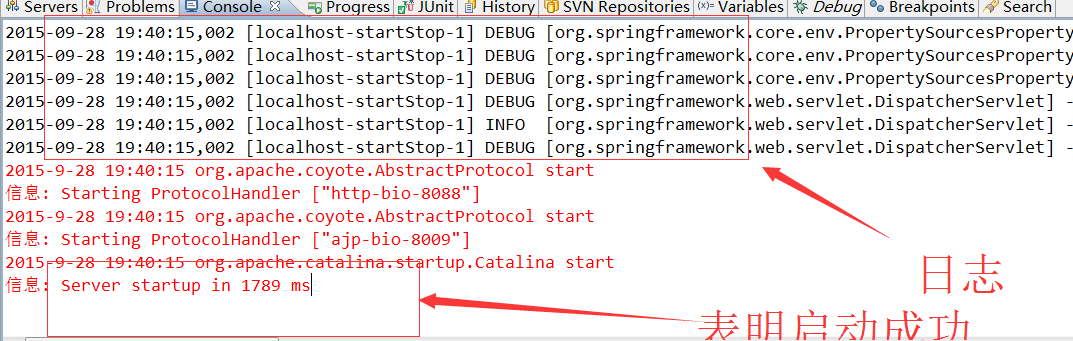
-----添加完依赖后,就可以通过tomcat运行项目了
接下来控制台就会打印日志出来了!如下
打印浏览器,输入网址:http://localhost:8088/activiti/