CentOS源码安装GitLab汉化版第3版
软件版本:
| 软件 | 版本 |
|---|---|
| CentOS | 7.5 |
| GraphicsMagick | 1.3.31 |
| Git | 2.21.0 |
| Ruby | 2.5.3 |
| Go | 1.12 |
| Node.js | 10.15.2 |
| PostgreSQL | 11.2 |
| Redis | 5.0.3 |
| GitLab | 11.8.0 汉化版 |
| Nginx | 1.14.2 |
1. 安装依赖
yum -y install libicu-devel patch gcc-c++ readline-devel zlib-devel libffi-devel openssl-devel make autoconf automake libtool bison libxml2-devel libxslt-devel libyaml-devel zlib-devel openssl-devel cpio expat-devel gettext-devel curl-devel perl-ExtUtils-CBuilder perl-ExtUtils-MakeMaker make cmake pcre-devel wget bzip2 systemd-devel2. 安装 GraphicsMagick
yum -y install libpng libjpeg libpng-devel libjpeg-devel ghostscript libtiff libtiff-devel freetype freetype-devel
cd /root/src
wget https://sourceforge.net/projects/graphicsmagick/files/graphicsmagick/1.3.31/GraphicsMagick-1.3.31.tar.xz/download -O GraphicsMagick-1.3.31.tar.xz
tar xf GraphicsMagick-1.3.31.tar.xz
cd GraphicsMagick-1.3.31
./configure --prefix=/App/GraphicsMagick
make && make install
echo 'PATH=/App/GraphicsMagick/bin:$PATH' >> /etc/profile
source /etc/profile
ln -s /App/GraphicsMagick/bin/gm /bin/
3. 安装 Git
查看当前 git 版本:
git --version如果 git 版本小于2.18.0,则先卸载:
rpm -e --nodeps git编译安装:
cd /root/src/
wget https://mirrors.edge.kernel.org/pub/software/scm/git/git-2.21.0.tar.xz
tar xf git-2.21.0.tar.xz
cd git-2.21.0
./configure --prefix=/App/git
make && make install
echo 'export PATH=/App/git/bin:$PATH' >> /etc/profile
source /etc/profile
ln -s /App/git/bin/git /bin/
ln -s /App/git/bin/git-receive-pack /bin/
ln -s /App/git/bin/git-upload-pack /bin/
4. 安装 Ruby
版本需求:
- Ruby 2.5.x
- 1.5.2 <= Bundler < 2.x
cd /root/src/
wget https://cache.ruby-lang.org/pub/ruby/2.5/ruby-2.5.3.tar.gz
tar xf ruby-2.5.3.tar.gz
cd ruby-2.5.3
./configure --prefix=/App/ruby --disable-install-rdoc
make && make install
ln -s /App/ruby/bin/ruby /bin/
echo 'export PATH=/App/ruby/bin:$PATH' >> /etc/profile
source /etc/profile
gem install bundler --no-document --version '< 2'
如果服务器在中国大陆,可以修改 RubyGems 镜像提高下载速度:
gem sources --add https://gems.ruby-china.org/ --remove https://rubygems.org/5. 安装 Go
cd /root/src/
wget https://dl.google.com/go/go1.12.linux-amd64.tar.gz
tar xf go1.12.linux-amd64.tar.gz
mv go /App/
echo 'export GOROOT=/App/go' >> /etc/profile
echo 'export GOPATH=/root/code/go' >> /etc/profile
echo 'export PATH=$GOROOT/bin:$GOPATH/bin:$PATH' >> /etc/profile
source /etc/profile
6. 安装 Node.js
版本需求:
- node >= v8.10.0
- yarn >= v1.10.0
cd /root/src/
wget https://nodejs.org/dist/v10.15.2/node-v10.15.2-linux-x64.tar.xz
tar xf node-v10.15.2-linux-x64.tar.xz
mv node-v10.15.2-linux-x64 /App/node
echo 'export PATH=/App/node/bin:$PATH' >> /etc/profile
source /etc/profile
npm install --global yarn
7. 创建系统 git 用户
useradd -r -s /bin/bash --comment 'GitLab' -m -d /home/git git8. 安装 PostgreSQL
版本需求:至少 9.2
cd /root/src/
wget https://ftp.postgresql.org/pub/source/v11.2/postgresql-11.2.tar.bz2
tar xf postgresql-11.2.tar.bz2
cd postgresql-11.2
./configure --prefix=/App/pgsql
make && make install
cd contrib/pg_trgm
make install
useradd postgres
mkdir -p /data/pgsql
chown postgres /data/pgsql
sudo -u postgres /App/pgsql/bin/initdb -D /data/pgsql
echo 'export PATH=/App/pgsql/bin:$PATH' >> /etc/profile
source /etc/profile
添加 systemd 服务管理配置 /usr/lib/systemd/system/pgsql.service:
[Unit]
Description=PostgreSQL database server
Documentation=man:postgres(1)[Service]
Type=notify
User=postgres
ExecStart=/App/pgsql/bin/postgres -D /data/pgsql
ExecReload=/bin/kill -HUP $MAINPID
KillMode=mixed
KillSignal=SIGINT
TimeoutSec=0[Install]
WantedBy=multi-user.target
启动 PostgreSQL:
systemctl enable pgsql
systemctl start pgsql
Shell 终端切换为 postgres 用户,登录数据库控制台:
su - postgres
psql -d template1
创建数据库账号:
CREATE USER git CREATEDB PASSWORD '数据库连接密码';创建 pg_trgm 扩展:
CREATE EXTENSION IF NOT EXISTS pg_trgm;创建数据库并授权:
CREATE DATABASE gitlabhq_production OWNER git;
\q
Shell终端切换为 git 用户,登录数据库控制台:
exit
su - git
psql -d gitlabhq_production
检查 pg_trgm 扩展 是否启用:
SELECT true AS enabled
FROM pg_available_extensions
WHERE name = 'pg_trgm'
AND installed_version IS NOT NULL;
输出结果如下,表示成功启用扩展:
 enabled
---------t
(1 row)
退出数据库控制台:
\q9. 安装 Redis
版本需求:至少2.8:
exit
cd /root/src/
wget http://download.redis.io/releases/redis-5.0.3.tar.gz
tar xf redis-5.0.3.tar.gz
cd redis-5.0.3
make PREFIX=/App/redis install
echo 'export PATH=/App/redis/bin:$PATH' >> /etc/profile
source /etc/profile
添加 Redis 配置 /App/redis/redis.conf:
bind 127.0.0.1
protected-mode yes
port 6379
tcp-backlog 511
timeout 0
tcp-keepalive 300
daemonize yes
supervised no
pidfile /data/redis/redis.pid
loglevel warning
logfile "/data/redis/redis.log"
syslog-enabled no
databases 16
always-show-logo yes
save ""
stop-writes-on-bgsave-error yes
rdbcompression yes
rdbchecksum yes
dbfilename dump.rdb
dir /data/redis
lazyfree-lazy-eviction no
lazyfree-lazy-expire no
lazyfree-lazy-server-del no
replica-lazy-flush no
appendonly no
lua-time-limit 5000
slowlog-log-slower-than 10000
slowlog-max-len 128
latency-monitor-threshold 0
notify-keyspace-events ""
hash-max-ziplist-entries 512
hash-max-ziplist-value 64
list-max-ziplist-size -2
list-compress-depth 0
set-max-intset-entries 512
zset-max-ziplist-entries 128
zset-max-ziplist-value 64
hll-sparse-max-bytes 3000
stream-node-max-bytes 4096
stream-node-max-entries 100
activerehashing yes
client-output-buffer-limit normal 0 0 0
client-output-buffer-limit replica 256mb 64mb 60
client-output-buffer-limit pubsub 32mb 8mb 60
hz 10
dynamic-hz yes
aof-rewrite-incremental-fsync yes
rdb-save-incremental-fsync yes
启动 Redis:
mkdir -p /data/redis
useradd -s /sbin/nologin redis
chown redis. /data/redis
sudo -u redis /App/redis/bin/redis-server /App/redis/redis.conf
10. 安装 Google RE2
cd /root/src
git clone https://code.googlesource.com/re2
cd re2
make && make install
11. 安装 GitLab
修改 git 家目录权限,否则访问 gitlab.socket 报权限错误:
chmod 755 /home/git切换至 git 用户 clone 代码:
su - git
git clone https://gitlab.com/xhang/gitlab.git -b 11-8-stable-zh gitlab
拷贝 GitLab 配置:
cd gitlab/
cp config/gitlab.yml.example config/gitlab.yml
修改 gitlab.yml 配置,将 host: localhost 修改为本机IP地址或者域名,如为域名,确保域名已做解析。
拷贝示例配置,修改权限:
cp config/secrets.yml.example config/secrets.yml
chmod 0600 config/secrets.yml
chmod -R u+rwX,go-w log/
chmod -R u+rwX tmp/
chmod -R u+rwX tmp/pids/
chmod -R u+rwX tmp/sockets/
mkdir public/uploads/
chmod 0700 public/uploads
chmod -R u+rwX builds/
chmod -R u+rwX shared/artifacts/
chmod -R ug+rwX shared/pages/
cp config/unicorn.rb.example config/unicorn.rb
cp config/initializers/rack_attack.rb.example config/initializers/rack_attack.rb
git config --global core.autocrlf input
git config --global gc.auto 0
git config --global repack.writeBitmaps true
git config --global receive.advertisePushOptions true
cp config/resque.yml.example config/resque.yml
修改 Redis 相关配置 config/resque.yml 段 production内容:
url: unix:/var/run/redis/redis.sock为url: redis://127.0.0.1:6379
拷贝数据库相关配置:
cp config/database.yml.postgresql config/database.yml
chmod o-rwx config/database.yml
修改 config/database.yml 段 production 内容:
password: "secure password"为password: "数据库连接密码"
安装 Gems:
bundle install --deployment --without development test mysql aws kerberos如果服务器在中国大陆,可以修改 RubyGems 镜像提高下载速度:
bundle config mirror.https://rubygems.org https://gems.ruby-china.org安装 GitLab Shell:
bundle exec rake gitlab:shell:install REDIS_URL=redis://127.0.0.1:6379 RAILS_ENV=production SKIP_STORAGE_VALIDATION=true安装 GitLab-Workhorse:
bundle exec rake "gitlab:workhorse:install[/home/git/gitlab-workhorse]" RAILS_ENV=production安装 GitLab Pages:
cd /home/git
git clone https://gitlab.com/gitlab-org/gitlab-pages.git
cd gitlab-pages
make
安装 Gitaly:
cd /home/git/gitlab
bundle exec rake "gitlab:gitaly:install[/home/git/gitaly,/home/git/repositories]" RAILS_ENV=production
chmod 0700 /home/git/gitlab/tmp/sockets/private
检查修改 /home/git/gitaly/config.toml,若无目录 /home/git/gitaly/bin,则:
bin_dir = "/home/git/gitaly/bin"修改为bin_dir = "/home/git/gitaly"
修改 /home/git/gitlab/lib/tasks/gitlab/setup.rake:
check_gitaly_connection行首添加#注释用以跳过检查,否则可能报错:Failed to connect to Gitaly
初始化数据库并激活高级功能:
cd /home/git/gitlab
bundle exec rake gitlab:setup RAILS_ENV=production GITLAB_ROOT_PASSWORD=root密码
GITLAB_ROOT_PASSWORD 值为 GitLab 管理员 root 密码。
切换为 root 拷贝服务管理脚本:
cp /home/git/gitlab/lib/support/init.d/gitlab /etc/init.d/配置 Logrotate:
cp /home/git/gitlab/lib/support/logrotate/gitlab /etc/logrotate.d/检查应用状态:
su - git
cd gitlab/
bundle exec rake gitlab:env:info RAILS_ENV=production
编译 GetText PO 文件:
bundle exec rake gettext:compile RAILS_ENV=production编译静态文件:
yarn install --production --pure-lockfile
bundle exec rake gitlab:assets:compile RAILS_ENV=production NODE_ENV=production
12. 安装 Nginx
exit
cd /root/src/
wget http://nginx.org/download/nginx-1.14.2.tar.gz
tar xf nginx-1.14.2.tar.gz
cd nginx-1.14.2
./configure --prefix=/App/nginx --with-http_stub_status_module --with-http_gzip_static_module --with-http_ssl_module --with-http_realip_module
make && make install
useradd -s /sbin/nologin nginx
修改 Nginx 配置 /App/nginx/conf/nginx.conf:
user  nginx nginx;
worker_processes  auto;pid        logs/nginx.pid;
worker_rlimit_nofile    65536;events
{use epoll;accept_mutex off;worker_connections  65536;
}http
{include       mime.types;default_type  text/html;charset    UTF-8;server_names_hash_bucket_size    128;client_header_buffer_size        4k;large_client_header_buffers     4    32k;client_max_body_size            20m;open_file_cache max=65536  inactive=60s;open_file_cache_valid      80s;open_file_cache_min_uses   1;sendfile    on;server_tokens off;keepalive_timeout  60;gzip  on;gzip_min_length    1k;gzip_buffers  4    64k;gzip_http_version    1.1;gzip_comp_level    2;gzip_types text/plain text/css application/json application/x-javascript text/xml application/xml application/xml+rss text/javascript;upstream gitlab-workhorse{server unix:/home/git/gitlab/tmp/sockets/gitlab-workhorse.socket fail_timeout=0;}map $http_upgrade $connection_upgrade_gitlab{default upgrade;''      close;}log_format gitlab_access $remote_addr - $remote_user [$time_local] "$request_method $gitlab_filtered_request_uri $server_protocol" $status $body_bytes_sent "$gitlab_filtered_http_referer" "$http_user_agent";map $request_uri $gitlab_temp_request_uri_1{default $request_uri;~(?i)^(?<start>.*)(?<temp>[\?&]private[\-_]token)=[^&]*(?<rest>.*)$ "$start$temp=[FILTERED]$rest";}map $gitlab_temp_request_uri_1 $gitlab_temp_request_uri_2{default $gitlab_temp_request_uri_1;~(?i)^(?<start>.*)(?<temp>[\?&]authenticity[\-_]token)=[^&]*(?<rest>.*)$ "$start$temp=[FILTERED]$rest";}map $gitlab_temp_request_uri_2 $gitlab_filtered_request_uri{default $gitlab_temp_request_uri_2;~(?i)^(?<start>.*)(?<temp>[\?&]feed[\-_]token)=[^&]*(?<rest>.*)$ "$start$temp=[FILTERED]$rest";}map $http_referer $gitlab_filtered_http_referer{default $http_referer;~^(?<temp>.*)\? $temp;}server{listen 0.0.0.0:80 default_server;listen [::]:80 default_server;server_name gitlab.songsong.me;server_tokens off;real_ip_header X-Real-IP;real_ip_recursive off;access_log  /data/logs/nginx/access.log gitlab_access;error_log   /data/logs/nginx/error.log;location /{client_max_body_size 0;gzip off;proxy_read_timeout      300;proxy_connect_timeout   300;proxy_redirect          off;proxy_http_version 1.1;proxy_set_header    Host                $http_host;proxy_set_header    X-Real-IP           $remote_addr;proxy_set_header    X-Forwarded-For     $proxy_add_x_forwarded_for;proxy_set_header    X-Forwarded-Proto   $scheme;proxy_set_header    Upgrade             $http_upgrade;proxy_set_header    Connection          $connection_upgrade_gitlab;proxy_pass http://gitlab-workhorse;}error_page 404 /404.html;error_page 422 /422.html;error_page 500 /500.html;error_page 502 /502.html;error_page 503 /503.html;location ~ ^/(404|422|500|502|503)\.html${root /home/git/gitlab/public;internal;}}
}
启动 Nginx:
mkdir -p /data/logs/nginx
chown nginx. /data/logs/nginx
/App/nginx/sbin/nginx
13. SMTP 配置
复制 smtp 示例配置:
su - git
cd gitlab
cp config/initializers/smtp_settings.rb.sample config/initializers/smtp_settings.rb
修改 config/initializers/smtp_settings.rb {} 内设置:
address: "smtp.exmail.qq.com",port: 465,user_name: "邮箱账号",password: "邮箱密码",domain: "exmail.qq.com",authentication: :login,enable_starttls_auto: true,tls: true,openssl_verify_mode: 'none'14. 启动 GitLab
exit
/etc/init.d/gitlab start
15. 二次检查应用状态
su - git
cd gitlab
bundle exec rake gitlab:check RAILS_ENV=production
所有项目检查结果显示绿色,表示安装成功。
转载于:https://blog.51cto.com/dongsong/2352855
相关文章:

用JSP+JDBC开发Web程序
以前一直想找个纯粹的JSPJDBC开发Web程序的架构,一直没有找到合适的,后来自己写了一个简单实现,并实施了几个项目。 此开发架构的特点是: 1.架构技术简单,只包含JSP和JDBC,不需要学习即可快速开发Web应用&a…
catia怎么创建约束快捷键_答疑 | CATIA结构树无法显示怎么办?
问题有小伙伴反馈,设计过程中,CATIA的结构树不见了……怎么办?问题听起来很简单,但总能难倒一些新手。原因与解决方案:下面针对产生该问题的不同的原因,提出不同的解决方案。第一种情况原因:结构…
【UVA】11992 - Fast Matrix Operations(段树模板)
主体段树,要注意,因为有set和add操作,当慵懒的标志下推。递归优先set,后复发add,每次运行set行动add马克清0 WA了好几次是由于计算那一段的时候出问题了,可笑的是我对着模板找了一个多小时的错。 #include&…
记录一次MySQL两千万数据的大表优化解决过程,提供三种解决方案
问题概述使用阿里云rds for MySQL数据库(就是MySQL5.6版本),有个用户上网记录表6个月的数据量近2000万,保留最近一年的数据量达到4000万,查询速度极慢,日常卡死。严重影响业务。 问题前提:老系统…
SQL Server 2008 下载地址(微软官方网站)
哪里有sqlserver2008下载?2011-9-24 23:58提问者:ooseestars | 浏览次数:3252次2011-9-26 11:38最佳答案SQL Server 2008 下载地址(微软官方网站) 中文版(3.28GB):http://sqlserver.dlservice.microsoft.com/dl/download/B/8/0/B8…

java实现最长连续子序列_最长公共子序列 ||
问题:在 前一篇文章 最长公共子序列 | 的基础上要求将所有的最长公共子序列打印出来,因为最长公共子序列可能不只一种。难点:输出一个最长公共子序列并不难,难点在于输出所有的最长公共子序列,我们需要在动态规划表上进…

替换元素和非替换元素的学习
替换元素和非替换元素的学习 (元素)[妙瞳] 引言 元素是文档结构的基础,在CSS中,每个元素生成了一个包含了元素内容的框(box,也翻译为“盒子”)。但是不同的元素显示的方式会有所不同,例如div和span不同,而s…
第十六天-企业应用架构模式-离线并发模式
1.乐观离线锁 (Optimistic Offline Lock) 运行机制 使用时机 例:领域层与数据层数据映射器 2.悲观离线锁 (Pessimistic Offline Lock) 运行机制 使用时机 例:简单锁管理对象 3.粗粒度锁 (Coarse…
hdu1518 bjfuoj1042 zoj1909 poj2362 经典的搜索加剪枝
bjfuoj的测试数据最水,用很简单的方法一下就过了,又调了好长时间,才过掉其它OJ上的这道题目~ /* * hdu1518/win.cpp * Created on: 2011-11-8 * Author : ben*/#include <cstdio>#include <cstdlib>#include <cstring>#…

投影参数_智能投影仪参数如何去看,其实很简单
我又来给大家安利投影仪了,毕竟用过的都知道有多刺激,但是估计很多人看到参数就头疼了吧?所以话不多说,直接上科普啦流明亮度流明怎么算的,家人们就不用详细了解了,只用记住,流明越高画面就越亮…
zoj 3554 A Miser Boss
题意:有a、b、c三个人同时工作,三个人做不同的任务需要不同的时间,但最后要求三个人做事情的总时间相同,输出做完所有任务需要的最少时间,如果无法达到三个人总工作时间相同,则输出“No” 当时一股脑筋觉着…
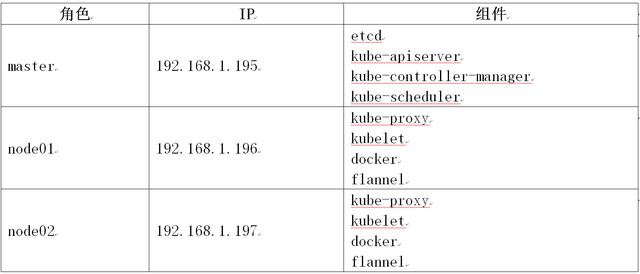
二进制_Kubernetes集群二进制部署
一、环境规划操作系统:CentOS7.4_x64kubernetes安装目录:/opt/kubernetes版本说明:Kubernetes:v1.9Docker:v17.12.0-ceEtcd:3.1二、安装Docker在所有节点执行:setenforce 0iptables -Fiptables …

delphi对窗体的查询(delphi xe2)
1、显示所有窗口的标题 2、根据关键字查询窗口 3、某一窗口内的所有控件及其内容 . unit Unit1;interfaceusesWinapi.Windows, Winapi.Messages, System.SysUtils, System.Variants,System.Classes, Vcl.Graphics,Vcl.Controls, Vcl.Forms, Vcl.Dialogs, Vcl.StdCtrls;typeTFo…
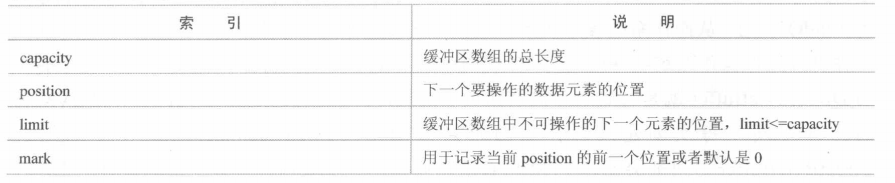
Buffer的工作方式
1、Buffer的工作方式 前面《java NIO的工作方式》介绍了Selector检测到通信信道I/O有数据传输时,通过select()方法取得SocketChannel,将数据读取或写入Buffer缓冲区,下面讨论Buffer如何接受和写出数据。通过查看JDK源码可知道,…

PHP 相关配置
2019独角兽企业重金招聘Python工程师标准>>> 1. php-fpm的pool 编辑php-fpm配置文件php-fpm.convim /usr/local/php/etc/php-fpm.conf //在[global]部分增加以下内容include etc/php-fpm.d/*.conf # 相当与Nginx的虚拟主机文件 “vhost” 的配置 创建存放pool配置…

学生教育云平台登录入口_湖南省教育云平台登录入口
湖南省教育云平台官方网站http://www.hnzyzx.com/,好学网的中小学频道为学友整理。 湖南省教育网: 点击登录: 湖南省教育云平台登录系统 下方为湖南信息教育云平台登录入口图示:安全教育平台学生姓名错误处理方法…
flash中制的SWC组件怎样导入到flex中使用
flash中制的SWC组件怎样导入到flex中使用2010-04-30 11:18在使用FLASH导出SWC组件文件后,放入项目的LIB文件夹,然后要用实例化一个对象才能进行时操作使用, 但要记得的是,导出时候要再导出的组件处勾选链接,勾选为AS导…
开源智能手机 Librem 5 跳票了,推迟至第3季度发布
百度智能云 云生态狂欢季 热门云产品1折起>>> 由 Purism 公司打造的开源智能手机 Librem 5 原计划于2019年4月正式发布。但根据官方最新的消息,Librem 5 将推迟至2019年第3季度发货。 根据之前的消息,Librem 5 的预售价为 599 美元。 Librem …
js 获取URL后面的参数
1、有时间由于缓存问题,用PHP可能就不是太好处理,所以可以用客户端进行URL的处理 如下:js 获取URL后面的参数 <script> function getUrlParam(name) { //获取url参数 var reg new RegExp("(^|&)" name "([^&…

机械键盘恢复出厂fn_黑爵毛茸茸系列机械键盘评测
写在前面之前试用过黑爵的巧克力键盘,给我留下了挺不错的使用体验,不仅外观设计上好看,原厂Cherry轴体手感也不错,这次有幸体验到黑爵新品毛茸茸系列键盘实属荣幸。开箱学弟这次拿到的键盘是Cherry青轴,可能是快递有些…
centos防火墙端口配置
增加防火墙配置,允许8080端口: # vi /etc/sysconfig/iptables 在允许ssh的下面增加一条: -A INPUT -m state --state NEW -m tcp -p tcp --dport 8080 -j ACCEPT 保存,重启iptables服务 : # service iptables restart…

实时智能决策引擎在蚂蚁金服风险管理中的实践
摘要:以“数字金融新原力(The New Force of Digital Finance)”为主题,蚂蚁金服ATEC城市峰会于2019年1月4日上海如期举办。金融智能专场分论坛上,蚂蚁金服数据技术专家王修坤做了主题为《实时智能决策引擎在蚂蚁金服风险管理中的实践》的精彩…
JAVA如何检测GC日志
只需要在JAVA程序运行的时候,加上VM参数就可以。像下面这样: -XX:PrintGCDetails 更具体的请参考: http://flash520.blog.163.com/blog/static/34414475201063041157163/ 转载于:https://www.cnblogs.com/bestchenwu/archive/2011/11/26/9655409.html

eclipse c语言_如果你的电脑是windows7/10的环境,用什么编译器学习C语言好?
既然问题已经限制了Windows环境,那么就不再推荐Linux环境下的编译器了,虽然在Linux环境进行C语言的编程会比Windows可以更好的掌握一些基础知识,自己动手gcc,写makefile文件了解编译,链接的过程。下面对windows环境C语言开发IDE进…
Apache Tomcat 7.0.93 发布,开源 Java Web 应用服务器
Apache Tomcat 7.0.93 已发布,Tomcat 是 Java Servlet、JavaServer Pages、Java 表达式语言和 Java WebSocket 技术的开源实现,是一个免费的开放源代码的 Web 应用服务器。 与 7.0.92 相比,该版本包含许多 bug 修复和改进。有以下值得关注的变…
C# using 语法说明
using 关键字有两个主要用途: (一).作为指令,用于为命名空间创建别名或导入其他命名空间中定义的类型。 (二).作为语句,用于定义一个范围,在此范围的末尾将释放对象。using指令 ①允许在命名空间中使用类型,这样&…

多行表头_多行表头数据汇总你怎么操作?手动复制粘贴?OUT!用VBA1分钟完成
前景提要(文末提供源码下载)发现小伙伴们的数据结果真的好复杂,不昨天才分享过有多行表头的数据如何汇总合并,今天就有小伙伴反馈,他的数据虽然是有多行表头的,但是又有一些数据没有多行表头,那么在进行批量数据汇总的…

VirtualBox上Ubuntu 共享文件夹
1. virtualbox 菜单栏中设备--》共享文件夹,添加一个共享文件夹,比如共享文件夹路径是D:/share,共享文件夹名称是share。 2. 进入虚拟Ubuntu,在命令行终端输入: sudo mkdir /mnt/sharesudo mount -t vboxsf share /mnt…

tinyMCE
TinyMCE是一个轻量级的基于浏览器的所见即所得编辑器,由JavaScript写成。它对IE6和Firefox1.5都有着非常良好的支持。 功能方面虽然不能称得上是最强,但绝对能够满足大部分网站的需求,并且功能配置灵活简单。另一特点是加载速度非常快&#x…