esp freertos_如何开始使用FreeRTOS和ESP8266
esp freertos
by Denis Nuțiu
丹尼斯·努尤(Denis Nuțiu)
如何开始使用FreeRTOS和ESP8266 (How to get started with FreeRTOS and ESP8266)
Recently, I purchased a NodeMCU from AliExpress for about $4. The reason I did this was to find out what all the fuss is about with ESP8266.
最近,我以4美元左右的价格从速卖通购买了一个NodeMCU。 我这样做的原因是要弄清楚ESP8266有什么大惊小怪的。
NodeMCU is an open source IoT platform. It includes firmware which runs on the ESP8266 Wi-Fi SoC from Espressif Systems, and hardware which is based on the ESP-12 module.
NodeMCU是一个开源物联网平台。 它包括运行在Espressif Systems的ESP8266 Wi-Fi SoC上的固件以及基于ESP-12模块的硬件。
Compared to the Arduino UNO, my ESP8266 totally knocks it out of the park when it comes to CPU power and price.
与Arduino UNO相比,我的ESP8266在CPU功耗和价格上完全无法使用。
The ESP8266 is 500% faster and 82% cheaper than the Arduino. The ESP8266 also has WiFi connectivity.
ESP8266比Arduino快500%,便宜82%。 ESP8266还具有WiFi连接。
I was very surprised when I visited the Espressif website for the ESP8266. There’s lots of documentation and resources that you can use. For example, there’s an Android application which tells your ESP8266 to connect to your WiFi. The app sends the SSID and password as packets, the ESP8266 sniffs them, and then it connects to your WiFi. This is called SmartConfig, and was invented by Texas Instruments.
当我访问Espressif网站上的ESP8266时,我感到非常惊讶。 您可以使用很多文档和资源。 例如,有一个Android应用程序告诉您ESP8266连接到您的WiFi。 该应用程序将SSID和密码作为数据包发送,ESP8266嗅探它们,然后连接到您的WiFi。 这称为SmartConfig,由Texas Instruments发明。
In this article, I will guide you to setup and run the Smart Config example from the Espressif RTOS SDK.
在本文中,我将指导您从Espressif RTOS SDK设置和运行Smart Config示例。
这是您需要的东西: (Here’s the things you’ll need:)
- A modern computer.一台现代计算机。
- A NodeMCU board with ESP12-E带有ESP12-E的NodeMCU板
VirtualBox (https://www.virtualbox.org/wiki/Downloads)
VirtualBox( https://www.virtualbox.org/wiki/Downloads )
Ubuntu Server LTS (https://www.ubuntu.com/download/server)
Ubuntu Server LTS( https://www.ubuntu.com/download/server )
配置VirtualBox进行开发 (Configuring VirtualBox for development)
Download VirtualBox and install Ubuntu Server. This should be easy to do, but if you don’t know how, Google it or have a look at this graphic step by step guide. Installing an OS is a nice skill to have. (Tip: When VirtualBox prompts you to select the disk, make it dynamically allocated and at least 50GB in size. This will save you some headaches further down the line.)
下载VirtualBox并安装Ubuntu Server。 这应该很容易做到,但是如果您不知道如何操作,请通过Google或查看此图形逐步指南 。 安装操作系统是一项不错的技能。 (提示:当VirtualBox提示您选择磁盘时,请对其进行动态分配,并使其至少具有50GB的大小。这将使您省去一些麻烦。)
- Make sure that you can access the internet from within the virtual machine and configure the DNS server:确保可以从虚拟机内部访问Internet并配置DNS服务器:
To configure the DNS server, have a look at this example.
要配置DNS服务器,请看以下示例 。
Example:
dns-nameservers 8.8.8.8 8.8.4.4If you can ping Google, then you’re good to go!示例:
dns-nameservers 8.8.8.8 8.8.4.4如果您可以ping通Google,那么您就可以了!
3. (Optional) Install OpenSSH and Samba server. This will make your life much easier.
3.(可选)安装OpenSSH和Samba服务器。 这将使您的生活更加轻松。
4. (Optional) Enable port forwarding. In order to SSH directly into your virtual machine, you need to enable port forwarding. For example, to map the port 2222 on your host machine to the port 22 of your virtual machine.
4. (可选)启用端口转发。 为了直接通过SSH进入您的虚拟机,您需要启用端口转发。 例如,要将主机上的端口2222映射到虚拟机的端口22 。
If you have enabled port forwarding, you can now SSH into your virtual machine from your Host machine as in the figure below.
如果启用了端口转发,则现在可以从主机计算机SSH到虚拟机中,如下图所示。
Note: If you’re on Windows, you need Putty in order to SSH into the virtual machine.
注意:如果您使用的是Windows,则需要Putty才能通过SSH进入虚拟机。
5. Plug in your NodeMCU and execute the following command:
5.插入您的NodeMCU并执行以下命令:
tail -f /var/log/kern.log
tail -f /var/log/kern.log
This should reveal to you that the device has been identified as /dev/ttyUSB0. If nothing happens, then you need to add the USB to the virtual machine. After adding the USB, unplug and plug your device in again.
这应该向您显示该设备已被标识为/ dev / ttyUSB0。 如果没有任何React,则需要将USB添加到虚拟机。 添加USB后,拔出插头并再次插入设备。
If you’ve reached this point and every thing is working, congratulations! You’re now ready to compile the SDK and run the SmartConfig example. You can even shoot me a tweet at https://twitter.com/metonymyqt
如果您到了这一步并且一切正常,那么恭喜 ! 现在,您可以编译SDK并运行SmartConfig示例。 您甚至可以在https://twitter.com/metonymyqt上给我发一条推文
编译SDK并刷新开发板 (Compiling the SDK and flashing the board)
- Install the required packages (as below). This info is also available on the SDK’s readme.md.安装所需的软件包(如下所示)。 此信息也可在SDK的readme.md中获得。
sudo apt-get install make unrar-free autoconf automake libtool gcc g++ gperf flex bison texinfo gawk ncurses-dev libexpat-dev python-dev python python-serial sed git unzip bash help2man wget bzip2 libtool-bin2. Create a new folder and navigate into it: mkdir Development && cd Development
2.创建一个新文件夹并浏览到其中: mkdir Development && cd Development
3. Clone the Open SDK: https://github.com/pfalcon/esp-open-sdk
3.克隆Open SDK: https : //github.com/pfalcon/esp-open-sdk
git clone --recursive https://github.com/pfalcon/esp-open-sdk.git
git clone --recursive https://github.com/pfalcon/esp-open-sdk.git
3. Run make: make
3.运行make: make
Warning: This step will take a while to finish so please be patient. On my virtual machine it completed after 50 minutes. On yours it might take more or less, but before you run, make make sure that you’re connected to the internet and DNS is properly configured. The best way to check this is to execute a ping to Google or some other site if Google is blocked in your region.
警告:此步骤需要一段时间才能完成,因此请耐心等待。 在我的虚拟机上,它在50分钟后完成。 在您的计算机上,可能需要或多或少的时间,但是在运行之前,请确保已连接到Internet并正确配置了DNS 。 最好的检查方法是对您所在地区的Google或其他网站执行ping操作。
If your ping is successful, you can minimize the windows and watch an episode of your favorite TV show. Come back after about 40 minutes (but make sure your computer doesn’t go to sleep).
如果ping成功,则可以最小化窗口并观看自己喜欢的电视节目的一集。 大约40分钟后再回来(但请确保您的计算机不会进入睡眠状态)。
After the SDK has been built successfully, you’ll see a message telling you to put something in your path. To do so, execute the following:
成功构建SDK之后,您会看到一条消息,提示您将某些内容放入路径中。 为此,请执行以下操作:
echo 'export PATH=/home/denis/Development/esp-open-sdk/xtensa-lx106-elf/bin:$PATH' >> ~/.profileThe command will append the string to the ~/.profile file. Now please run the following command:
该命令会将字符串追加到〜/ .profile文件。 现在,请运行以下命令:
xtensa-lx106-elf-gcc --version
xtensa-lx106-elf-gcc --version
If the command executes successfully, then you’re good to go!
如果命令成功执行,那么一切就好了!
4. Test your board
4.测试您的板子
Plug your NodeMCU and run lsusb to verify that your device is connected. After that, run esptool.py chip_id. You should now see the board’s chip id.
插入NodeMCU并运行lsusb,以验证您的设备已连接。 之后,运行esptool.py chip_id 。 现在,您应该看到主板的芯片ID。
5. Clone ESP8266_RTOS_SDK
5.克隆ESP8266_RTOS_SDK
git clone https://github.com/espressif/ESP8266_RTOS_SDK.git6. Export the SDK path and SDK/BIN path using the commands below.
6.使用以下命令导出SDK路径和SDK / BIN路径。
echo 'export SDK_PATH=/home/denis/Development/ESP8266_RTOS_SDK' >> ~/.profileecho 'export BIN_PATH=/home/denis/Development/ESP8266_RTOS_SDK/bin' >> ~/.profile7. Compile the SmartConfig example
7.编译SmartConfig示例
cd /home/denis/Development/ESP8266_RTOS_SDK/examples/smart_config/chmod +x ./gen_misc.sh./gen_misc.shNow accept the default values until you’re asked for SPI_SIZE_MAP. This is where you select 4 because the NodeMCU has a flash size of 32Mbit and this translates to 4MB. You can also select SPI_SPEED 3=80Mhz
现在接受默认值,直到要求您提供SPI_SIZE_MAP。 在此处选择4,因为NodeMCU的闪存大小为32Mbit,并且转换为4MB。 您也可以选择SPI_SPEED 3 = 80Mhz
You’ll see something like this:
您会看到以下内容:
!!!SDK_PATH: /home/denis/Development/ESP8266_RTOS_SDKBIN_PATH: /home/denis/Development/ESP8266_RTOS_SDK/binNo boot needed.Generate eagle.flash.bin and eagle.irom0text.bin successully in BIN_PATHeagle.flash.bin — — — →0x00000eagle.irom0text.bin — →0x20000!!!8. Flash the board
8.刷板
cd $BIN_PATHesptool.py erase_flashesptool.py write_flash 0x00000 $BIN_PATH/eagle.flash.bin 0x20000 $BIN_PATH/eagle.irom0text.bin 0x3FC000 $BIN_PATH/esp_init_data_default.binNow, if you reset the board, you should see no LED blinking.
现在,如果您重置电路板,则应该看不到LED闪烁。
9. Use the Phone Application
9.使用电话应用程序
Android Application
Android应用
iPhone Application
iPhone应用
Open the Application, make sure that you’re connected to a WiFi AP, enter your password, and press confirm. After a few seconds the ESP8266 should connect to your AP. That’s it. Congratulations for reaching the end!
打开应用程序,确保您已连接到WiFi AP,输入密码,然后按确认。 几秒钟后,ESP8266应该连接到您的AP。 而已。 恭喜您成功!
If you want to develop more using the ESP8266-RTOS-SDK, please visit the official websites. You’ll find a lot of resources and documentation there. Also, please take a look at the other examples found in the SDK folder.
如果您想使用ESP8266-RTOS-SDK进行更多开发,请访问官方网站。 您会在那里找到很多资源和文档。 另外,请查看SDK文件夹中的其他示例。
Thank you very much for your time reading this. If you want to reach out to me, you can do so on Twitter: MetonymyQT
非常感谢您阅读本文。 如果您想与我联系,可以在Twitter上进行: MetonymyQT
资源资源 (Resources)
ESP8266 Overview
ESP8266概述
ESP8266 Resources
ESP8266资源
FreeRTOS Website
FreeRTOS网站
翻译自: https://www.freecodecamp.org/news/how-to-get-started-with-freertos-and-esp8266-7a16035ddd71/
esp freertos
相关文章:

[SCOI2007]修车
题目描述 同一时刻有N位车主带着他们的爱车来到了汽车维修中心。维修中心共有M位技术人员,不同的技术人员对不同的车进行维修所用的时间是不同的。现在需要安排这M位技术人员所维修的车及顺序,使得顾客平均等待的时间最小。 说明:顾客的等待时…

[微信小程序]时间戳转日期
有问题可以扫码加我微信,有偿解决问题。承接小程序开发。 微信小程序开发交流qq群 173683895 、 526474645 ; 正文: // util.js //时间戳转换成日期时间 function js_date_time(unixtime) {var dateTime new Date(parseInt(unixtime) …
React模式:集中式PropTypes
通过集中化PropType避免重复自己 (Avoid repeating yourself by centralizing PropTypes) There are three popular ways to handle types in React: PropTypes, TypeScript and Flow. This post is about PropTypes, which are currently the most popular.在React中有三种流行…

Java Class SecurityManager
# 前言 简单了解 SecurityManager。具体查阅 API。 # What 它是 Java 沙盒模型控制安全的重要一个环节。它是 Java 的一个类。下面一段话源于SecurityManager API: The security manager is a class that allows applications to implement a security policy. It a…
微信小程序,对象转换成数组
有问题可以扫码加我微信,有偿解决问题。承接小程序开发。 微信小程序开发交流qq群 173683895 、 526474645 ; 正文: 对象转数组: var jiu res.data.k4.f3var nArr [];for (var i in jiu){nArr.push(jiu[i]);}console.log(jiu);consol…
sql 事务使用
BEGIN TRAN Tran_Money --开始事务DECLARE tran_error int; SET tran_error 0;BEGIN TRY UPDATE tb_Money SET MyMoney MyMoney - 30 WHERE Name 刘备;SET tran_error tran_error ERROR;--测试出错代码,看看刘备的钱减少,关羽的钱是否会增加--SE…
一群算法_树遍历解释:他们就像一群懒惰的学生,试图欺骗他们的考试
一群算法by Sachin Malhotra由Sachin Malhotra 树遍历解释:他们就像一群懒惰的学生,试图欺骗他们的考试 (Tree Traversals explained: They’re like a class of lazy students trying to cheat on their exam) Imagine that you are enrolled in a mat…

微信小程序转发 分享 打电话功能,完整代码附效果图
微信小程序开发交流qq群 581478349 承接微信小程序开发。扫码加微信。 正文: 按钮绑定在页面内发起转发事件onShareApp:(注意这里是button 并且给他设置了open-type"share" 属性) <button classbottom_1 bottom_1_zf open-type"share" bi…
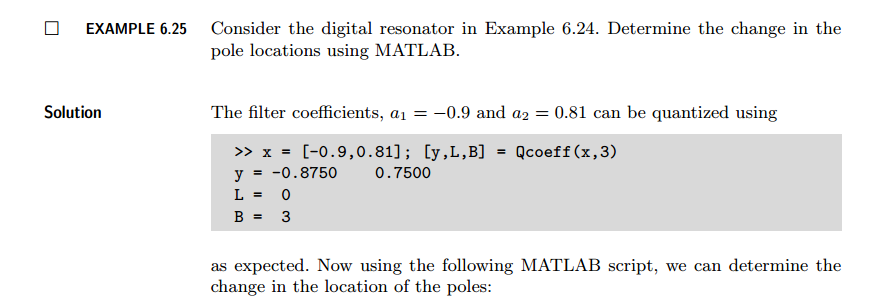
《DSP using MATLAB》示例 Example 6.25
代码: % x [-0.9, 0.81]; [y, L, B] QCoeff(x, 3) % Unquantized parameters r 0.9; theta pi/3; a1 -2*r*cos(theta); a2 r*r; p1 r*exp(j*theta); p2 p1;% Quantized parameters: N 3; [ahat, L, B] QCoeff([a1, a2], 3); rhat sqrt(ahat(2)); thetah…
sqlserver查询自定义的函数
1)sp_helptext同样适应用自定义函数 2)sys.sql_modules表也可以查 查看函数的源代码: exec sp_helptext 函数名转载于:https://www.cnblogs.com/toSeeMyDream/p/4195030.html
辍学的名人_我辍学去追求成为网络开发人员和设计师的梦想
辍学的名人by Carlos Sz由Carlos Sz 我辍学去追求成为网络开发人员和设计师的梦想 (I dropped out of college to pursue my dreams of being a web developer and designer) When I was 14, I discovered HTML. Thanks to my computer science teacher at school. And from t…
Java中的static关键字的用法
1.静态方法 static:通常在一个类中定义一个方法为static,那就是说,无需本类的对象即可调用此方法 声明为static的方法有以下几条限制: (1)它们仅能调用其他的static方法。 (2)它们只…
[微信小程序]上传单张和多张图片
微信小程序开发交流qq群 173683895 承接微信小程序开发。扫码加微信。 上传单张图片并展示, <button bindtap"upimg" classjia_img >上传</button> <image src"{{tempFilePaths[0]}}"></image> data{ tempFilePaths:[]; },u…
“猪”飞起来了吗
(让我们用代码改变世界,也让代码改变自己的生活) 台风来了,猪都能飞起来。 这是投资者对A股近期走势最生动的形容。当成交量不断的刷新纪录,直冲1.2万亿天量成交时,股指的高度也在不断的被刷新,…
微信公众号开发本地环境开发_如何在5分钟内使HTTPS在本地开发环境上工作
微信公众号开发本地环境开发Almost any website you visit today is protected by HTTPS. If yours isn’t yet, it should be. Securing your server with HTTPS also means that you can’t send requests to this server from one that isn’t protected by HTTPS. This pos…

pcntl_fork 导致 MySQL server has gone away 解决方案
pcntl_fork 前连数据库,就会报 MySQL server has gone away 错误。原因是子进程会继承主进程的数据库连接,当mysql返回数据时,这些子进程都可以通过这个连接读到数据,造成数据错乱。 该操作数据库的地方还是要操作数据库ÿ…
[微信小程序]滚动选择器
微信小程序开发交流qq群 581478349 承接微信小程序开发。扫码加微信。 正文: <view class"section"><view class"section__title">普通选择器</view><picker bindchange"bindPickerChange" value"{{ind…
北航MOOC客户端
我们的团队作业终于完成了,欢迎下载使用我们的北航MOOC手机客户端软件(Android端)——北航学堂,学习北航的公开课程。 安装包下载地址: http://pan.baidu.com/s/1jGvH7fS 团队发布博客 http://www.cnblogs.com/sevens/…
大学毕业没有实习经历_我是如何在大学毕业后没有实习的情况下获得第一份开发人员工作的...
大学毕业没有实习经历by Tim Park蒂姆帕克(Tim Park) 我是如何在大学毕业后没有实习的情况下获得第一份开发人员工作的 (How I got my first developer job with no internships straight out of college) 5个关键要素,将在求职中发挥重要作用 (5 key elements tha…

java的线程中断
在java中中断线程可以使用interrupt()函数。此函数虽然不能终止线程的运行,但是可以改变线程的状态为true 即:isInterrupted()的值返回为true 注意:当函数调用了已经被阻塞的线程后,被阻塞的线程将会接收到…
验证表单不为空
有问题可以扫码加我微信,有偿解决问题。承接小程序开发。 微信小程序开发交流qq群 173683895 、 526474645 ; 正文: 目的 : 验证表单是否为空,如果其中一个input的值为空就alert提示它的 name的值不能为空 , <!DOCTYPE html> &…

java中文乱码解决之道(二)—–字符编码详解:基础知识 + ASCII + GB**
原文出处:http://cmsblogs.com/?p1412 在上篇博文(java中文乱码解决之道(一)—–认识字符集)中,LZ简单介绍了主流的字符编码,对各种编码都是点到为止,以下LZ将详细阐述字符集、字符…
swift视图容器_如何使用IBDesignable在Swift中创建漂亮的,可重复使用的渐变视图...
swift视图容器by Lee Dowthwaite通过李道思韦特 如何使用IBDesignable在Swift中创建漂亮的,可重复使用的渐变视图 (How to create a beautiful, reusable gradient view in Swift with IBDesignable) This tutorial will demonstrate how to create a versatile, I…

android 以不规则图片为边框切割另外图片
转自:http://blog.sina.com.cn/s/blog_474928c90101dkvf.html 最近工作上遇到了一个将一个图片按照相框进行裁剪的问题,花了一个下午研究了下,在此整理一下,以便后用。 (相片) …
L3-010. 是否完全二叉搜索树
L3-010. 是否完全二叉搜索树 时间限制400 ms内存限制65536 kB代码长度限制8000 B判题程序Standard作者陈越将一系列给定数字顺序插入一个初始为空的二叉搜索树(定义为左子树键值大,右子树键值小),你需要判断最后的树是否一棵完全二…
[微信小程序]计算自己手机到指定位置的距离
微信小程序开发交流qq群 581478349 承接微信小程序开发。扫码加微信。 正文: 目的: 根据目的地的坐标计算自己手机的位置离目的地的距离的 核心思路: 后续操作必须等所有异步请求都返回了才能继续 使用Promise() const qqmap require("../../utils/qqma…
ai css 线条粗细_如何训练AI将您的设计模型转换为HTML和CSS
ai css 线条粗细by Emil Wallner埃米尔沃尔纳(Emil Wallner) 如何训练AI将您的设计模型转换为HTML和CSS (How you can train an AI to convert your design mockups into HTML and CSS) Within three years, deep learning will change front-end development. It will increa…
Android Layer List 使用实现实例
Layer List是Anroid中的一种图形的方式,它是通过叠加若干张图片的方式来形成最终的图片,最终的图片在代码中表现为一个LayerDrawable对象。 效果图:第一张是默认显示,第二张为按改变按钮后的图 下面通过一个实例来说明:…
Promise - js异步控制神器
微信小程序开发交流qq群 581478349 承接微信小程序开发。扫码加微信。 正文: 首先给来一个简单的demo看看Promise是怎么使用的: <!DOCTYPE html> <html><head><meta charset"utf-8"><script type"text/ja…

lab_2 Selenium
1、安装SeleniumIDE插件 添加组件-搜索Selenium IDE 安装后重启浏览器可以看到工具中存在此IDE 2、学会使用SeleniumIDE录制脚本和导出脚本 工具--Selenium IDE,得到界面如图 以百度搜索天津大学为例,如下图 红色的是录制按钮,base url是当前…