如何征服Webpack 4并构建一个出色的React应用
This article has been outdated with the new release for babel, kindly check the updated article “How to combine Webpack 4 and Babel 7 to create a fantastic React app”, last updated October 13th, 2018
本文与babel的新版本已经过时,请查看更新的文章``如何结合Webpack 4和Babel 7来创建出色的React应用程序 '',最新更新于2018年10月13日
In this article, I’ll go through how to set up a React application using Webpack 4. By the end of this tutorial, you’ll know on how to hot reload your application every time you press ctrl + s in your editor of choice.
在本文中,我将介绍如何使用Webpack 4设置React应用程序。在本教程结束时,您将了解如何在每次按ctrl + s时热重载应用程序ctrl + s 在您选择的编辑器中。
I use Visual Studio Code (VS Code), and I love it. It is light weight, flexible, and the best part is it’s free. I love free. If you haven’t tried it out, give it a try.
我使用Visual Studio代码 (VS代码),而且我喜欢它。 它重量轻,灵活,并且最好的部分是免费的。 我爱自由。 如果您还没有尝试过,请尝试一下。
我们的目标 (Our Goal)
Our goal for this tutorial is to create a React app, with some cool features like async/await. I won’t be using react-router version 4 in this tutorial, because I mainly want to focus on how to play with Webpack.
本教程的目标是创建一个React应用程序,并具有一些异步/等待等酷功能。 在本教程中,我不会使用第4版react-router ,因为我主要希望专注于如何使用Webpack。
So by the end of this article, you will be good at:
因此,到本文结尾,您将擅长:
Setting up a development environment, with hot reloading using webpack-dev-server
设置开发环境,并使用webpack-dev-server进行热重载
- Adding SCSS and HTML support in your code with webpack使用webpack在代码中添加SCSS和HTML支持
- Adding support for features like try/catch, async/await and rest operator添加对try / catch,async / await和rest运算符等功能的支持
- Creating a production build — optimized and ready for deployment创建生产版本-优化并准备部署
- Setting up different environments in your code like stage, demo and production在代码中设置不同的环境,例如舞台,演示和生产
Guys I am telling you that if Webpack seems a bit hard, after this that won’t be the case anymore.
伙计们,我告诉你,如果Webpack看起来有些困难,那么以后就不再是这种情况了。
开发环境 (Development Environment)
制作文件夹 (Make the Folder)
Make a folder called tutorial in your directory.
在目录中创建一个名为tutorial的文件夹。
创建package.json (Create package.json)
Open up your terminal, and go into the tutorial folder.
打开终端,然后进入tutorial文件夹。
Type:
类型:
npm init -yThis will create a package.json file in your tutorial folder.
这将创建一个package.json 文件放在tutorial文件夹中。
The file will look something like this:
该文件将如下所示:
创建index.js文件 (Create the index.js file)
I’ll create a folder called src in my tutorial folder.
我将在tutorial文件夹中创建一个名为src文件夹。
In the src folder, I’ll create a file called index.js.
在src文件夹中,我将创建一个名为index.js的文件。
捆绑代码 (Bundle the code)
I know this isn’t much, but bear with me. Things will get interesting pretty soon.
我知道这不多,但请多多包涵。 事情很快就会变得有趣。
Now in order to bundle our code, we need to set up some configurations so that Webpack can know where to bundle the code from. For that we need to install some dependencies.
现在,为了捆绑我们的代码,我们需要设置一些配置,以便Webpack可以知道从哪里捆绑代码。 为此,我们需要安装一些依赖项。
So let’s start by typing:
因此,让我们开始键入:
npm i --save-dev webpack webpack-cli webpack-dev-server @babel/core @babel/preset-env @babel/preset-react @babel/preset-stage-2 babel-loader@^8.0.0-betaWOW! I know that was a lot of dependencies. Let’s recap why we needed these in the first place.
哇! 我知道那是很多依赖性。 让我们回顾一下为什么我们首先需要这些。
webpack: We need Webpack to bundle our code.
webpack :我们需要Webpack来捆绑我们的代码。
webpack-cli: We will be using some CLI features for Webpack to make our life easier while writing some scripts.
webpack-cli :我们将为Webpack使用一些CLI功能,以在编写某些脚本时使我们的生活更轻松。
webpack-dev-server: I will create a server using the webpack-dev-server package. This is only meant to be used in the development environment, and not for production. This means while developing and working on my code, I don’t need a separate server like Node.js.
webpack-dev-server :我将使用webpack-dev-server包创建服务器。 这仅用于开发环境,而不用于生产。 这意味着在开发和处理代码时,不需要像Node.js这样的单独服务器。
@babel/preset-env: This package behaves exactly the same as @babel/preset-latest (or @babel/preset-es2015, @babel/preset-es2016, and @babel/preset-es2017 together). Cool right?
@ babel / preset-env :此软件包的行为与@ babel / preset-latest完全相同(或一起@ babel / preset-es2015,@ babel / preset-es2016和@ babel / preset-es2017)。 酷吧?
@babel/preset-react: The name of the package sounds clear — this will add support for react while we bundle our code.
@ babel / preset-react : 包的名称听起来很清晰-这将在我们捆绑代码时增加对react的支持。
@babel/preset-stage-2: This will add stage-2 feature of the Ecma TC39 proposal. You can read more about it here.
@ babel / preset-stage-2 : 这将添加Ecma TC39提案的第二阶段功能。 您可以在此处了解更多信息。
@babel/loader: This is a dependency of Webpack. It allows transpiling Babel using Webpack.
@ babel / loader :这是Webpack的依赖项。 它允许使用Webpack转换Babel。
@babel/core: This is a dependency for the @babel/loader itself.
@ babel / core :这是@ babel / loader本身的依赖项。
So now you know a little bit about what we installed and why.
现在,您对我们安装了什么以及为什么安装了一些了解。
Your package.json file should be looking something like this:
您的package.json文件应如下所示:
创建一个Babel文件 (Create a Babel file)
We also need to add a new file called .babelrc , so let’s create it as well.
我们还需要添加一个名为.babelrc的新文件,因此我们.babelrc创建它。
In your main folder directory, create a file .babelrc and the following code snippet. This will help Webpack when bundling your code and converting those Sassy codes that we will write.
在主文件夹目录中,创建文件.babelrc和以下代码片段。 这将在打包您的代码并转换我们将要编写的Sassy代码时帮助Webpack。
设置Webpack 4 (Set up Webpack 4)
Okay so the boring part has been done. Let’s move onto the main part of this tutorial: setting up Webpack 4.
好吧,无聊的部分已经完成。 让我们进入本教程的主要部分:设置Webpack 4。
To quote from Star Trek:
引用星际迷航:
He tasks me. He tasks me; and I shall have him. I’ll chase him ’round the moons of Nibia and ’round the Antares maelstrom and ’round Perdition’s flames before I give him up.
他给我任务。 他的任务我; 我将拥有他。 在我放弃他之前,我将在“尼比亚的卫星周围,在安塔雷斯的漩涡中以及在“灭亡”周围的火焰中 ”追逐他。
So let’s create a new folder called config and inside that folder let’s create a file called webpack.base.config.js.
因此,我们创建一个名为config的新文件夹,并在该文件夹内创建一个名为webpack.base.config.js的文件。
The reason I call this file .base is because this contains all the common features we will use in our development and different production environments. Changes in this one file will reflect in all environments. Again if this doesn’t make sense now, guys, bear with me for a couple more minutes. It will start making sense.
我之所以将该文件.base是因为它包含了我们将在开发和不同生产环境中使用的所有常用功能。 此文件的更改将反映在所有环境中。 再说一次,如果现在没有意义的话,伙计们,请多忍耐我几分钟。 它将开始有意义。
Without further waiting, in your config/webpack.base.config.js file write these lines of code:
无需进一步等待,在config/webpack.base.config.js文件中编写以下代码行:
The module.rules define the set of rules that Webpack will apply to certain file extensions.
module.rules 定义Webpack将应用于某些文件扩展名的规则集。
In our rules array, we define a test that tells Webpack what extension to use. Here I am telling Webpack to apply a certain rule to only .js based files.
在rules数组中,我们定义一个test 告诉Webpack使用什么扩展名。 在这里,我告诉Webpack将特定规则仅应用于.js 基于文件。
Next comes exclude. While bundling, I don’t want Webpack to transpile everything. This will become very slow, especially when I include my node_modules folder as well.
接下来是exclude 。 捆绑时,我不希望Webpack移植所有内容。 这将变得非常慢,特别是当我包含我的node_modules时 文件夹。
So I will exclude it using the exclude property in the rule set. The last one, which is the most important one, is the use.loader property. Here I give it the value of babel-loader. What babel-loader does is use our defined presets that we defined in our .babelrc file to transpile all files with a .js extension.
所以我将使用exclude将其exclude 规则集中的属性。 最后一个(最重要的一个)是use.loader 属性。 在这里,我将其赋予babel-loader值。 babel-loader所做的是使用我们在.babelrc定义的预设 文件以.js转换所有文件 延期。
So far so good, yeah? We are more then halfway there…
到目前为止一切都很好,是吗? 我们到了一半了……
Also one more thing: Webpack 4 sets the src folder as the default entry point and the dist folder as the default output point of your bundled result. Cool, right?
还有一件事:Webpack 4将src文件夹设置为捆绑结果的默认入口点,并将dist文件夹设置为捆绑结果的默认输出点。 酷吧?
Go into your tutorial folder and run this script. This will bundle all your code and run that code in the browser:
进入您的tutorial文件夹并运行此脚本。 这将捆绑所有代码并在浏览器中运行该代码:
Adeel@Frodo MINGW64 ~/Desktop/article/tutorial$ node_modules/.bin/webpack-dev-server --mode development --config config/webpack.base.config.js --open --hot --history-api-fallbackThe basis for this script is that it will combine all of our code in the src directory and run it on the browser at this address:
该脚本的基础是它将所有代码合并到src目录中,并在浏览器上的以下地址运行:
http://localhost:8080/HTML (HTML)
So when we ran the script it compiled and opened up the browser. Now it had the code that we wrote in our index.js file, but it didn’t have an .html file in which it could run it.
因此,当我们运行脚本时,它将编译并打开浏览器。 现在它具有我们在index.js编写的代码 文件,但它没有可以运行该文件的.html文件。
We need to add an html-webpack-plugin inside our webpack.base.config.js file, and an index.html file in our src directory.
我们需要在webpack.base.config.js文件内添加html-webpack-plugin,并在src目录中添加index.html文件。
First install the dependency for transpiling HTML with Webpack:
首先安装用于通过Webpack转换HTML的依赖项:
npm i --save-dev html-webpack-pluginYour package.json file should look like this:
您的package.json文件应如下所示:
Now let’s add an HTML file in our src directory and name it index.html:
现在,让我们在src目录中添加一个HTML文件,并将其命名为index.html :
Our project directory should look like this now:
我们的项目目录现在应该如下所示:
While we are at it, let’s add that html-webpack-plugin in our webpack.base.config.js file.
在此过程中,让我们添加html-webpack-plugin 在我们的webpack.base.config.js文件中。
So we added something new to our webpack config file — did you notice? I am just messing with you. I know you did.
因此,我们在webpack配置文件中添加了一些新内容-您注意到了吗? 我只是在惹你。 我知道你做到了
Now what does this plugin do? Well, it’s very simple. Plugins, put simply, add abilities to your Webpack. You can read more about them here.
现在这个插件做什么? 好吧,这很简单。 简而言之,插件为Webpack添加了功能。 您可以在此处阅读有关它们的更多信息。
Now I have added just this one plugin called html-webpack-plugin. The purpose of this plugin is very simple: it creates HTML files to serve your bundle file(s).
现在,我仅添加了一个名为html-webpack-plugin的插件 。 这个插件的用途非常简单:它创建HTML文件来服务您的捆绑文件。
Ok so let’s run that script again (fingers crossed). “I hope no errors this time,” said every developer once.
好的,让我们再次运行该脚本(手指交叉)。 “我希望这次没有错误,”每个开发人员都说过一次。
Adeel@Frodo MINGW64 ~/Desktop/article/tutorial$ node_modules/.bin/webpack-dev-server --mode development --config config/webpack.base.config.js --open --hot --history-api-fallbackThis will compile and open up your browser in the available default port. Mine is:
这将在可用的默认端口中编译并打开浏览器。 我的是:
http://localhost:8080/Blue part: The blue part is simply where I put in my meta tags and defined a title for the app.
蓝色部分:蓝色部分只是我放置我的元标记并为应用定义标题的地方。
Yellow part: The yellow part highlighted is the hard coded part that we wrote in our index.html file. This is where our future React app will reside.
黄色部分:突出显示的黄色部分是我们在index.html文件中编写的硬编码部分。 这是我们未来的React应用程序将驻留的地方。
Red Part: The part where I underlined in red is the most interesting part. We never wrote this in our index.html file, so where did it come from?
红色部分:我用红色强调的部分是最有趣的部分。 我们从未在index.html文件中编写此代码,那么它是从哪里来的呢?
Webpack is very smart. It took that file in your index.js , bundled it all up nicely, and added it up all neatly in the file called main.js . Then it injected it in our index.html file. Super Cool!
Webpack非常聪明。 将该文件放入index.js ,将其很好地捆绑在一起,并将其整齐地添加到名为main.js的文件中。 然后将其注入到我们的index.html文件中。 超酷!
添加React (Add React)
Let’s add React and get the party going. For that, we need to install some dependencies.
让我们添加React并开始聚会。 为此,我们需要安装一些依赖项。
Let’s start with:
让我们开始:
npm i react react-dom --saveNow go in your index.js file and write:
现在进入您的index.js文件并编写:
Let’s run that script again:
让我们再次运行该脚本:
Adeel@Frodo MINGW64 ~/Desktop/article/tutorial$ node_modules/.bin/webpack-dev-server --mode development --config config/webpack.base.config.js --open --hot --history-api-fallbackThis will compile and open up your browser in the default port. Mine is:
这将在默认端口编译并打开浏览器。 我的是:
http://localhost:8080/Wow, did you see what opened in your browser? Yes! You did! Your first Webpack configured React app.
哇,您看到浏览器中打开了什么吗? 是! 你做到了! 您的第一个Webpack配置的React应用程序。
Now there is still loads of stuff to do. But man oh man. Good job!
现在仍然有很多工作要做。 但是,天哪。 做得好!
Now here is the fun part. Go in your index.js file and change the title to anything of your choice. Hit ctrl + s and check your browser. It automatically updated your content.
现在,这是有趣的部分。 进入index.js文件,并将标题更改为您选择的任何内容。 按ctrl + s并检查您的浏览器。 它会自动更新您的内容。
Cool, right?
酷吧?
回顾一下 (Let’s Recap)
We have added a development environment. We added hot module reloading. We added support for .js files with React code. In the next part, we’ll add SCSS support in our Webpack.
我们添加了一个开发环境。 我们添加了热模块重装。 我们使用React代码添加了对.js文件的支持。 在下一部分中,我们将在Webpack中添加SCSS支持。
SCSS (SCSS)
For SCSS support, we need to add some more dependencies in our package.json file.
为了支持SCSS,我们需要在package.json file .添加更多依赖项package.json file .
Install the following packages:
安装以下软件包:
npm i --save-dev style-loader css-loader sass-loader node-sass extract-text-webpack-plugin@^4.0.0-beta.0sass-loader: This plugin will help us compile SCSS to CSS.
sass-loader : 这个插件将帮助我们将SCSS编译为CSS。
node-sass: The sass-loader required node-sass as a peer dependency.
node-sass : sass-loader必须将node-sass作为对等依赖项。
css-loader: The CSS loader interprets @import and url() like import/require() and will resolve them.
css-loader :CSS loader会像import/require()一样解释@import和url()并将解析它们。
style-loader: Adds CSS to the DOM by injecting style tag.
style-loader :通过注入样式标签将CSS添加到DOM。
extract-text-webpack-plugin: It moves all the required .css modules into a separate CSS file.
extract-text-webpack-plugin :它将所有必需的.css模块移动到单独CSS文件中。
So your styles are no longer in-lined into the JavaScript bundle, but are in a separate CSS file (styles.css). If your total stylesheet volume is big, it will be faster because the CSS bundle is loaded in parallel to the JavaScript bundle.
因此,您的样式不再内联到JavaScript包中,而是在单独CSS文件中( styles.css )。 如果您的样式表总容量很大,则会更快,因为CSS包与JavaScript包并行加载。
Now that our dependencies have been installed, let’s make some changes to our Webpack config file.
现在我们的依赖项已经安装,让我们对Webpack配置文件进行一些更改。
Let’s understand what we did here first. In our module.rules we have added a new rule. What that rule does is apply some bundling to all .scss files. I hope that made sense. Inside our use , we tell it extract some information.
让我们先了解一下我们在这里做了什么。 在我们的module.rules我们添加了一条新规则。 该规则的作用是对所有.scss文件进行捆绑。 我希望这是有道理的。 在我们的use ,我们告诉它提取一些信息。
Let’s get a bit deeper, and I’ll try to make it as simple as I can.
让我们更深入一点,我将尝试使其尽可能简单。
{ fallback: "style-loader", use: "css-loader!sass-loader" }Try reading this piece of code from bottom-to-top.
尝试从头到尾阅读这段代码。
Get all SASS code — .scss — using sass-loader and then convert it into CSS code using css-loader. Then take all that CSS code and inject it into our DOM with the <style> tag by using style-loader.
使用sass-loader获取所有SASS代码-.scss 然后使用css-loader.将其转换为CSS代码css-loader. 然后, using style-样式加载器将所有这些CSS代码添加到带有<style>标记的DOM中。
Now this entire object is surrounded by:
现在,整个对象被包围:
use: ExtractTextPlugin.extract({ ... })This ExtractTextPlugin.extract({ }) will take all of our CSS code that was suppose to be injected in our DOM and combine all of the CSS code and bundle it in a single file called style.css.
此ExtractTextPlugin.extract({ }) 将采用我们假定要注入到DOM中的所有CSS代码,并将所有CSS代码组合在一起,并将其捆绑在一个名为style.css文件中。
The huge benefit of this approach is that if our total style sheet volume is big while loading it up from the browser, it will load it in parallel with our JavaScript code. This will make our site download faster.
这种方法的巨大好处是,如果从浏览器加载样式表的总体积很大,它将与我们JavaScript代码并行加载。 这将使我们的网站下载速度更快。
In the second part, we had to add a new entry in our plugins array which was:
在第二部分中,我们必须在我们的plugins数组中添加一个新条目:
new ExtractTextPlugin('style.css')This basically tells the plugin to combine all our CSS code and put it in a file called style.css.
这基本上告诉插件将我们所有CSS代码组合在一起,并将其放入一个名为style.css的文件中。
Let’s create a new file called styles.scss in our root folder and play with some styling.
让我们在根文件夹中创建一个名为styles.scss的新文件,并使用一些样式。
Now in your index.js file add the styles.scss. Webpack allows you to import CSS in JavaScript. It’s awesome, I know.
现在,在index.js文件中添加styles.scss 。 Webpack允许您使用JavaScript导入CSS。 我知道,这太棒了。
In your code, simply add this line:
在您的代码中,只需添加以下行:
import './styles.scss';Now run this script again, and check your browser:
现在再次运行此脚本,并检查您的浏览器:
Adeel@Frodo MINGW64 ~/Desktop/article/tutorial$ node_modules/.bin/webpack-dev-server --mode development --config config/webpack.base.config.js --open --hot --history-api-fallbackThis is the last time we write it manually. Coming up we’ll make a script. And yeah, I remember — I still haven’t explained what this script does. I will. I promise.
这是我们最后一次手动编写它。 来吧,我们将编写一个脚本。 是的,我记得-我仍然没有解释该脚本的作用。 我会。 我承诺。
Anyways, check your browser…ok cool.
无论如何,请检查您的浏览器...好酷。
编写脚本 (Make the Script)
Let’s write some script, and make our lives a bit easier. The reason I kept on asking you to write that script again and again is so that you would actually memorize it and not just copy and paste it off the internet.
让我们编写一些脚本,使我们的生活更轻松一些。 我一直要求您一次又一次编写该脚本的原因是,您实际上可以记住它,而不仅仅是将其复制并粘贴到Internet之外。
Let’s jump into our package.json file.
让我们跳入package.json文件。
In your scripts section, add the following code:
在您的scripts 部分,添加以下代码:
Now in your terminal, type:
现在在您的终端中,键入:
Adeel@Frodo MINGW64 ~/Desktop/article/tutorial$ npm run start:devNote: in the script we no longer have to write this:
注意 :在脚本中,我们不再需要这样写:
node_modules/.bin/webpackMore details about in the webpack-dev-server usage docs here.
有关webpack-dev-server用法文档的更多详细信息,请参见此处 。
The script for start:dev looks something like this now:
start:dev的脚本 现在看起来像这样:
webpack-dev-server --mode development --config config/webpack.base.config.js --open --hot --history-api-fallbackLet’s break down what this script does:
让我们分解一下此脚本的作用:
webpack-dev-server --mode development
webpack-dev-server --mode development
The flag --mode development sets the build that’s the most optimized for development purposes. It has fast incremental compilation for the development cycle and useful error messages at runtime.
标志--mode development设置为开发目的而最优化的构建。 它具有针对开发周期的快速增量编译,并在运行时提供有用的错误消息。
You can read more about modes in this amazing article: Webpack 4: Mode and Optimization.
您可以在这篇令人惊奇的文章中了解更多有关模式的信息: Webpack 4:模式和优化 。
The flag --config config/webpack.base.config.js tells Webpack where all our configuration is placed for our Webpack bundling.
标志--config config/webpack.base.config.js告诉Webpack我们所有的配置都放置在Webpack捆绑中。
The flag --open tells the webpack-dev-server to open up the browser.
标志--open告诉webpack-dev-server打开浏览器。
The flag --hot tells the webpack-dev-server to enable Webpack’s hot module replacement feature. This updates the browser every time you hit ctrl + s
标志--hot告诉webpack-dev-server启用Webpack的热模块替换功能。 每次您按ctrl + s都会更新浏览器
The flag — -history-api-fallback tells webpack-dev-server to fallback to index.html in the event that a requested resource cannot be found. You can read more about history-api-fallback here.
标志— -history-api-fallback告诉webpack-dev-server在找不到请求的资源的情况webpack-dev-server index.html 。 您可以在此处阅读有关history-api-fallback的更多信息。
生产环境 (Production Environment)
Now that we are done with our development environment, let’s get our hands dirty and get our code ready for production.
现在我们已经完成了开发环境,让我们动手做,准备好代码以进行生产。
Let’s create a new file webpack.opt.config.js. This file will contain all our production optimizations that we will need.
让我们创建一个新文件webpack.opt.config.js 。 该文件将包含我们将需要的所有生产优化。
The plan is to do something like merge our webpack.base.config.js file with the webpack.opt.config.js file to create a production configuration for our single page application.
该计划是要进行一些操作,例如将webpack.base.config.js文件与webpack.opt.config.js文件合并, webpack.opt.config.js单页应用程序创建生产配置。
So let’s begin. In your config directory create a new file called webpack.opt.config.js. opt is short for optimization. If someone can came up with a cooler name, let me know.
因此,让我们开始吧。 在您的config目录中,创建一个名为webpack.opt.config.js的新文件。 opt是优化的简称。 如果有人想出一个更酷的名字,请告诉我。
We need to install some dependencies to help with our optimizations:
我们需要安装一些依赖项以帮助我们进行优化:
$ npm i --save-dev optimize-css-assets-webpack-plugin uglifyjs-webpack-pluginAlthough the --mode production comes up with some pretty cool optimizations itself. You can read more about it here. But I’d still like to add a couple more.
尽管--mode production本身进行了一些非常酷的优化。 您可以在此处了解更多信息。 但是我仍然想添加更多。
The code is as follows:
代码如下:
Let’s recap what we did here. I added to new modules in dev-dependency.
让我们回顾一下我们在这里所做的事情。 我在dev-dependency中添加了新模块。
uglifyjs-webpack-plugin: As the name sounds, this will uglify and minimize all our code to reduce the bundle size.
uglifyjs-webpack-plugin :顾名思义,这将使我们的所有代码丑化并最小化,以减小捆绑包的大小。
optimize-css-assets-webpack-plugin: This plugin will minimize and optimize your CSS code.
optimize-css-assets-webpack-plugin :此插件将最小化和优化您CSS代码。
So far so good everybody — we are almost done.
到目前为止,每个人都很好-我们几乎完成了。
Remember when I talked about a way where we wouldn’t have to repeat our code again and again? One for development, the other for production…and don’t even get me started on managing those environments stage, demo and live! Well that ends today. No more code repetitions.
还记得我在谈论一种无需一次又一次重复代码的方法吗? 一个用于开发,另一个用于生产……甚至没有让我开始管理舞台,演示和现场环境! 好,到今天结束。 没有更多的代码重复。
I introduce to you our savior, the white knight Webpack Merge. This plugin is amazing, as the name sounds.
我向您介绍我们的救星,白色骑士Webpack Merge 。 这个插件听起来很神奇,就像名字一样。
What this will do is combine our configuration for .base and .opt files in a smart way. It provides a merge function that concatenates arrays and merges objects to create a new object.
这将以一种智能的方式结合我们对.base和.opt文件的配置。 它提供了merge功能,可以合并数组并合并对象以创建新对象。
So without further ado, let’s install this amazing plugin as well:
因此,事不宜迟,我们也要安装这个惊人的插件:
$ npm i --save-dev webpack-mergeLet’s create our final webpack.prod.config.js file:
让我们创建最终的webpack.prod.config.js文件:
We pass a parameter to our function called productionConfiguration and used env . This is how we pass information in Webpack through our CLI (I’ll explain how we do that in a minute).
我们将一个参数传递给名为productionConfiguration的函数,并使用env 。 这就是我们如何通过CLI在Webpack中传递信息的方式(我将在几分钟内解释如何做到)。
I am passing something called NODE_ENV . It’s the value in which I will tell my webpack that what environment I will be running — such as demo, test, live or whatever.
我正在传递名为NODE_ENV东西。 这是我将告诉Webpack我将要运行的环境的价值—例如演示,测试,实时运行或其他。
Next, whatever I get in my env.NODE_ENV I set in my process.env.NODE_ENV using the Webpack builtin plugin called DefinePlugin . We just need to make sure that whatever value we pass is always stringified.
接下来,无论我在得到env.NODE_ENV我在我集process.env.NODE_ENV使用的WebPack内置插件叫做DefinePlugin 。 我们只需要确保传递的任何值始终是字符串即可。
Then, in the last line, we do this:
然后,在最后一行,我们这样做:
module.exports = merge.smart(baseConfig, optimizationConfig, productionConfiguration);What is happening here is we use webpack-merge's method called smart to smartly merge all three of our configurations. That way we don’t repeat the same code everywhere. This is coolest feature.
这里发生的是我们使用webpack-merge's名为smart webpack-merge's方法来smart地合并所有三个配置。 这样,我们就不会在各处重复相同的代码。 这是最酷的功能。
I remember a time before I found this plugin. It was a lot of mess doing the same thing in all of my Webpack configuration files. Now it’s just a breeze.
我记得有一段时间才找到这个插件。 在我所有的Webpack配置文件中做同样的事情很麻烦。 现在只是轻而易举。
Anyways, moving forward, since now our Webpack configurations are finally done. Let’s make our production ready build script in our package.json file.
无论如何,向前迈进,因为现在我们的Webpack配置终于完成了。 让我们在package.json文件中制作可用于生产的构建脚本。
In your scripts section, add the following lines:
在脚本部分中,添加以下行:
I’ll start with the prestart:prod command:
我将从prestart:prod命令开始:
"prestart:prod": "webpack --mode production --config config/webpack.prod.config.js --env.NODE_ENV=production --progress",We’ll break this command down.
我们将分解此命令。
webpack --mode production . As we discussed earlier, when discussing development mode , production mode will run some really cool optimization processes on our bundled file(s) to make the size smaller.
webpack --mode production 。 正如我们之前讨论的那样,在讨论development mode ,生产模式将在我们的捆绑文件上运行一些非常酷的优化过程,以减小文件大小。
Next flag is --config config/webpack.prod.config.js. This tells Webpack where our production configuration lies in the directory.
下一个标志是--config config/webpack.prod.config.js 。 这告诉Webpack我们的生产配置在目录中。
The env flag specifies the environment variable that we pass through our webpack-cli. It goes like this: --env.NOVE_ENV=production passes an object in our webpack.prod.config.js with the key NODE_ENV which has the value called production .
env标志指定我们通过webpack-cli传递的环境变量。 它是这样的:-- --env.NOVE_ENV=production在我们的webpack.prod.config.js传递一个对象 使用键NODE_ENV的值称为production 。
You can pass as many environment variables as you want, like --env.X=foo --env.Y=bar . Then in your configuration you would get these values the same way you accesses NODE_ENV value.
您可以根据需要传递任意多个环境变量,例如--env.X=foo --env.Y=bar 。 然后,在您的配置中,您将以与访问NODE_ENV值相同的方式获得这些值。
The last flag is --progess . It simply tells the progress/status of the bundle, like what percentage the bundle has completed while making the bundled files in your dist folder.
最后一个标志是--progess 。 它只是告诉捆绑的进度/状态,例如在dist制作捆绑文件时捆绑完成的百分比 夹。
快速提醒 (A quick reminder)
Webpack 4 by default sets the src folder as the default entry point and the dist folder as the default output point of your bundled result. Cool, right? I know I am repeating this — I told you earlier — but that’s why I said reminder.
默认情况下,Webpack 4将src文件夹设置为捆绑结果的默认入口点,并将dist文件夹设置为捆绑结果的默认输出点。 酷吧? 我知道我重复一遍(我早些时候告诉过您),但这就是为什么我要提醒我。
返回我们的教程 (Back to our Tutorial)
We discussed prestart:prod script, now we will talk about the final script called start:prod.
我们讨论了prestart:prod脚本,现在我们将讨论名为start:prod的最终脚本。
With npm, any time you want to run scripts one after the other, you sequence them with preCOMMAND COMMAND postCOMMAND.
使用npm,每当您要一个接一个地运行脚本时,可以使用preCOMMAND COMMAND postCOMMAND.对脚本进行postCOMMAND.
Like we did here:
就像我们在这里所做的那样:
$ prestart:prod$ start:prodSo we will always run the script npm run start:prod before executing the script called npm run prestart:prod.
因此,在执行名为npm run prestart:prod.的脚本之前,我们将始终运行脚本npm run start:prod npm run prestart:prod.
Let’s discuss start:prod.
让我们讨论start:prod.
$ node server => {This is equivalent to} => $ node server/index.jsLet’s create a folder called server. Inside the folder, create a file called index.js. But before we do that, we need to add one last dependency.
让我们创建一个名为server的文件夹。 在该文件夹内,创建一个名为index.js的文件。 但是在此之前,我们需要添加最后一个依赖项。
This is going to be Express, our back-end Node.js framework:
这将是Express,我们的后端Node.js框架:
npm i --save expressLet’s discuss this code before we proceed further.
在继续进行之前,让我们讨论一下此代码。
We instantiate our app with express() and then set up a static public folder called dist. This is the same folder created by Webpack when we run our production command.
我们使用express()实例化应用程序,然后设置一个名为dist的静态公共文件夹。 这是我们运行生产命令时Webpack创建的文件夹。
We include our routes file — we will create that in a second — and set the routes file to the / directory.
我们包含了routes文件-我们将在稍后创建它-并将routes文件设置为/目录。
Next we set up a port. If none is provided to set via the node CLI, we use port 3000. After that, we create an HTTP server and listen on that server via the port. At the very last, we console to our terminal that we are running the server on that certain port.
接下来,我们设置一个端口。 如果未通过节点CLI提供任何设置,我们将使用端口3000 。 之后,我们创建一个HTTP服务器,并通过端口在该服务器上进行侦听。 最后,我们在终端上控制台我们正在该特定端口上运行服务器。
Let’s create our last file called routes/index.js:
让我们创建最后一个名为routes/index.js :文件routes/index.js :
Here we check that whatever the user comes on, the path redirects the user to the dist/index.html where our React application lives.
在这里,我们检查是否有用户参与,该路径会将用户重定向到React应用程序所在的dist/index.html 。
And that’s it. We are done.
就是这样。 我们完了。
Now go in your terminal and type:
现在进入终端并输入:
npm run start:prodThis will take a moment. It will show you the progress while it transpiles. After that, it consoles a message that it is listening to port 3000 if none is provided.
这需要一点时间。 它将在转换过程中向您显示进度。 此后,如果未提供任何消息,它将发出一条消息,通知它正在listening to port 3000 。
Now go to your browser http:localhost:3000/ and your application is alive.
现在转到浏览器http:localhost:3000/ ,您的应用程序仍处于运行状态。
See the code on GitHub.
请参阅GitHub上的代码。
A shout out to my good friend Ahmed Abbasi for helping me proof read this article.
向我的好朋友艾哈迈德·阿巴斯 ( Ahmed Abbasi)大喊大叫,以帮助我证明阅读本文。
You can follow me on Twitter, I would love to talk and hear you guys out.
您可以在Twitter上关注我,我很乐意倾听并听到你们的声音。
翻译自: https://www.freecodecamp.org/news/how-to-conquer-webpack-4-and-build-a-sweet-react-app-236d721e6745/
相关文章:

React State和生命周期 3
微信小程序开发交流qq群 173683895 承接微信小程序开发。扫码加微信。 一:组件的生命周期 组件的生命周期可分成三个状态: 安装:已插入真实DOM更新:正在被重新渲染卸载:已移出真实DOM 生命周期的方法有:…
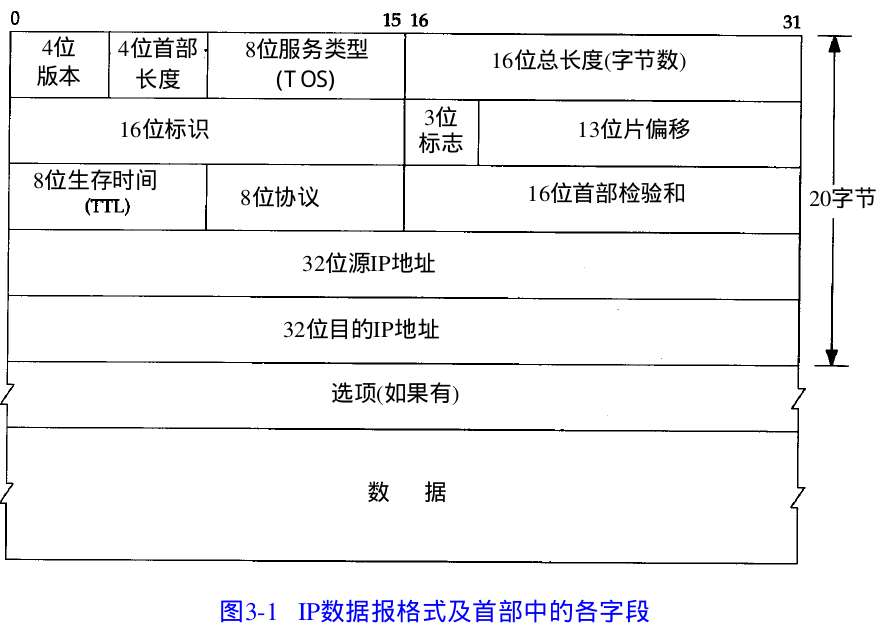
TCP/IP 笔记 1.3 IP:网际协议
---恢复内容开始--- I P是T C P / I P协议族中最为核心的协议。所有的 T C P、U D P、I C M P及I G M P数据都以I P数据报格式传输。 不可靠( u n r e l i a b l e)的意思是它不能保证 I P数据报能成功地到达目的地。 I P仅提供最好的传输服务。如果发生某种错误时ÿ…

keras bi-lstm_LSTM用于文本生成的应用介绍-使用Keras和启用GPU的Kaggle Kernels
keras bi-lstmby Megan Risdal梅根里斯达尔(Megan Risdal) LSTM用于文本生成的应用介绍-使用Keras和启用GPU的Kaggle Kernels (An applied introduction to LSTMs for text generation — using Keras and GPU-enabled Kaggle Kernels) Kaggle recently gave data scientists …
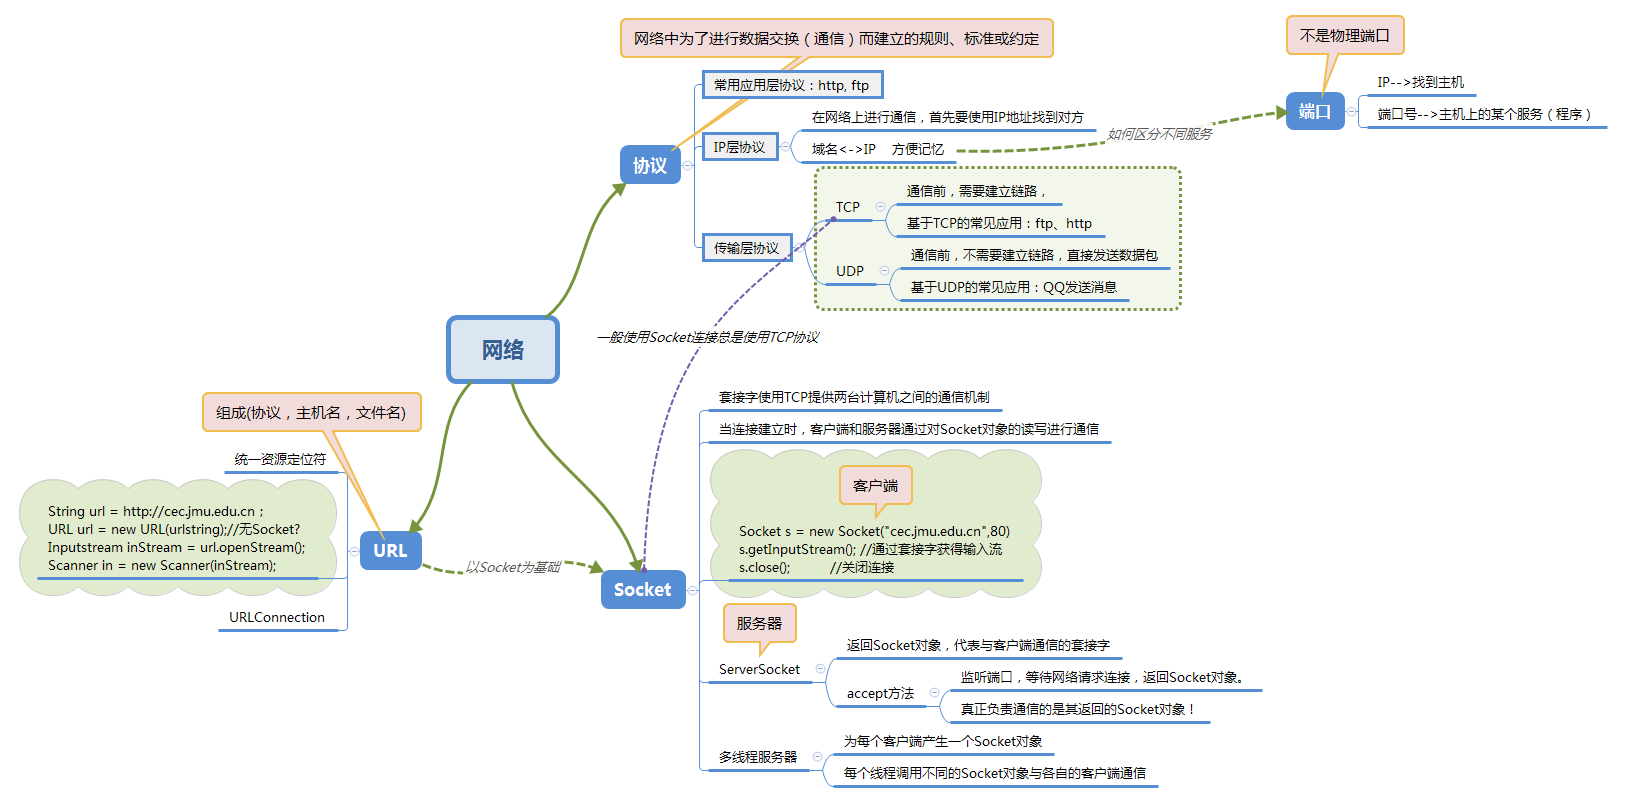
201521123013 《Java程序设计》第13周学习总结
1. 本周学习总结 2. 书面作业 Q1. 网络基础 1.1 比较ping www.baidu.com与ping cec.jmu.edu.cn,分析返回结果有何不同?为什么会有这样的不同? ping值不同(time列),cec.jmu.edu.cn的ping值比较小。ping值&am…
React 事件 4
微信小程序开发交流qq群 173683895 承接微信小程序开发。扫码加微信。 将参数传递给事件处理程序 在循环内部,通常需要将额外的参数传递给事件处理程序。例如,如果id是行ID,则以下任何一个都可以工作: <button onClick{(e…
border-radius
周知:OPPO R819T Android 4.2.1和红米某些机型上,webview中,如果一个元素定义了 border border-radius,这时如果该元素有背景,那么背景将会溢出圆角之外,Yo新增了一个方法来fix这个问题,大家之…
javascript调试_如何提高JavaScript调试技能
javascript调试Almost all software developers who have written even a few lines of code for the Web have had at least a quick glance at JavaScript. After all, it is currently one of the most in-demand programming languages.几乎所有甚至为Web编写了几行代码的软…
Java transient
原文出自:http://www.importnew.com/21517.html 1. transient的作用及使用方法 我们都知道一个对象只要实现了Serilizable接口,这个对象就可以被序列化,java的这种序列化模式为开发者提供了很多便利,我们可以不必关系具体序列化的…
KBMMW 的日志管理器
kbmmw 4.82 最大的新特性就是增加了 日志管理器。 新的日志管理器实现了不同类型的日志、断言、异常处理、计时等功能。 首先。引用kbmMWLog.pas 单元后,系统就默认生成一个IkbmMWLog 实例: Log:IkbmMWLog; log 默认使用对应操作系统的日志功能。 为了能…
React 循环渲染 5
微信小程序开发交流qq群 173683895 承接微信小程序开发。扫码加微信。 使用循环渲染的demo: const todoItems todos.map((todo) ><li key{todo.id}>{todo.text}</li> ); const todoItems todos.map((todo, index) >// Only do this if item…
面试时与人事交谈时间_如何与您的技术负责人交谈并解决通讯故障
面试时与人事交谈时间by Greg Sabo由格雷格萨博(Greg Sabo) 如何与您的技术负责人交谈并解决通讯故障 (How to talk to your tech lead and fix your communication glitches) Here’s where you messed up.这是你搞砸的地方。 Your tech lead told you to build out a new A…
inotify简介
一、inotify简介 inotify是Linux内核2.6.13 (June 18, 2005)版本新增的一个子系统(API),它提供了一种监控文件系统(基于inode的)事件的机制,可以监控文件系统的变化如文件修改、新增、删除等,并…

链路层寻址与 ARP
一、 MAC 地址 不是主机或路由器具有链路层地址,而是它们的适配器(即网络接口)具有链路层地址。因此,具有多个网络接口的主机或路由器将具有与之相关联的多个链路层地址。 然而,链路层交换机并不具有与它们接口相关联的…
React 开始制作 6
微信小程序开发交流qq群 173683895 承接微信小程序开发。扫码加微信。 从模拟开始 第1步:将UI分解为组件层次结构 不同的颜色为不同的组件, 第2步:在React中构建静态版本 第3步:确定UI状态的最小(但完整ÿ…
php 空间类元素引入_引入单元素模式
php 空间类元素引入by Diego Haz迭戈哈兹(Diego Haz) 引入单元素模式 (Introducing the Single Element Pattern) 使用React和其他基于组件的库创建可靠的构建基块的规则和最佳实践。 (Rules and best practices for creating reliable building blocks with React and other …

Tcl学习之--列表|字典
【列表|字典】Tcl使用列表来处理各种集合,比方一个目录中的全部文件,以及一个组件的全部选项。最简单的列表就是包括由随意个空格、制表符、换行符、分隔的随意多个元素的字符串。比方: JerryAlice Mandy David l lindex命令: --> 获取元素 至少须要…
JAVA代码实现下载单个文件,和下载打包文件
//下载单个文件调用方法 /** * response * imgPath 下载图片地址 * fileName 保存下载文件名称 * date 2015年4月14日 下午5:53:24 */ public static void download(HttpServletResponse response,String imgPath,String fileName){ OutputStrea…
php读取本地xlsx格式文件的数据并按json格式返回
微信小程序开发交流qq群 173683895 承接微信小程序开发。扫码加微信。 目的:php读取并操作本地xlsx格式的文件; 完整示例代码: 代码讲解:前端发起post网络请求,php接收一个name(姓名)的参数…
面向对象编程概念_如何向6岁的孩子解释面向对象的编程概念
面向对象编程概念by Alexander Petkov通过亚历山大佩特科夫(Alexander Petkov) Have you noticed how the same cliche questions always get asked at job interviews — over and over again?您是否注意到在求职面试中总是一遍又一遍地问同样的陈词滥调问题? I…
jQuery 属性
jQuery 属性 方法描述context在版本 1.10 中被废弃。包含被传递到 jQuery 的原始上下文jquery包含 jQuery 的版本号jQuery.fx.interval改变以毫秒计的动画运行速率jQuery.fx.off对所有动画进行全局禁用或启用jQuery.support包含表示不同浏览器特性或漏洞的属性集(主…
mongodb的几种启动方法
1 mongodb的几种启动方法 启动Mongodb服务有两种方式,前台启动或者Daemon方式启动,前者启动会需要保持当前Session不能被关闭,后者可以作为系统的fork进程执行,下文中的path是mongodb部署的实际地址。1. 最简单的启动方式…
php 修改数据库表的字段的值
微信小程序开发交流qq群 173683895 承接微信小程序开发。扫码加微信。 php 前端传递参数,遍历数据库表的字段后根据条件进行修改。 <?phpheader("Content-Type:text/html;charsetutf8"); header("Access-Control-Allow-Origin: *"); //解…
如何开始使用PostgreSQL
by Akul Tomar通过Akul Tomar 如何开始使用PostgreSQL (How to get started with PostgreSQL) PostgreSQL is an open source Relational Database Management System (RDBMS). In this article, I’ll provide an introduction to getting started with PostgreSQL. Here is …
Java中数组常见的几种排序方法!
数组的定义: int[] arr new int[5];int[] arr1 {1,2,3,4,5};long[] arr2 new long[6];String[] strs new String[5];Person[] ps new Person[5]; 数组的操作: int[] arr {45, 34, 53, 43};Arrays.sort(arr);System.out.println(Arrays.toString(ar…
oracle 如何预估将要创建的索引的大小
一.1 oracle 如何预估将要创建的索引的大小 oracle 提供了2种可以预估将要创建的索引大小的办法: ① 利用包 Dbms_space.create_index_cost 直接得到 ② 利用11g新特性 Note raised when explain plan for create index 下边分别举例说明。 一.2 环境说明 [ora…
删除对象的某个属性
微信小程序开发交流qq群 173683895 承接微信小程序开发。扫码加微信。 实现代码: var data {a:1,b:2,c:3}for(var item in data){if (item b) {delete data[item];} }console.log(data:, data) 打印结果: data: {a: 1, c: 3}
java 学到什么实习_我如何获得外展实习机会以及到目前为止所学到的知识
java 学到什么实习by Nguedia Adele由Nguedia Adele 我如何获得外展实习机会以及到目前为止所学到的知识 (How I got my Outreachy internship and what I’ve learned so far) I recently got accepted for an Outreachy internship, working with LibreHealth.我最近接受了与…

STM32F103C8开发板原理图和管脚图
转载于:https://www.cnblogs.com/libra13179/p/6894335.html
js实用数组方法
微信小程序开发交流qq群 173683895 承接微信小程序开发。扫码加微信。 判断是否为数组 1. Array.isArray([]) 2. var arr[1,2] arr instanceof Array -->true arr instanceof String -->false map ---- 返回数组得出的结果 const filtered [1, 2,…

BasicModal - 简单易用的现代 Web App 弹窗
BasicModal 是为现代 Web 应用程序打造的弹窗系统。它包括所有你需要显示的信息,问题或接收用户的输入。这里的弹窗还可以链接起来,所以你可以很容易地建立一个预定义顺序的安装帮助或显示对话框。无效输入可以使用包含突出显示和处理功能。 在线演示 …