unity 灯笼_如何创建将自己拼成文字的漂亮灯笼
unity 灯笼
In this tutorial, we will go through how to create a group of festival lanterns that arrange themselves into the words you choose. An online demo can be found here.
在本教程中,我们将介绍如何创建一组节日灯笼,这些灯笼将自己布置成您选择的单词。 可以在此处找到在线演示。
This tutorial is a little bit more advanced than my previous tutorials. I am going to assume you can figure out a lot of the rudimentary things on your own. I have also made some tutorials for total beginners, which I have attached in the end as links.
本教程比我以前的教程更高级。 我假设您可以自己解决许多基本问题。 我还为初学者编写了一些教程,最后将它们作为链接附在其中。
介绍 (Introduction)
Since this tutorial is a bit longer, we will go over what you are about to read. First, we will go through how to design a breathing lantern with CSS. After that, we will learn how to dynamically create lanterns through JavaScript. Then we will learn how to create the input box and how to decipher the input text. After that, we will go over some algorithms that arrange the lanterns appropriately. Finally, we will learn about how to animate the lanterns.
由于本教程要长一些,因此我们将介绍您将要阅读的内容。 首先,我们将介绍如何使用CSS设计呼吸灯。 之后,我们将学习如何通过JavaScript动态创建灯笼。 然后,我们将学习如何创建输入框以及如何解密输入文本。 在那之后,我们将介绍一些适当安排灯笼的算法。 最后,我们将学习如何为灯笼设置动画。
Enough said, let’s get started! Before you start you will need a website. If you do not wish to use one of your own, you can copy the code below and save it as an .html file.
够了,让我们开始吧! 在开始之前,您将需要一个网站。 如果您不想使用自己的代码,可以复制以下代码并将其另存为。 html文件。
<!--Copyright to Shen Huang, you can reach me out at shenhuang@live.ca-->
<!DOCTYPE html>
<meta name = "viewport" content = "width = device-width, initial-scale = 1.0">
<html><head><title>LANTERN DEMO</title><style>body {background-color : #190f00;}</style></head><body>
</body><script>
</script>
</html>
1.设计灯笼 (1. Designing the Lanterns)
We will be using CSS to define the shapes and animations for the lanterns, and then construct them inside the HTML body to test our results.
我们将使用CSS定义灯笼的形状和动画,然后在HTML正文中构造它们以测试结果。
The lantern consists of 3 parts:
灯笼由三部分组成:
The Outer Light
外光
The Lantern Body
灯笼体
The Inner Light
内在的光
The Outer Light is placed behind the Lantern Body, and the Inner Light is placed in front of the Lantern Body. These 3 elements are placed within an invisible Lantern object, which is responsible for the shaking left and right animations.
外部灯放在灯笼体的后面, 内部灯在灯笼体的前面。 这3个元素放置在一个不可见的Lantern对象中,该对象负责左右晃动动画。
1.1灯笼 (1.1 Lantern)
The Lantern object is essentially an invisible object with the same size as the Lantern Body. It has a pivot at the top center, defining the center of rotation of the pendulum movement. The following CSS code defines the Lantern.
Lantern对象本质上是一个与Lantern Body大小相同的不可见对象。 它在顶部中心有一个枢轴,定义了摆运动的旋转中心。 以下CSS代码定义了Lantern 。
@keyframes shake {0% {transform : rotate(10deg) scale(1);}50% {transform : rotate(-10deg) scale(1);}100% {transform : rotate(10deg) scale(1);}
}
.lantern {z-index : 999;position : absolute;height : 70px;width : 50px;transform-origin : top center;animation : shake 4s ease-in-out infinite;
}
1.2外灯 (1.2 Outer Light)
The Outer Light is actually a radial gradient from a bright color to transparency. The animations scale its size to make it breathe. The Outer Light can be defined by the following code:
外光实际上是从明亮的颜色到透明的径向渐变。 动画会缩放其大小以使其呼吸。 可以通过以下代码定义外部光 :
@keyframes outerlightbreathe {0% {height : 100px;width : 100px;top : -10px;left : -20px;}50% {height : 200px;width : 200px;top : -60px;left : -70px;}100% {height : 100px;width : 100px;top : -10px;left : -20px;}
}
.outerLight {z-index : -1;position : absolute;background-image:radial-gradient(rgba(117, 107, 60, 1.0), rgba(117, 107, 60, 0.0), rgba(117, 107, 60, 0.0));opacity : 0.5;border-radius : 50%;animation : outerlightbreathe 3s ease-in-out infinite;
}
1.3灯笼身 (1.3 Lantern Body)
The Lantern Body is a rectangle with a rounded border, with heavier rounding on the bottom. The Lantern Body can be defined by the following code:
灯笼主体是一个带有圆角边框的矩形,底部的圆角较大。 灯笼体可以通过以下代码定义:
.lanternBody {position : absolute;background-color : #756b3c;height : 70px;width : 50px;border-radius : 15px 15px 25px 25px;
}
1.4内灯 (1.4 Inner Light)
The Inner Light, similar to the Outer Light, is also a radial gradient from a bright color to transparency, but with a larger bright portion. The animation also chops off the light when it reaches a certain size to make it look like the light is contained by the Lantern Body. The code defining the Inner Light can be found below:
与外部光类似, 内部光也是从明亮的颜色到透明的放射状渐变,但是明亮部分更大。 当动画达到一定大小时,动画也会将其截断,以使其看起来像灯笼体中包含的灯光。 定义内部灯的代码可以在下面找到:
@keyframes innerlightbreathe {0% {height : 30px;width : 30px;opacity : 0.1;top : 35px;left : 10px;}20% {clip-path : inset(0px 0px 0px 0px);}50% {height : 60px;width : 60px;opacity : 0.5;top : 5px;left : -5px;clip-path : inset(0px 5px 0px 5px);}80% {clip-path : inset(0px 0px 0px 0px);}100% {height : 30px;width : 30px;opacity : 0.1;top : 35px;left : 10px;}
}
.innerLight {position : absolute;background-image:radial-gradient(rgba(255, 241, 181, 1.0), rgba(255, 241, 181, 1.0), rgba(255, 241, 181, 0.0));border-radius : 50%;animation : innerlightbreathe 3s ease-in-out infinite;
}
1.5灯笼构造 (1.5 Lantern Construction)
To test our result, we can use the following CSS and HTML code to build a lantern at the center of our HTML page.
为了测试结果,我们可以使用以下CSS和HTML代码在HTML页面的中心构建一个灯笼。
CSS:
CSS:
center {position : absolute;top : 50%;left : 50%;
}
HTML:
HTML:
<center><div class = "lantern"><div class = "outerLight"></div><div class = "lanternBody"><div class = "innerLight"></div></div></div>
</center>
A complete demonstration can be found in the CODEPEN below.
完整的演示可以在下面的CODEPEN中找到。
2.制作灯笼 (2. Creating the Lanterns)
Since we’ve learned how to draw and animate a lantern, we can now move onto the JavaScript that creates the lanterns dynamically. In the end of this section, we will also go over how to arrange the lanterns into words.
由于我们已经学习了如何绘制和设置灯笼动画,因此现在可以进入动态创建灯笼JavaScript。 在本节的最后,我们还将介绍如何将灯笼排列成文字。
2.1使用Java脚本创建灯笼 (2.1 Lantern Creation with Java Script)
Before we start, we should also change the scale in our lantern animation to make it half as large. The size was okay when trying to show you how a single lantern is constructed, but too large when we want to show batches of them.
在开始之前,我们还应该将灯笼动画的比例更改为一半。 尝试向您展示如何构造单个灯笼时,尺寸还可以,但是当我们要显示一批灯笼时,尺寸太大。
@keyframes shake {0% {transform : rotate(10deg) scale(0.5);}50% {transform : rotate(-10deg) scale(0.5);}100% {transform : rotate(10deg) scale(0.5);}
}
Then we can use the following code to dynamically generate lanterns. The brd is just a place holder in case we want to integrate it to other websites. The code creates the lantern in the same sequence of the HTML script we used. There are many other variables inside this code, which will make sense in the upcoming sections.
然后,我们可以使用以下代码动态生成灯笼。 brd只是一个占位符,以防我们要将其集成到其他网站。 该代码以与我们使用HTML脚本相同的顺序创建灯笼。 这段代码中还有许多其他变量,这些变量将在后面的部分中讲解。
var brd = document.createElement("DIV");
document.body.insertBefore(brd, document.getElementById("board"));
const speed = 0.5;
const fadeInTime = 3000;
const fadeOutTime = 3000;
var lanterns = [];
function generateLantern(x, y)
{var lantern = document.createElement("DIV");var ltrBdy = document.createElement("DIV");var otrLit = document.createElement("DIV");var inrLit = document.createElement("DIV");lantern.setAttribute('class', 'lantern');ltrBdy.setAttribute('class', 'lanternBody');otrLit.setAttribute('class', 'outerLight');inrLit.setAttribute('class', 'innerLight');ltrBdy.appendChild(inrLit);lantern.appendChild(ltrBdy);lantern.appendChild(otrLit);brd.appendChild(lantern);lantern.FIT = fadeInTime;lantern.FOT = fadeOutTime;lantern.style.opacity = 1.0;// 0: ALIVE, 1: DEAD.lantern.state = 0;lantern.x = x;lantern.y = y;lantern.bounce = 0;lantern.destination = [];lantern.destination.x = x;lantern.destination.y = y;lantern.arrived = true;lantern.style.left = lantern.x + "px";lantern.style.top = lantern.y + "px";if(lanterns == null)lanterns = [];lanterns.push(lantern);return lantern;
}
We can test this code with the following code, which should generate a lantern at x:100, y:100.
我们可以使用以下代码测试此代码,该代码应在x:100 , y:100处生成灯笼。
generateLantern(100, 100);2.2灯笼字图 (2.2 Word Map for Lanterns)
Now in order for the lanterns to display a particular word, we will need a map for each alphabet. A lantern word map can be found in this GitHub Gist, which will not be shown here because of the size.
现在,为了使灯笼显示一个特定的单词,我们将需要每个字母的映射。 可以在此GitHub Gist中找到灯笼字地图,由于大小,此处将不再显示。
Once done, you can test to see if the word map worked with the code below, which draws the word “LOVE”.
完成后,您可以测试一下单词映射是否与下面的代码一起工作,下面的代码绘制了单词“ LOVE”。
var xstart = 50;
var ystart = 100;
var xspace = 50;
var yspace = 50;
var letter = "L";
for(i = 0; i < ltrMap[letter][0].length; i++)
{for(j = 0; j < ltrMap[letter].length; j++){if(ltrMap[letter][j][i] == 1){generateLantern(xstart + i * xspace, ystart + j * yspace);}}
}
var xstart = 350;
var letter = "O";
for(i = 0; i < ltrMap[letter][0].length; i++)
{for(j = 0; j < ltrMap[letter].length; j++){if(ltrMap[letter][j][i] == 1){generateLantern(xstart + i * xspace, ystart + j * yspace);}}
}
var xstart = 650;
var letter = "V";
for(i = 0; i < ltrMap[letter][0].length; i++)
{for(j = 0; j < ltrMap[letter].length; j++){if(ltrMap[letter][j][i] == 1){generateLantern(xstart + i * xspace, ystart + j * yspace);}}
}
var xstart = 950;
var letter = "E";
for(i = 0; i < ltrMap[letter][0].length; i++)
{for(j = 0; j < ltrMap[letter].length; j++){if(ltrMap[letter][j][i] == 1){generateLantern(xstart + i * xspace, ystart + j * yspace);}}
}
Check out the CODEPEN demo below:
查看以下CODEPEN演示:
3.解密单词输入 (3. Deciphering Word Inputs)
3.1创建输入框。 (3.1 Creating the Input Box.)
The Input Box fades in and takes inputs. Once the inputs have been taken, the lanterns should start to arrange. The Input Box will fade out until the lanterns are fully arranged. In order to accomplish such an effect, we remove the Input Box once it has taken its input and create a Fake Input Box at the same location. We then fade out the Fake Input Box instead.
输入框会淡入并接受输入。 输入完毕后,灯笼应开始排列。 输入框将逐渐消失,直到灯笼完全排好为止。 为了实现这种效果,我们在输入框输入后将其删除,并在同一位置创建伪输入框 。 然后,我们淡出“ 假输入框” 。
To start, first we define the Input Box in HTML, then the style and animations in CSS. For this project our Input Box only accepts 5 upper case letters, and the default contents inside is “LOVE”.
首先,我们先以HTML定义输入框 ,然后以CSS定义样式和动画。 对于此项目,我们的输入框仅接受5个大写字母,并且内部的默认内容为“ LOVE ”。
HTML:
HTML:
<input  id   = "wordBox"class  = "wordInput"type  = "text"maxlength = "5"value  = "LOVE"onkeypress = "return (event.charCode > 64 && event.charCode < 91)"
>
CSS:
CSS:
@keyframes fadein {0% {opacity : 0.0;}100% {opacity : 1.0;}
}
@keyframes fadeout {0% {opacity : 1.0;}50% {opacity : 0.0;}100% {opacity : 0.0;}
}
.wordInput, .fakeInput{position : absolute;bottom : 25px;left : 25px;
}
.wordInput {height : 30px;width : 100px;color : #a88600;font-size : 25px;font-family : Arial;text-align : center;border : 3px;border-radius : 15px;border-style : solid;background-color : #fff9e5;border-color : #fff9e5;animation : fadein 1s ease-in;
}
.wordInput:hover,  .wordInput:focus{border-color : #a88600;
}
.fakeInput {height : 30px;width : 100px;color : #a88600;font-size : 25px;font-family : Arial;text-align : center;border : 3px;border-radius : 15px;border-style : solid;background-color : #fff9e5;border-color : #fff9e5;animation : fadeout 2s ease-out;
}
Now we should be able to see an Input Box at the bottom right corner of the webpage. We then use the following JavaScript code to make it take inputs. Once the user changes focus, it creates a Fake Input Box with the same input to fade out.
现在,我们应该可以在网页的右下角看到一个输入框 。 然后,我们使用以下JavaScript代码使其接受输入。 一旦用户更改焦点,它就会创建一个假输入框,并使用相同的输入淡出。
var wordBox = document.getElementById("wordBox");
var word = "";
wordBox.addEventListener("focusout", wordBoxFocusOut);
function wordBoxFocusOut()
{word = wordBox.value;var fakeBox = document.createElement("DIV");fakeBox.setAttribute('class', 'fakeInput');fakeBox.textContent = word;wordBox.style.display = "none";brd.appendChild(fakeBox);setTimeout(function(){fakeBox.parentNode.removeChild(fakeBox);}, 2000);arrangeLanterns(word);wordBox.addEventListener("focusout", wordBoxFocusOut);
}
We also need to add the following JavaScript to make it fade out after the Enter Key is pressed. The enterPressed is there to prevent the script from executing twice.
我们还需要添加以下JavaScript,以使其在按下Enter键后逐渐消失。 其中的enterPressed可以防止脚本执行两次。
window.onkeydown = function(e)
{key = e.keyCode;if(key == 13){wordBox.blur();}
};
Once done, we should be able to see an Input Box that fades in, and fades out once the Enter Key is pressed or the box is out of focus.
完成后,我们应该能够看到一个淡入淡出的输入框 ,一旦按下Enter键或该框失去焦点,淡入淡出。
3.2处理输入 (3.2 Processing the Input)
Now that we have the Input Box ready, we should test and see if it can correctly process the input. In order to do so first we append the following code to the end of our wordBoxFocusOut() function.
现在我们已经准备好输入框 ,我们应该测试一下,看看它是否可以正确处理输入。 为了做到这一点,我们首先将以下代码添加到wordBoxFocusOut()函数的末尾。
arrangeLanterns(word);The we can define our arrangeLanterns() function.
我们可以定义我们的describeLanterns()函数。
function arrangeLanternsChar(char, charCount)
{for(i = 0; i < ltrMap[char][0].length; i++){for(j = 0; j < ltrMap[char].length; j++){if(ltrMap[char][j][i] == 1){generateLantern(xstart + i * xspace + xsplit * charCount, ystart + j * yspace);}}}
}
Once done, we should be able to see something as shown by the following demo, where a batch of lanterns will be printed to match the input.
完成后,我们应该能够看到如以下演示所示的内容,其中将打印一批灯笼以匹配输入。
4.布置灯笼 (4. Arranging the Lanterns)
Now this part may be a little bit dry. We will not be able to see the effects until we animate the lanterns, and the contents lean towards the theoretical side. But these theories are essential in efficiently creating the cool effects in the end.
现在这部分可能有点干。 在为灯笼设置动画之前,我们将看不到效果,并且内容向理论侧倾斜。 但是,这些理论对于有效地最终创建出色效果至关重要。
We will first go over our problem, and then introduce 2 algorithms that solve the problem in an efficient way. For those who already know, we will be trying to minimize the total distance traveled by the lanterns. In order to do so, we will use a k-d Tree and some Dynamic Programming.
我们将首先解决我们的问题,然后介绍2种有效解决问题的算法。 对于那些已经知道的人,我们将尝试最小化灯笼走过的总距离。 为了做到这一点,我们将使用kd Tree和一些Dynamic Programming 。
4.2最短总距离计算 (4.2 Shortest Total Distance Calculation)
First of all, we have to define our problem. We have some destinations defined by our word inputs, where the lanterns have to end up in those positions to display the word. We would want as many lanterns as destinations, and we will be generating them at random locations on the screen. These lanterns will then fly off to the destinations, but we want the total distances traveled by all the lanterns to be minimal. We also want one lantern per destination.
首先,我们必须定义我们的问题。 我们有一些由单词输入定义的目的地 ,灯笼必须在这些位置处结束才能显示单词。 我们需要与目标数量一样多的灯笼,并且我们将在屏幕上的随机位置生成它们。 这些灯笼会飞到目的地,但我们希望所有灯笼的总行驶距离最小。 我们还希望每个目的地一个灯笼。
In order to accomplish this, we have to alter our code with the following. The code preforms 4 major operations in sequence:
为了做到这一点,我们必须使用以下内容更改代码。 该代码按顺序执行4个主要操作:
- Calculate the total number of required lanterns.计算所需的灯笼总数。
- Generate additional lanterns at random locations if there are more required lanterns than we have on the field.如果需要的灯笼数量超过我们在现场所需的数量,请在随机位置生成其他灯笼。
Set the destination for each lantern to their closest destination with the help of k-d Tree.
借助kd Tree将每个灯笼的目标设置为最接近的目标。
Further optimize the destination of each lantern with Dynamic Programming.
通过动态规划进一步优化每个灯笼的目的地。
In order to test our code properly, we will have to comment out the parts that we are not there yet. We will go into the details of the code very soon.
为了正确地测试我们的代码,我们将不得不注释掉尚不存在的部分。 我们将很快讨论代码的细节。
var distance = function(a, b){return Math.pow(a.x - b.x, 2) +  Math.pow(a.y - b.y, 2);
}
var lanternDesinationTree;
var arrivedCount = 0;
var requiredLanterns = 0;
function arrangeLanterns(word)
{requiredLanterns = 0;for(c = 0; c < word.length; c++){requiredLanterns += ltrMap[word[c]].lanternCount;}while(lanterns.length < requiredLanterns){generateLantern(window.innerWidth * Math.random(), window.innerHeight * Math.random());}lanternDestinationTree = new kdTree([], distance, ["x", "y"]);for(c = 0; c < word.length; c++){appendLanternDestinations(word[c], c);}for(i = 0; i < lanterns.length; i++){if(i < requiredLanterns){var nearest = lanternDestinationTree.nearest(lanterns[i].destination, 1);lanternDestinationTree.remove(nearest[0][0]);lanterns[i].destination = nearest[0][0];lanterns[i].arrived = false;}else{lanterns[i].state = 1;}}optimizeTotalDistance();
}
4.2.1 kd树 (4.2.1 k-d Tree)
In order to find the shortest total distance, we will need something called the k-d Tree. k-d Tree is a data structure which allows us to map multi-dimensional coordinates and perform actions on them more efficiently. If you are interested in learning about k-d Trees and runtime complexity you can find more about them here.
为了找到最短的总距离,我们需要一个叫做kd Tree的东西。 kd Tree是一种数据结构,可让我们映射多维坐标并更有效地对其执行操作。 如果您对了解kd树和运行时复杂性感兴趣,可以在此处找到有关它们的更多信息。
In order to implement the k-d Tree, we will first have to download the k-d Tree from Ubilabs. The .js file can be found here on GitHub and the implementation guides can be found on the main GitHub page here. Once you have it in the same folder with your .html file, you can reference it with the following HTML scripts:
为了实现kd树 ,我们首先必须从Ubilabs下载kd树 。 的。 js文件可以发现这里在GitHub和实施指南可以在主GitHub的网页上找到这里 。 将其保存在与您的文件夹相同的文件夹中。 html文件,您可以使用以下HTML脚本进行引用:
<script src = "./kdTree.js" type= "text/javascript" ></script>You can then test to see if your k-d Tree worked with the following code (the 2 returned nearest points should be printed in the console).
然后,您可以测试一下您的kd Tree是否与以下代码一起使用(返回的2个最近点应在控制台中打印)。
var points = [{x: 1, y: 2},{x: 3, y: 4},{x: 5, y: 6},{x: 7, y: 8}
];
var distance = function(a, b){return Math.pow(a.x - b.x, 2) +  Math.pow(a.y - b.y, 2);
}
var tree = new kdTree(points, distance, ["x", "y"]);
var nearest = tree.nearest({ x: 5, y: 5 }, 2);
console.log(nearest);
And now we can construct our appendLanternDestinations() function with the k-d Tree.
现在,我们可以使用kd Tree构造appendLanternDestinations()函数。
function appendLanternDestinations(char, charCount)
{for(i = 0; i < ltrMap[char][0].length; i++){for(j = 0; j < ltrMap[char].length; j++){if(ltrMap[char][j][i] == 1){var destination = {};destination.x = xstart + i * xspace + xsplit * charCount;destination.y = ystart + j * yspace;lanternDestinationTree.insert(destination);}}}
}
To test, we can alter our arrangeLanterns() function to add the following code. We should then see the console printing the nearest distance with the k-d Tree constructed by our word input.
为了进行测试,我们可以更改我们的describeLanterns()函数以添加以下代码。 然后,我们应该看到控制台使用由单词输入构造的kd树打印最近的距离。
lanternDestinationTree = new kdTree([], distance, ["x", "y"]);
for(c = 0; c < word.length; c++)
{appendLanternDestinations(word[c], c);
}
// Test kdTree with Lantern Destinations.
var nearest = lanternDestinationTree.nearest({ x: 200, y: 200 }, 1);
console.log(nearest[0][0]);
Now the code below the append function sets the destination of each lantern to their nearest available destination. For any extra lanterns, their states are set to 1, meaning that they should fade away by the animation controller which we will get to in the next section.
现在,append函数下方的代码将每个灯笼的目标设置为最近的可用目标。 对于任何其他灯笼,它们的状态都设置为1,这意味着它们应该由动画控制器淡出,这将在下一节中介绍。
4.2.2动态编程 (4.2.2 Dynamic Programming)
The k-d Tree optimization is good, but not perfect. We will need some Dynamic Programming to ensure the algorithm returns the minimal total distance. Dynamic Programming is the concept where you try to find the optimized solution by incrementally approaching a better state from a previously stored state.
kd树优化是好的,但不是完美的。 我们将需要一些动态编程来确保算法返回最小的总距离。 动态编程是一个概念,您尝试通过从以前存储的状态逐步接近更好的状态来找到优化的解决方案。
The algorithm we are using is actually similar to Bubble Sort, which can be described by the following:
我们使用的算法实际上类似于Bubble Sort ,可以通过以下方式进行描述:
- We iterate through every pair of lanterns.我们遍历每对灯笼。
- We check to see if swapping the destinations of a pair of lanterns yields a shorter total distance.我们检查一下,交换一对灯笼的目的地是否会产生较短的总距离。
- We swap their destinations if the total distance is shorter.如果总距离较短,我们会交换他们的目的地。
For lanterns that are “DEAD”, their distance to destination is considered as 0, swapping makes the other lantern have a 0 distance to destination.
对于“ DEAD ”的灯笼,其到目标的距离视为0,交换使另一个灯笼到目标的距离为0。
- Ends when no more swaps can be done to shorten the distance.当无法进行更多交换以缩短距离时结束。
The code implementation to this algorithm can be found below. We also have to deal with their states and arrival status which will be further explained in the next section. Notice that the distance formula is not square rooted, meaning the algorithm will heavily punish longer distances.
该算法的代码实现可在下面找到。 我们还必须处理它们的状态和到达状态,这将在下一部分中进一步说明。 注意,距离公式不是平方根的,这意味着该算法将严重惩罚较长的距离。
function optimizeTotalDistance()
{var undone = true;while(undone){undone = false;for(i = 0; i < lanterns.length; i++){var lanternA = lanterns[i];for(j = 0; j < lanterns.length; j++){var lanternB = lanterns[j];if(lanternA.state == 0 && lanternB.state == 0){var oldDistance = distance(lanternA, lanternA.destination) + distance(lanternB, lanternB.destination);var newDistance = distance(lanternA, lanternB.destination) + distance(lanternB, lanternA.destination);if(newDistance < oldDistance){[lanternA.destination, lanternB.destination] = [lanternB.destination, lanternA.destination];undone = true;}}else if(lanternA.state == 0 && lanternB.state == 1){var oldDistance = distance(lanternA, lanternA.destination);var newDistance = distance(lanternB, lanternA.destination);if(newDistance < oldDistance){lanternB.destination = {x: lanternA.destination.x, y: lanternA.destination.y};lanternA.destination = {x: lanternA.x, y: lanternA.y};lanternA.state = 1;lanternB.state = 0;lanternA.arrived = true;lanternB.arrived = false;undone = true;}}else if(lanternA.state == 1 && lanternB.state == 0){var oldDistance = distance(lanternB, lanternB.destination);var newDistance = distance(lanternA, lanternB.destination);if(newDistance < oldDistance){lanternA.destination = {x: lanternB.destination.x, y: lanternB.destination.y};lanternB.destination = {x: lanternB.x, y: lanternB.y};lanternA.state = 0;lanternB.state = 1;lanternA.arrived = false;lanternB.arrived = true;undone = true;}}}}}
}
5.制作灯笼动画 (5. Animating the Lanterns)
It is finally the last section! We will now complete this project. A lot of the mysteries mentioned in the previous sections will be explained here. Sit tight, the magic show is about to begin.
最后是最后一节! 现在,我们将完成该项目。 前面几节中提到的许多奥秘将在这里进行解释。 坐好,魔术表演即将开始。
5.1使用JavaScript淡入和淡出 (5.1 Fade In & Fade Out with JavaScript)
Now in case you were wondering what the lantern.FIT and lantern.FOT does in generateLantern(), here you go: it actually allows the animation controller to fade in the lanterns after creation, and fades it out after it is “DEAD”.
现在,如果您想知道Lantern.FIT和Lantern.FOT在generateLantern()中做了什么,就可以使用:它实际上允许动画控制器在创建后淡入灯笼,并在它变为“ DEAD ”后淡出。
Now in order to make this happen, we have to first do some script changes, so that the lanterns will be initially transparent.
现在,为了实现此目的,我们必须首先进行一些脚本更改,以使灯笼最初是透明的。
We need to change:
我们需要更改:
lantern.style.opacity = 1.0;into:
变成:
lantern.style.opacity = 0.0;After that we can construct our animation controller with the code below. The spedFctr defines how fast the lanterns should move. The arivThsh defines how tolerant it is for the program to consider the lantern arrived at its destination. The bonsFctr defines how fast the lantern should bounce up and down, and bonsMrgn defines how wide the bounce is. These parameters will make more sense later.
之后,我们可以使用以下代码构建动画控制器。 spedFctr定义灯笼应移动的速度。 arivThsh定义程序考虑灯笼到达其目的地的容忍度 。 bonsFctr定义灯笼应该上下弹起的速度,而bonsMrgn定义弹起的宽度。 这些参数以后会更有意义。
The animation controller refreshes every 10 milliseconds, resulting in a frame rate of 100fps. Right now, it will slowly decrement the lantern.FIT counter and set the opacity accordingly for newly created lanterns. It’ll do the opposite for lanterns that are dead. Once the lantern.FOT reaches zero for the dead lanterns, it will be removed permanently.
动画控制器每10毫秒刷新一次,从而获得100fps的帧速率。 现在,它将缓慢减小灯笼。FIT计数器并相应地为新创建的灯笼设置不透明度。 对于已经死掉的灯笼,情况会相反。 一旦灯笼.FOT的死灯达到零,它将被永久移除。
const spedFctr = 0.025;
const arivThsh = 5 * spedFctr;
const bonsFctr = 0.001;
const bonsMrgn = 5;
var before = Date.now();
var id = setInterval(frame, 10);
function frame()
{var current = Date.now();var deltaTime = current - before;before = current;for(i in lanterns){var lantern = lanterns[i];switch(lantern.state){case 0:if(lantern.FIT > 0){lantern.FIT -= deltaTime;lantern.style.opacity = 1 - lantern.FIT / fadeOutTime;}break;case 1:if(lantern.FOT > 0){lantern.FOT -= deltaTime;lantern.style.opacity = lantern.FOT / fadeOutTime;}else{lantern.parentNode.removeChild(lantern);lanterns.splice(i, 1);}break;}}
}
5.2移动动画 (5.2 Move Animations)
Now in order to animate the lanterns we append the following code under case 1 inside the for loop of the animation controller. The code basically just slowly increments the position of the lanterns towards their destinations. Once the lanterns reach their destination, it will be marked as arrived and the arrive count will be incremented.
现在,为了使灯笼动起来,我们在情况1下在动画控制器的for循环内附加以下代码。 该代码基本上只是缓慢地将灯笼的位置朝其目的地增加。 灯笼到达目的地后,将标记为到达,到达计数将增加。
var xDiff = lantern.destination.x - lantern.x;
var yDiff = lantern.destination.y - lantern.y;
var dDiff = Math.sqrt(xDiff * xDiff + yDiff * yDiff);
if(!lantern.arrived)
{if(Math.abs(dDiff) < arivThsh){lantern.arrived = true;arrivedCount++;}else{lantern.x += xDiff / dDiff * spedFctr * deltaTime;lantern.y += yDiff / dDiff * spedFctr * deltaTime;}lantern.style.left = lantern.x + "px";
}
else
{lantern.bounce += bonsFctr * deltaTime;
}
lantern.style.top = lantern.y + Math.sin(lantern.bounce) * bonsMrgn + "px";
We use the following code to check if all the lanterns have arrived every 0.1 seconds. Once all the lanterns have arrived, we bring back the input field again.
我们使用以下代码检查所有灯笼是否每隔0.1秒到达一次。 一旦所有的灯笼都到了,我们再次带回输入字段。
var gr = setInterval(check, 100);
function check()
{if(arrivedCount == requiredLanterns){wordBox.style.display = "inline";arrivedCount = 0;}
}
function check()
{if(arrivedCount == requiredLanterns){wordBox.style.display = "inline";arrivedCount = 0;}
}
Congratulations!!! You have now learned how to create a batch of lanterns that arranges themselves to display the words you like. A demo of the full project can be found here. Hope you have a great Lantern Festival!!!
恭喜!!! 您现在已经了解了如何创建一批灯笼,以布置自己显示喜欢的单词。 完整项目的演示可以在这里找到。 希望您有个很棒的元宵节!!!
最后的话 (Words In the End)
The Chinese Lantern Festival this year is on February 19th. If you live in a small Chinese town, you would see the festival spirit growing throughout the streets. Back in time, this illuminating festival is actually a Chinese equivalent of Valentine’s Day. Boys and girls go out onto the streets hoping to meet their significant other and send hand-crafted lanterns which are believed to grant wishes in the following time of the year.
今年的中国元宵节是2月19日。 如果您住在一个中国小镇上,您会看到节日的气息在街头遍地开花。 时光倒流,这个具有启发性的节日实际上相当于情人节。 男孩和女孩走上街头,希望与他们相遇,并送上手工制作的灯笼,据信这些灯笼会在每年的下一个时间许愿。
I have some previous guides on similar projects.
我以前有一些类似项目的指南。
Beginner:
初学者:
how to fill your website with lovely VALENTINES HEARTS
如何用可爱的情人节心填充您的网站
how to add some FIREWORKS to your website
如何向您的网站添加一些烟花
how to add some BUBBLES to your website
如何在您的网站上添加一些气泡
Advanced:
高级:
how to drop LEPRECHAUN-HATS into your website with COMPUTER VISION
如何使用COMPUTER VISION将LEPRECHAUN-HATS放入您的网站
I am passionate about coding and would love to learn new stuff. I believe knowledge can make the world a better place and therefore am self-motivated to share. Let me know if you are interested in reading anything in particular.
我对编码充满热情,并愿意学习新知识。 我相信知识可以使世界变得更美好,因此会自我激励去分享。 让我知道您是否对阅读特别内容感兴趣。
翻译自: https://www.freecodecamp.org/news/how-to-create-beautiful-lanterns-that-arrange-themselves-into-words-da01ae98238/
unity 灯笼
相关文章:

Android PackageManager packages.xml文件格式
packages.xml文件存放在/data/system目录下 该文件记录了系统中所有应用程序的包管理相关信息 PmS根据该文件进行包管理的各种操作 标签名称所包含的值举例last-platform-versioninternal"17" external"17"<permission-trees />暂时不使用<…
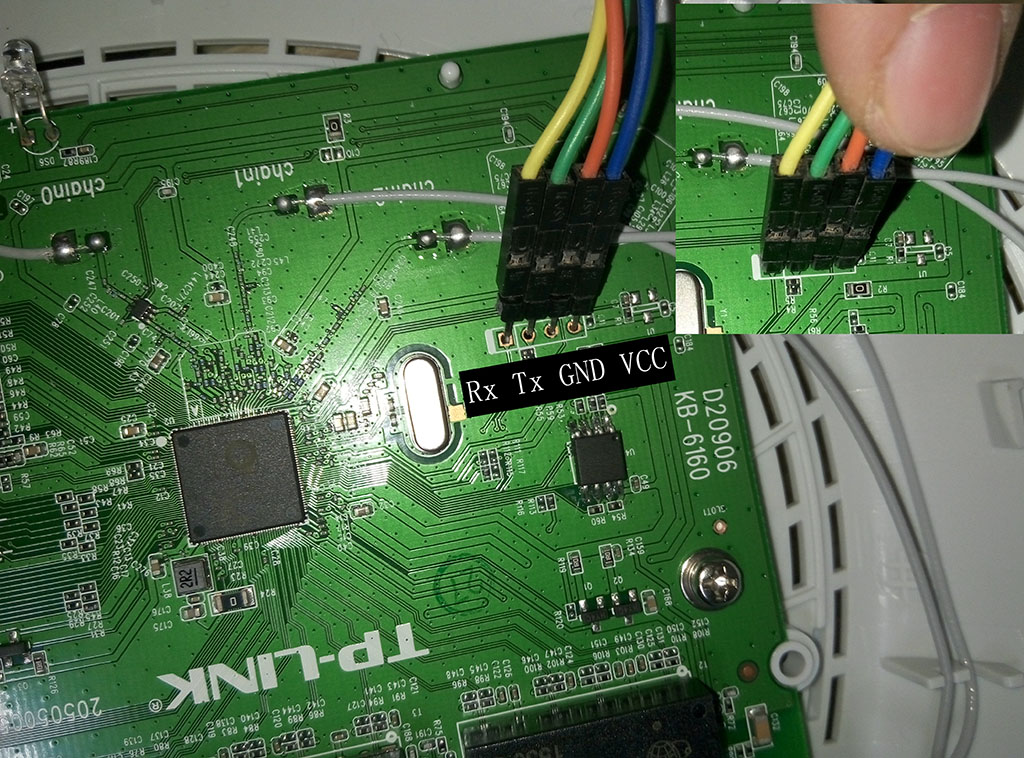
tplink wr886n v5.0 ttl 接线方法
我的倒是有ttl信息,但是全是乱码,换过RX和TX,也换过串口速率都没用,附上TTL接线图.2016-11-02今天晚上终于搞定了ttl了,步骤如下:1.先将串口波特率改为117500(推荐使用Putty).如果可以了就不用第二步了2.将usb转ttl转接板上的rx和tx的指示灯干掉,可以留下电源指示灯详细教程见s…

React子组件给父组件传值, 父组件引用子组件并给子组件传值
本博客代码是 React 父组件和子组件相互传值的 demo;实现封装一个折线图,折线图选择下拉框,获取下拉框点击的值并且传给父组件根据下拉框筛选的条件更新视图;效果图如下: 父组件代码: 代码解析:父组件 Parent 引用子组件 Sub ,传递了 list 组件给子组件,并且接收子组件…

我如何使用深度学习通过Fast.ai对医学图像进行分类
by James Dietle詹姆斯迪特尔(James Dietle) Convolutional Neural Networks (CNNs) have rapidly advanced the last two years helping with medical image classification. How can we, even as hobbyists, take these recent advances and apply them to new datasets? W…
Java——基础
1.数据类型 int,short,byte,long double,float char,String 2.变量 int var; var 12; int var1 12;final int v1 0; //常量 C/C变量的声明和定义是分开的,JAVA不区分。 //c/c extern int a; //声明 …

Gradle系列教程之依赖管理
这一章我将介绍Gradle对依赖管理的强大支持,学习依赖分组和定位不同类型仓库。依赖管理看起来很容易,但是当出现依赖解析冲突时就会很棘手,复杂的依赖关系可能导致构建中依赖一个库的多个版本。Gradle通过分析依赖树得到依赖报告,…
Ant Design Pro 登录流程以及路由权限设置
登录流程: 1.ant 框架最外层套了 SecurityLayout 布局 SecurityLayout 中判断用户是否登录,做自动跳转路由处理。 里面的 currentUser 和 currentUser.userid 很关键,是判断登录状态的值. 2.currentUser 是通过 src/models/user 中 fetchCurrent 绑定 type saveCurrentUs…
初级开发人员的缺点_这是我想放弃初级开发人员时所做的事情
初级开发人员的缺点Coding is hard. Really hard. There are times when you’ll think “this is amazing! I love this!”编码很难。 真的很难。 有时您会认为“这太神奇了! 我喜欢这个!” But you’ll also have the not so amazing times. The time…
C#之 HashSet(临时笔记,未参考资料,请慎重)
HashSet是一个集合,类似于DataSet,但是其主要用途是用来存放同一种类型的元素(string、row、table等),如果添加的元素跟定义时初始的类型不一致,就会直接编译失败。 例如: HashSet<string> hsnew Has…
Ant Design of React从入门到开发教程
Ant Design Pro 是一个企业级中后台前端/设计解决方案。 目录: 一:开发前的准备 二:创建页面 三:创建组件并引用 四:封装网络请求和网络请求走向 五:登录流程以及路由权限设置 六:父组件和子组件相互传值和接收 七:for 循环渲染组件 Ant Design Pro 全家桶技术…
适合初学者的数据结构_数据结构101:数组-初学者的直观介绍
适合初学者的数据结构了解您每天使用的数据结构。 (Get to know the data structures that you use every day. ) Welcome! Let’s Start with some Vital Context. Let me ask you this: ✅ Do you listen to music on your smartphone?✅ Do you keep a list of contacts on…

少侠,找个千手观音来帮你营销可好?
亚历山大公司营销主管老张最近有点儿烦,不是因为老婆更年期、女儿叛逆期,而是工作遇到了些麻烦。 社交营销很火,老张自认为公司始终游走在新科技最前沿,当然在第一时间就开通了微信、微博、QQ……各种社交网络的一大堆账号&#x…

Upload上传图片
实现antd上传图片,Upload 组件可以上传多张图片,多张图片上传成功的效果图: 每次上传 onChange 回调函数都会执行一次并且里面接收一个JSON对象,其中 file 对象是本次上传的图片信息,status 值为 done 就表示这一次上传成功了,fileList 中是一个数组,里面是组件所有上传…
将html中的代码拷贝到jsp后出现的问题 Failed to create the part's controls
Failed to create the parts controls 解决方法: 在文件上右键:open with转载于:https://www.cnblogs.com/flyoung/p/4885921.html
面试官问你想找什么工作_找工作时如何面试面试官
面试官问你想找什么工作在技术面试中要问的十二个问题 (Twelve questions to ask at tech interviews) I’ve just come off six weeks’ of interviewing for medior software developer roles, in a market that is desperate for talent (Amsterdam). That means I went…

windows7 端口查看以及杀死进程释放端口
1、调出命令窗口:开始---->运行---->cmd,或者是windowR组合键 2、输入命令:netstat -ano,列出所有端口的情况。在列表中我们观察被占用的端口,比如是4300,我们拿它来做实验。 3、查看被占用端口对应的…
web-view 跳转小程序页面 网页跳转小程序
H5实现代码: <!DOCTYPE html> <html><head><meta charset"UTF-8"><title>测试H5</title><meta content"widthdevice-width, initial-scale1.0, maximum-scale1.0, user-scalable0" name"viewport…

MongoDB安装指南
0. 环境说明:Ubuntu 14.04, MongoDB2.6.1 1.输入MongoDB中public Key值到Ubuntu包系统中 2. 在Sources列表中创建MongoDB的文件 3. 又一次载入本地的文件包库列表 4. 安装MongoDB数据库 5. 启动MongoDB 6. 启动MongoDB shell,shell提供了一个类似SQLConsole的方式…
待办事项优先级 开发_如何通过创建主题待办事项确定学习内容的优先级
待办事项优先级 开发by Dan Draper通过丹德雷珀(Dan Draper) 如何通过创建主题待办事项确定学习内容的优先级 (How to prioritize what you learn by creating a topic backlog) 25年编码经验 (Lessons from 25 years of coding) Way back in 1994, I started learning how to…
Luogu P1087 FBI树
P1087 FBI树 题目描述 我们可以把由“0”和“1”组成的字符串分为三类:全“0”串称为B串,全“1”串称为I串,既含“0”又含“1”的串则称为F串。 FBI树是一种二叉树,它的结点类型也包括F结点,B结点和I结点三种。由一个长…
小程序 url 对象转字符串编码传参 url 字符串转对象解码接收参数
url 对象转字符串编码传参 let info encodeURI(JSON.stringify(this.data.info));wx.navigateTo({url: /pages/partner_reward/recognition_result/result?info info,}) url 字符串转对象解码接收参数 onLoad(options){let info JSON.parse(decodeURI(options.info));},
入职体检体检错了_我们如何更新入职体验并获得更多用户
入职体检体检错了by William Woodhead威廉伍德黑德(William Woodhead) 我们如何更新入职体验并获得更多用户 (How we updated our onboarding experience and got more users) 我们过去将转化率提高60%的方法 (Methods we used to increase conversion by 60%) As …
Java集合框架:EnumMap
EnumMap定义 package java.util;import java.util.Map.Entry; import sun.misc.SharedSecrets; public class EnumMap<K extends Enum<K>, V> extends AbstractMap<K, V>implements java.io.Serializable, Cloneable{private final Class<K> keyType;p…
javascript eval和JSON之间的联系
eval函数的工作原理 eval函数会评估一个给定的含有JavaScript代码的字符串,并且试图去执行包含在字符串里的表达式或者一系列的合法的JavaScript语句。eval函数将把最后一个表达式或者语句所包含的值或引用作为返回值。 举例说明 eval评估JavaScript表达式var bar …
notification antd 弹窗使用示例
示例代码 import { notification } from antd;notification.error({description: 您的网络发生异常,无法连接服务器,message: 网络异常,});
python如何编写数据库_如何在几分钟内用Python编写一个简单的玩具数据库
python如何编写数据库MySQL, PostgreSQL, Oracle, Redis, and many more, you just name it — databases are a really important piece of technology in the progress of human civilization. Today we can see how valuable data are, and so keeping them safe and stable…

齐博cms 7.0 漏洞分析
** 0x01 原理分析 ** 还是很早之前爆出来的漏洞,现在拿出来学习一下,参考阿里巴巴:https://security.alibaba.com/... 漏洞发生在/inc/common.inc.php页面中。首先看这个函数: 首先使用ini_get来获取php.ini中变量register_global…
J2EE 中的服务器 tomcat6.0 配置
Tomcat6.0 配置 第一步:下载jdk和tomcat:JDK下载 Tomcat下载 最新的jdk为1.6.10,tomcat为6.0,建议jdk1.4以上,tomcat4.0以上 第二步:安装和配置你的jdk和tomcat:执行jdk和tomcat的安装程序…
【Ant Design Pro 四】react 点击事件传参
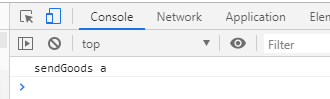
简单的绑定点击事件传参: 点击事件 function myClick(){console.log(点击)}return (<Button onClick{myClick}>点击</Button>) 点击事件传参 sendGoods(e){console.log(sendGoods,e)}render() {retrun(<Button type"primary" onClick{(e…
初创公司为什么要我_在一家大型初创公司担任副总裁之前,我希望知道什么
初创公司为什么要我by Assaf Elovic通过阿萨夫埃洛维奇 在一家大型初创公司担任副总裁之前,我希望知道什么 (What I wish I knew before becoming a VP at a large startup) When I started my position as VP of R&D at a growing startup, I thought my bigg…