使用FortJs使用现代JavaScript开发Node.js
介绍 (Introduction)
Nodejs gives you the power to write server side code using JavaScript. In fact, it is very easy and fast to create a web server using Nodejs. There are several frameworks available on Node package manager which makes the development even easier and faster.
Nodejs使您能够使用JavaScript编写服务器端代码。 实际上,使用Node.js创建Web服务器非常简单快捷。 Node软件包管理器上有几种可用的框架,这些框架使开发变得更加轻松和快捷。
But there are a few challenges in Nodejs development:
但是,Nodejs开发中存在一些挑战:
- Nodejs is all about callbacks, and with more and more callbacks you end up with a situation called callback hell.Node.js完全是关于回调的,随着越来越多的回调,您最终会遇到称为回调地狱的情况。
- Writing readable code.编写可读的代码。
- Writing maintainable code.编写可维护的代码。
- You don't get much intellisense support which makes development slow.您没有太多的智能感知支持,这会使开发变慢。
If you are quite experienced and have a good knowledge of Nodejs, you can use different techniques and try to minimize these challenges.
如果您有丰富的经验并且对Node.js有所了解,则可以使用不同的技术并尽量减少这些挑战。
The best way to solve these problems is by using modern JavaScript ES6, ES7 or TypeScript, whatever you feel comfortable with. I recommend TypeScript, because it provides intillisense support for every word of code which makes your development faster.
解决这些问题的最佳方法是使用现代JavaScript ES6,ES7或TypeScript,无论您喜欢什么。 我推荐TypeScript,因为它为每个代码字提供了intillisense支持,从而使您的开发更快。
So I created a framework called FortJs which is very easy to learn and use. FortJs enables you to write server-side code using ES6 or TypeScript which is modular, secure, and pretty much just beautiful and readable.
因此,我创建了一个名为FortJs的框架,该框架非常易于学习和使用。 FortJs使您可以使用ES6或TypeScript编写服务器端代码,该代码模块化,安全且几乎美观且可读。
特征 (Features)
Some of the important features of FortJs are:
FortJ的一些重要功能包括:
Based on Fort architecture.
基于Fort体系结构。
- MVC Framework and follows OOPS approach so everything is class and object.MVC框架并遵循OOPS方法,因此一切都是类和对象。
- Provides components - Wall, Shield and Guard. Components help modularize the application.提供组件-墙,盾和护罩。 组件有助于模块化应用程序。
- Uses ES6 async/await or promise for executing asychronous code.使用ES6异步/等待或Promise执行异步代码。
- Everything is configurable - you can configure your session store, view engine, websocket etc.一切都是可配置的-您可以配置会话存储,查看引擎,websocket等。
- Dependency Injection.依赖注入。
Everything can be unit tested, so you can use a TDD approach.
一切都可以进行单元测试,因此您可以使用TDD方法。
让我们编码 (Let's Code)
In this article I am going to create a REST API using FortJs and ES6. But you can use the same code and steps to implement using TypeScript too.
在本文中,我将使用FortJs和ES6创建REST API。 但是您也可以使用相同的代码和步骤来使用TypeScript实施。
项目设置 (Project Setup)
FortJs provides a CLI - fort-creator. This helps you set up the project and develop faster. Let's use the CLI to develop.
FortJs提供了一个CLI-堡垒创建者。 这可以帮助您设置项目并加快开发速度。 让我们使用CLI进行开发。
Perform the below steps sequentially:
依次执行以下步骤:
- Open your terminal or command prompt.打开您的终端或命令提示符。
Install fort-creator globally - run the command "npm i fort-creator -g". Note: Make sure you have Nodejs installed in your system.
全局安装Fort- creator-运行命令“ npm i fort-creator -g”。 注意:确保在系统中安装了Nodejs。
- Create a new project - run the command "fort-creator new my-app". Here “my-app” is the name of the app, so you can choose any name. The CLI will prompt you to choose the language with two options: TypeScript and JavaScript. Choose your language by using the arrow keys and press enter - i have chosen JavaScript. It will take some time to create the project, so please wait until you see "new project my-app created".创建一个新项目-运行命令“ fort-creator new my-app”。 “ my-app”是应用程序的名称,因此您可以选择任何名称。 CLI将提示您选择带有两种选项的语言:TypeScript和JavaScript。 使用箭头键选择您的语言,然后按Enter键-我选择了JavaScript。 创建项目将需要一些时间,因此请等到看到“我的应用程序已创建新项目”。
Enter into the project directory - "cd my-app".
进入项目目录-“ cd my-app”。
Start the development server with live reloading - run the command "fort-creator start".
通过实时重装启动开发服务器-运行命令“ fort-creator start”。
Open the browser and type the URL - http://localhost:4000/.
打开浏览器并输入URL- http:// localhost:4000 / 。
Open the browser and type the URL - http://localhost:4000/.
打开浏览器,然后输入URL- http:// localhost:4000 / 。
You should see something like this in the browser.
您应该在浏览器中看到类似的内容。
Let's understand how this page is rendered:
让我们了解如何呈现此页面:
- Open the project folder in your favourite code editor. I am going to use VS Code. You will see many folders inside project root such as controllers, views, etc. Every folder is grouped by their use - for example, the controllers folder contains all controllers and the views folder contains all views.在您喜欢的代码编辑器中打开项目文件夹。 我将使用VS Code。 您将在项目根目录中看到许多文件夹,例如controllers,views等。每个文件夹均按用途分组-例如,controllers文件夹包含所有控制器,而viewss文件夹包含所有视图。
Open the controllers folder -> Inside the controllers, you will see a file name - default_controller. Let's open it and observe the code. The file contains a class DefaultController - this is a controller class and it contains methods which return some http response.
打开controllers文件夹-> controllers内部,您将看到一个文件名-default_controller。 让我们打开它并观察代码。 该文件包含一个DefaultController类-这是一个控制器类,它包含返回一些http响应的方法。
Inside the class DefaultController, you will see a method 'index' - this is the one which is rendering current output to the browser. The method is known as worker in FortJs because they do some kind of work and return the result as an http response. Let's observe the index method code:
在类DefaultController内,您将看到一个方法'index'-这是一种将当前输出呈现给浏览器的方法。 该方法在FortJs中被称为worker ,因为它们进行某种工作并将结果作为http响应返回。 让我们观察一下索引方法代码:
```
```
const data = {
const data = {
title: title
标题:标题
}
}
const result = await viewResult('default/index.html', data);
const result = await viewResult('default / index.html',data);
return result;
返回结果;
```
```
It creates a data object and passes that object into the
它创建一个数据对象并将该对象传递到
viewResult method. The viewResult method takes two parameters - the view location and view data. The work of viewResult is to render the view and return a response, which we are seeing in the browser.
viewResult方法。 viewResult方法采用两个参数-视图位置和视图数据。 viewResult的工作是呈现视图并返回响应,我们正在浏览器中看到该响应。
- Let's find the view code and understand it. Open the views folder - > open default folder - > open index.html. This is our view code. It is simple HTML code along with some mustache syntax. The default view engine for Fortjs is mustache.让我们找到视图代码并理解它。 打开views文件夹->打开默认文件夹->打开index.html。 这是我们的视图代码。 它是简单HTML代码以及一些胡须语法。 Fortjs的默认视图引擎是胡须。
I hope you have understood the project architecture. If you are having any difficulties or doubts, please feel free to ask in the comments section.
希望您了解项目架构。 如果您有任何困难或疑问,请随时在评论部分提问。
Now we will move to next part of this article where we will learn how to create a simple rest API.
现在,我们将转到本文的下一部分,在那里我们将学习如何创建一个简单的rest API。
休息 (REST)
We are going to create a REST endpoint for entity user - which will perform CRUD operations for the user such as adding a user, deleting a user, getting a user, and updating a user.
我们将为实体用户创建一个REST端点-它将为用户执行CRUD操作,例如添加用户,删除用户,获取用户和更新用户。
According to REST:
根据REST:
Adding user - should be done using the http method "
POST"添加用户-应该使用http方法“
POST”完成Deleting user - should be done using the http method "
REMOVE"删除用户-应该使用http方法“
REMOVE”完成Getting user - should be done using the http method "
GET"获取用户-应该使用http方法“
GET”完成Updating user - should be done using the http method "
PUT"更新用户-应该使用http方法“
PUT”完成
For creating an endpoint, we need to create a Controller similar to the default controller explained earlier.
为了创建端点,我们需要创建一个类似于前面解释的默认控制器的Controller。
Execute the command "fort-creator add". It will ask you to "Choose the component to add ?" Choose Controller & press enter. Enter the controller name "User" and press enter.
执行命令“ fort-creator add ”。 它将要求您“选择要添加的组件?” 选择控制器,然后按回车 。 输入控制器名称“用户”,然后按Enter 。
Now that we have created the user controller we need to inform FortJs by adding it to routes. The route is used to map our controller to a path.
现在,我们已经创建了用户控制器,我们需要通过将其添加到路由来通知FortJs。 该路线用于将我们的控制器映射到路径。
Since our entity is user, "/user" will be a good route. Let's add it. Open routes.js inside the root directory of the project and add UserController to routes.
由于我们的实体是用户,因此“ /user ”将是一个不错的选择。 让我们添加它。 在项目的根目录中打开routes.js,然后将UserController添加到路由中。
After adding UserController, routes.js will look like this:
添加UserController之后,routes.js将如下所示:
So when an http request has the path "/user" then UserController will be called.
因此,当http请求具有路径“ / user”时,将调用UserController。
Let's open the url - http://localhost:4000/user.
让我们打开url- http:// localhost:4000 / user 。
Note: If you have stopped FortJs while adding the controller, please start it again by running the cmd - fort-creator start
注意:如果添加控制器时已停止FortJs,请通过运行cmd重新启动-Fort fort-creator start
And you see a white page right?
然后您看到白页了吗?
This is because we are not returning anything from the index method and thus we get a blank response. Let's return a text "Hello World" from the index method. Add the below code inside the index method and save:
这是因为我们没有从index方法返回任何内容,因此我们得到了一个空白响应。 让我们从索引方法返回文本“ Hello World”。 将以下代码添加到index方法中并保存:
return textResult('Hello World');Refresh the url - http://localhost:4000/user
刷新网址-http:// localhost:4000 / user
And you see "Hello World" right?
您看到“ Hello World”了吗?
Now, let's convert "UserController" to a REST API. But before writing code for the REST API, let's create a dummy service which will do CRUD operations for users.
现在,让我们将“ UserController”转换为REST API。 但是,在为REST API编写代码之前,让我们创建一个虚拟服务,该服务将为用户执行CRUD操作。
服务 (Service)
Create a folder called “services” and then a file “user_service.js” inside the folder. Paste the below code inside the file:
创建一个名为“ services”的文件夹,然后在该文件夹中创建一个文件“ user_service.js”。 将以下代码粘贴到文件中:
const store = {users: [{id: 1,name: "ujjwal",address: "Bangalore India",emailId: "ujjwal@mg.com",gender: "male",password: "admin"}]
}export class UserService {getUsers() {return store.users;}addUser(user) {const lastUser = store.users[store.users.length - 1];user.id = lastUser == null ? 1 : lastUser.id + 1;store.users.push(user);return user;}updateUser(user) {const existingUser = store.users.find(qry => qry.id === user.id);if (existingUser != null) {existingUser.name = user.name;existingUser.address = user.address;existingUser.gender = user.gender;existingUser.emailId = user.emailId;return true;}return false;}getUser(id) {return store.users.find(user => user.id === id);}removeUser(id) {const index = store.users.findIndex(user => user.id === id);store.users.splice(index, 1);}
}
The above code contains a variable store which contains a collection of users. The method inside the service does operations like add, update, delete, and get on that store.
上面的代码包含一个变量存储,其中包含一组用户。 服务中的方法执行诸如添加,更新,删除以及在该商店上获取之类的操作。
We will use this service in REST API implementation.
我们将在REST API实现中使用此服务。
得到 (GET)
For the route "/user" with the http method "GET", the API should return a list of all users.
对于使用http方法“ GET”的路由“ / user”,API应该返回所有用户的列表。
In order to implement this, let's rename the "index" method inside user_controller.js to "getUsers" making it semantically correct. Then paste the below code inside the method:
为了实现这一点,让我们将user_controller.js中的“ index”方法重命名为“ getUsers”,使其在语义上正确。 然后将以下代码粘贴到方法中:
const service = new UserService();
return jsonResult(service.getUsers());
Now user_controller.js looks like this:
现在,user_controller.js如下所示:
import { Controller, DefaultWorker, Worker, textResult, jsonResult } from "fortjs";
import { UserService } from "../services/user_service";export class UserController extends Controller {@DefaultWorker()async getUsers() {const service = new UserService();return jsonResult(service.getUsers());}
}
Here, we are using the decorator DefaultWorker. The DefaultWorker does two things: it adds the route "/" & the http method "GET". It's a shortcut for this scenario. In the next part, we will use other decorators to customize the route.
在这里,我们使用装饰器DefaultWorker。 DefaultWorker做两件事:添加路由“ /”和http方法“ GET”。 这是此方案的快捷方式。 在下一部分中,我们将使用其他装饰器来自定义路线。
Let's test this by calling the url http://localhost:4000/user. You can open this in the browser or use any http client tools like postman or curl.
让我们通过调用url http:// localhost:4000 / user进行测试 。 您可以在浏览器中打开它,也可以使用邮递员或curl等任何http客户端工具。
Ok, so we have successfully created an end point :) .
好的,我们已经成功创建了一个终点:)。
Let's look again at our code and see if we can make it better:
让我们再次看一下代码,看看是否可以做得更好:
The service "UserService" is tightly coupled with Controller "UserController" which becomes a problem for unit testing "UserController". So we will use dependency injection by FortJs to inject UserService.
服务“ UserService”与控制器“ UserController”紧密耦合,这成为单元测试“ UserController”的问题。 因此,我们将使用FortJs的依赖项注入来注入UserService。
- We are creating an instance of "UserService" every time the method getUsers is called. But what we need from "UserService" is a single object and then call the "UserService" method from the object.每次调用getUsers方法时,我们都会创建一个“ UserService”实例。 但是,我们从“ UserService”需要的是一个对象,然后从该对象调用“ UserService”方法。
So if we can somehow store an object of "UserService" then we can make our code faster (because calling new does some work under the hood). For this we will use the singleton feature of FortJs.
因此,如果我们可以某种方式存储“ UserService”的对象,则可以使我们的代码更快(因为调用new可以在后台进行某些工作)。 为此,我们将使用FortJs的单例功能。
Let's change the user_controller.js code by the below code:
让我们通过以下代码更改user_controller.js代码:
import { Controller, DefaultWorker, Worker, textResult, jsonResult, Singleton } from "fortjs";
import { UserService } from "../services/user_service";export class UserController extends Controller {@DefaultWorker()async getUsers(@Singleton(UserService) service) {return jsonResult(service.getUsers());}
}
As you can see, the only change is that we are using the "Singleton" decorator in the method getUsers. This will create a singleton and inject that singleton when getUsers is called. This singleton will be available throughout the application.
如您所见,唯一的变化是我们在getUsers方法中使用了“ Singleton”装饰器。 这将创建一个单例并在调用getUsers时注入该单例。 该单例将在整个应用程序中可用。
Since service is now a parameter, we can manually pass the parameter while calling. This makes getUsers unit testable.
由于service现在是参数,因此我们可以在调用时手动传递参数。 这使getUsers单元可测试。
For doing unit testing or E2E testing, please read this test doc - http://fortjs.info/tutorial/test/
对于进行单元测试或E2E测试,请阅读此测试文档-http: //fortjs.info/tutorial/test/
开机自检 (POST)
Let's add a method "addUser" which will extract data from the request body and call service to add a user.
让我们添加一个方法“ addUser”,该方法将从请求主体中提取数据并调用服务以添加用户。
async addUser(@Singleton(UserService) service) {const user = {name: this.body.name,gender: this.body.gender,address: this.body.address,emailId: this.body.emailId,password: this.body.password};const newUser = service.addUser(user);return jsonResult(newUser, HTTP_STATUS_CODE.Created);
}
In the above code we are creating the Singleton of the UserService again. So the question is will it create another object?
在上面的代码中,我们再次创建了UserService的Singleton。 那么问题是它将创建另一个对象吗?
No it will be same object that was in getUser. FortJs supplies the object as a parameter when it calls the method.
不,它将是与getUser中相同的对象。 FortJs在调用方法时将其作为参数提供。
The methods created are by default not visible for an http request. So in order to make this method visible for the http request, we need to mark this as a worker.
默认情况下,创建的方法对于http请求不可见。 因此,为了使该方法对于http请求可见,我们需要将此方法标记为工作程序。
A method is marked as a worker by adding the decorator "Worker". The Worker decorator takes a list of http methods and makes that method available for only those http methods. So let's add the decorator:
通过添加装饰器“ Worker”将方法标记为工作器。 Worker装饰器获取HTTP方法列表,并使该方法仅可用于那些http方法。 因此,让我们添加装饰器:
@Worker([HTTP_METHOD.Post])
async addUser(@Singleton(UserService) service) {const user = {name: this.body.name,gender: this.body.gender,address: this.body.address,emailId: this.body.emailId,password: this.body.password};const newUser = service.addUser(user);return jsonResult(newUser, HTTP_STATUS_CODE.Created);
}
Now the route of this method is the same as the name of the method that is "addUser". You can check this by sending a post request to http://localhost:4000/user/addUser with user data in the body.
现在,此方法的路由与方法名称“ addUser”相同。 您可以通过向正文中包含用户数据的http:// localhost:4000 / user / addUser发送发帖请求来进行检查。
But we want the route to be "/", so that it will be a rest API. The route of the worker is configured by using the decorator "Route". Let's change the route now.
但是我们希望路由为“ /”,因此它将是一个REST API。 使用装饰器“ Route”配置工作进程的路由。 让我们现在更改路线。
@Worker([HTTP_METHOD.Post])
@Route("/")
async addUser(@Singleton(UserService) service) {const user = {name: this.body.name,gender: this.body.gender,address: this.body.address,emailId: this.body.emailId,password: this.body.password};const newUser = service.addUser(user);return jsonResult(newUser, HTTP_STATUS_CODE.Created);
}
Now our end point is configured for a post request. Let's test this by sending a post request to http://localhost:4000/user/ with user data in the body.
现在,我们的端点已配置为发布请求。 让我们通过在正文中发送用户数据到http:// localhost:4000 / user /来发送发布请求,以进行测试。
It returns the user created with id which is our logic. So we have created the end point for the post request, but one important thing to do is to validate the data. Validation is an essential part of any app and is very important for a backend application.
它返回使用id创建的用户,这是我们的逻辑。 因此,我们为发布请求创建了终点,但是要做的一件事是验证数据。 验证是任何应用程序的重要组成部分,对于后端应用程序非常重要。
So far, our code is clean and readable. But if we add validation code it will become a little dirty.
到目前为止,我们的代码是清晰易读的。 但是,如果我们添加验证代码,它将变得有点脏。
Worry not, FortJs provides the component Guard for this kind of work. A/c to the FortJs docs:
不用担心,FortJs为此类工作提供了Guard组件。 FortJs文档的A / c:
Guard is security layer on top of Worker. It controls whether a request should be allowed to call the Worker.
Guard是Worker之上的安全层。 它控制是否应允许请求调用Worker。
So we are going to use guard for validation of the data. Let's create the guard using fort-creator. Execute the command fort-creator add and choose Guard. Enter the file name "UserValidator". There will be a file "user_validator_guard.js" created inside the guards folder. Open that file.
因此,我们将使用Guard来验证数据。 让我们使用堡垒创造者创建守卫。 执行命令fort-creator add并选择Guard。 输入文件名“ UserValidator”。 在guards文件夹中将创建一个文件“ user_validator_guard.js”。 打开该文件。
A guard has access to the body, so you can validate the data inside that. Returning null inside the method check means that we're allowing to call the worker. Returning anything else means block the call.
守卫可以进入尸体,因此您可以验证其中的数据。 在方法check返回null意味着我们允许调用工作程序。 返回其他任何内容均表示阻止通话。
Let's make it clearer by writing code for the validation. Paste the below code inside the file "user_validator_guard.js":
让我们通过编写验证代码来使其更加清晰。 将以下代码粘贴到文件“ user_validator_guard.js”中:
import { Guard, textResult, HTTP_STATUS_CODE } from "fortjs";export class UserValidatorGuard extends Guard {async check() {const user = {name: this.body.name,gender: this.body.gender,address: this.body.address,emailId: this.body.emailId,password: this.body.password};const errMsg = this.validate(user);if (errMsg == null) {// pass user to worker method, so that they dont need to parse again this.data.user = user;// returning null means - guard allows request to pass return null;} else {return textResult(errMsg, HTTP_STATUS_CODE.BadRequest);}}validate(user) {let errMessage;if (user.name == null || user.name.length < 5) {errMessage = "name should be minimum 5 characters"} else if (user.password == null || user.password.length < 5) {errMessage = "password should be minimum 5 characters";} else if (user.gender == null || ["male", "female"].indexOf(user.gender) < 0) {errMessage = "gender should be either male or female";} else if (user.emailId == null || !this.isValidEmail(user.emailId)) {errMessage = "email not valid";} else if (user.address == null || user.address.length < 10) {errMessage = "address length should be greater than 10";}return errMessage;}isValidEmail(email) {var re = /^(([^<>()\[\]\\.,;:\s@"]+(\.[^<>()\[\]\\.,;:\s@"]+)*)|(".+"))@((\[[0-9]{1,3}\.[0-9]{1,3}\.[0-9]{1,3}\.[0-9]{1,3}\])|(([a-zA-Z\-0-9]+\.)+[a-zA-Z]{2,}))$/;return re.test(String(email).toLowerCase());}}In the above code:
在上面的代码中:
- We have created a method validate which takes the parameter user. It validates the user & returns the error message if there is a validation error, otherwise null.我们创建了一个方法validate,它使用参数user。 它会验证用户并在出现验证错误时返回错误消息,否则返回null。
We are validating data inside the check method, which is part of guard lifecycle. We are validating the user inside it by calling the method validate.
我们正在检查方法内部的数据,这是保护生命周期的一部分。 我们通过调用validate方法来验证其中的用户。
If the user is valid, then we are passing the user value by using the "data" property and returning null. Returning null means guard has allowed this request and the worker should be called.
如果用户有效,那么我们通过使用“ data”属性并返回null来传递用户值。 返回null表示Guard已允许此请求,并且应调用worker。
- If a user is not valid, we are returning an error message as a text response with the HTTP code "Bad Request". In this case, execution will stop here and the worker won't be called.如果用户无效,我们将以HTTP代码“错误请求”的形式返回错误消息作为文本响应。 在这种情况下,执行将在此处停止,并且不会调用该工作程序。
In order to activate this guard for the method addUser, we need to add this on top of addUser. The guard is added by using the decorator "Guards". So let's add the guard:
为了激活方法addUser的此保护,我们需要将其添加到addUser之上。 通过使用装饰器“ Guards”来添加防护罩。 因此,让我们添加防护:
@Worker([HTTP_METHOD.Post])
@Route("/")
@Guards([UserValidatorGuard])
async addUser(@Singleton(UserService) service) {const newUser = service.addUser(this.data.user);return jsonResult(newUser, HTTP_STATUS_CODE.Created);
}
In the above code:
在上面的代码中:
- I have added the guard, “UserValidatorGuard” using the decorator Guards.我已经使用装饰器Guards添加了防护“ UserValidatorGuard”。
- With the guard in the process, we don't need to parse the data from the body anymore inside the worker. Rather, we are reading it from this.data which we are passing from "UserValidatorGuard".有了后卫,我们就不再需要在工人内部解析来自身体的数据。 而是从“ UserValidatorGuard”传递的this.data中读取它。
- The method “addUser” will only be called when Guard allows, which means all data is valid.仅当Guard允许时才调用方法“ addUser”,这意味着所有数据均有效。
One thing to note is that the method "addUser" looks very light after using a component, and it's doing validation too. You can add multiple guards to a worker which gives you the ability to modularize your code into multiple guards and use that guard at multiple places.
需要注意的一件事是,使用组件后,方法“ addUser”看起来非常轻巧,它也在进行验证。 您可以向工作人员添加多个防护,这使您能够将代码模块化为多个防护,并在多个位置使用该防护。
Isn't this cool :D?
:D这不是很酷吗?
Let's try adding a user with some invalid data:
让我们尝试为用户添加一些无效数据:
As you can see in the screenshot, I have tried sending a request without a password. The result is - "password should be minimum 5 characters". So it means that guard is activated and working perfectly.
如您在屏幕截图中所见,我尝试发送没有密码的请求。 结果是-“密码应至少为5个字符”。 因此,这意味着防护装置已启动且工作正常。
放 (PUT)
Let’s add another method - “updateUser” with route “/” , guard “UserValidatorGuard” (for validation of user) and most important - worker with http method “PUT”.
让我们添加另一种方法-带有路由“ /”的“ updateUser”,保护“ UserValidatorGuard”(用于验证用户)以及最重要的-使用http方法“ PUT”的worker。
@Worker([HTTP_METHOD.Put])
@Guards([UserValidatorGuard])
@Route("/")
async updateUser(@Singleton(UserService) service) {const user = this.data.user;const userUpdated = service.updateUser(user);if (userUpdated === true) {return textResult("user updated");} else {return textResult("invalid user");}
}
The updated code is similar to the addUser code except functionality wise it is updating the data. Here, we have reutilized UserValidatorGuard to validate data.
更新的代码与addUser代码类似,不同之处在于功能是在更新数据。 在这里,我们重新利用了UserValidatorGuard来验证数据。
删除 (DELETE)
In order to delete data, user needs to pass the id of the user. This can be passed by:
为了删除数据,用户需要传递用户的ID。 这可以通过:
- Sending data in body just like we did for add & update - {id:1}就像我们进行添加和更新一样,在正文中发送数据-{id:1}
- Sending data in query string - ?id=1以查询字符串发送数据-?id = 1
- Sending data in route - for this, we need to customize our route - "/user/1"在路由中发送数据-为此,我们需要自定义路由-“ / user / 1”
We have already implemented getting data from body. So let's see other two ways:
我们已经实现了从身体获取数据。 因此,让我们看看另外两种方式:
Sending Data in Query String
以查询字符串发送数据
Let's create a method "removeByQueryString" and paste the below code:
让我们创建一个方法“ removeByQueryString”并粘贴以下代码:
@Worker([HTTP_METHOD.Delete])
@Route("/")
async removeByQueryString(@Singleton(UserService) service) {// taking id from query stringconst userId = Number(this.query.id);const user = service.getUser(userId);if (user != null) {service.removeUser(userId);return textResult("user deleted");} else {return textResult("invalid user", 404);}
}
Sending Data in Route
在路线中发送数据
You can parameterise the route by using "{var}" in a route. Let's see how.
您可以通过在路由中使用“ {var}”来参数化路由。 让我们看看如何。
Let's create another method "removeByRoute" and paste the below code:
让我们创建另一个方法“ removeByRoute”并粘贴以下代码:
@Worker([HTTP_METHOD.Delete])
@Route("/{id}")
async removeByRoute(@Singleton(UserService) service) {// taking id from routeconst userId = Number(this.param.id);const user = service.getUser(userId);if (user != null) {service.removeUser(userId);return textResult("user deleted");} else {return textResult("invalid user");}
}
The above code is exactly the same as removeByQueryString except that it is extracting the id from the route and using parameter in route i.e., "/{id}" where id is parameter.
上面的代码与removeByQueryString完全相同,只不过它是从路由中提取ID并在route中使用参数,即“ / {id}”,其中id为参数。
Let's test this:
让我们测试一下:
So we have finally created a REST API for all the funtionalities except GETting a particular user by id. I will leave that to you for practice.
因此,我们终于为所有功能创建了REST API,除了通过id获取特定用户外。 我会把它留给您练习。
兴趣点 (POINTS OF INTEREST)
Q: How do we add authentication to "UserController", so that any unauthenticated request can't call the "/user" end point.
问:我们如何向“ UserController”添加身份验证,以使任何未经身份验证的请求都不能调用“ / user”端点。
A: There are multiple approaches for this:
答:有多种解决方法:
- We can check in every worker for authentication. (BAD - so much extra work and code repetition)我们可以签入每个工作人员进行身份验证。 (糟糕-太多的额外工作和代码重复)
- Create a Guard component and assign to every worker . (GOOD)创建一个Guard组件并分配给每个工作人员。 (好)
Create a Shield component and assign to controller. Shield is a security layer similar to guard but works on top of controller, so if shield rejects then controller is not initiated. (BEST)
创建一个Shield组件并分配给控制器。 Shield是类似于防护的安全层,但在控制器之上起作用,因此,如果Shield拒绝,则不会启动控制器。 (最好)
Take a look at the FortJs authentication docs - http://fortjs.info/tutorial/authentication/
看看在FortJs认证文档- http://fortjs.info/tutorial/authentication/
参考资料 (REFERENCES)
http://fortjs.info/
http://fortjs.info/
https://medium.com/fortjs
https://medium.com/fortjs
翻译自: https://www.freecodecamp.org/news/nodejs-development-with-modern-javascript-using-fortjs/
相关文章:
find 按时间查找
find 按时间查找 转载▼分类: linuxShell日记-mtime 修改时间-ctime 改变时间-atime 访问时间-mtime 5 至少5天之前修改过的文件,至少5天没修改过-mtime -5 5天之内修改过的文件-mtime 5 刚好5天前修改的文件 -perm 按权限查找 -perm 001 精确匹配权限…

转:从零开始做app需要做的事情列表
https://qdan.me/list/VaXl7N8emfv1ayWg 从零开始做App的Bootstrap 做一个App,需要很多东西。 不定期更新。 团队 工欲善其事,必先利其器。 需求管理 支持版本、迭代、需求的创建与管理。 产品经理在上面录入需求,开发参照开发,测…

uniapp自定义导航栏样式,自定义导航栏组件使用说明,兼容小程序和H5及各端
实现思路: 把底部导航做成一个组件,点击导航显示的页面也做成组件,在启动页面引入这四个组件,点击封装的导航组件就显示相应的组件页面,这样就不会出现页面重新加载的问题了,有个弊端就是导航页面不能使用…
javascript优化_如何通过使用服务人员来优化JavaScript应用
javascript优化Every now and then we hear about optimizing something. There are different kinds of optimizations we can do to make our apps faster and more efficient, or to save time or memory. This article will cover one of those methods — service worke…
【视觉SLAM14讲】ch3课后题答案
1.验证旋转矩阵是正交矩阵 感觉下面这篇博客写的不错 http://www.cnblogs.com/caster99/p/4703033.html 总结一下:旋转矩阵是一个完美的矩阵——正交矩阵。①行列式为1,②每个列向量都是单位向量且相互正交,③它的逆等于它的转置。 2.罗德里…

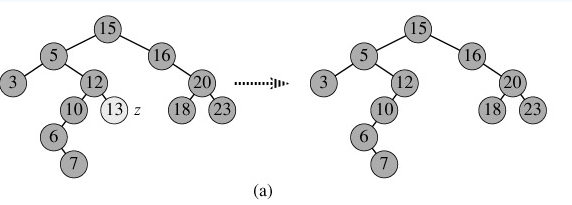
【转载】邻接表表示法
图的邻接表表示法 图的邻接表表示法类似于树的孩子链表表示法。对于图G中的每个顶点v i ,该方法把所有邻接于v i 的顶点v j 链成一个带头 结点的单链表,这个单链表就称为顶点v i 的邻接表(Adjacency List)。 1. 邻接表的结点结构 (…

宝塔的服务忽然挂掉解决方法
先登录宝塔看内存是否满了 如果满了就点击文件,找到大文件进行删除,然后清空回收站,重启服务器,就解决了。 清空回收站:点击首页,打开终端,输入下面命令, 清空回收站的命令是&#…
免费创办网站_足够好的工程来创办一家互联网公司
免费创办网站I gave a guest lecture in an undergraduate software engineering class (CSCE431) at Texas A&M University in March 2019. Now I’ve turned this lecture into a blog post here, and hopefully some people on the Internet will find this useful.我于…
centos7下安装docker(11容器操作总结)
这段时间主要是学习了对容器的操作,包括:容器的状态:start,stop,restart,rename,pause,unpause,rm,attach,exec,kill,logs…
Js插入元素到数组的头部和尾部 unshift push
我们经常会使用JS 数组插入数据,下面看一下常用的 1. 在数组头部插入元素 var arr [1,2,3]; arr.unshift(0);arr 输出结果: //arr [0,1,2,3] 2. 在数组尾部插入元素 var arr [1,2,3]; arr.push(4);arr 输出结果: //arr [1,2,3,4]
测试用例设计白皮书--正交实验设计方法
一.方法简介利用因果图来设计测试用例时, 作为输入条件的原因与输出结果之间的因果关系,有时很难从软件需求规格说明中得到。往往因果关系非常庞大,以至于据此因果图而得到的测试用例数目多的惊人,给软件测试带来沉重的负担,为了有效地,合理地减少测试的…
ios单应用模式_如何为iOS 13暗模式设置应用
ios单应用模式Apple launched the much-awaited iOS 13 updates globally on September 19 across all iPhones launched within the past 4 years (back to the iPhone 6s). 苹果于9月19日在全球发布了期待已久的iOS 13更新,该更新适用于过去4年内发布的所有iPhone…
BZOJ1965 [Ahoi2005]SHUFFLE 洗牌 快速幂
欢迎访问~原文出处——博客园-zhouzhendong 去博客园看该题解 题目传送门 - BZOJ1965 题意概括 对于扑克牌的一次洗牌是这样定义的,将一叠N(N为偶数)张扑克牌平均分成上下两叠,取下面一叠的第一张作为新的一叠的第一张,…
uniapp 长链接 socket 封装
App.vue <script>import socket from @/util/IM.jsexport default {watch: {$route: function() {var page = getCurrentPages();console.log(watch-监听路由, page);}},globalData: {ImAuth: socket.connect(),},onLaunch: function(e) {},onShow: function() {socket.…
react项目开发步骤_成为专业React开发人员的31个步骤
react项目开发步骤我为达到可雇用水平而进行的每个项目和课程。 (Every single project and course I took to reach a hireable level.) Before I learned how to code, I used to ask developers how much time it took them to learn their craft — and how they managed t…

P1979 [NOIP]华容道
【问题描述】 小 B 最近迷上了华容道,可是他总是要花很长的时间才能完成一次。于是,他想到用编程来完成华容道:给定一种局面, 华容道是否根本就无法完成,如果能完成, 最少需要多少时间。 小 B 玩的华容道与…
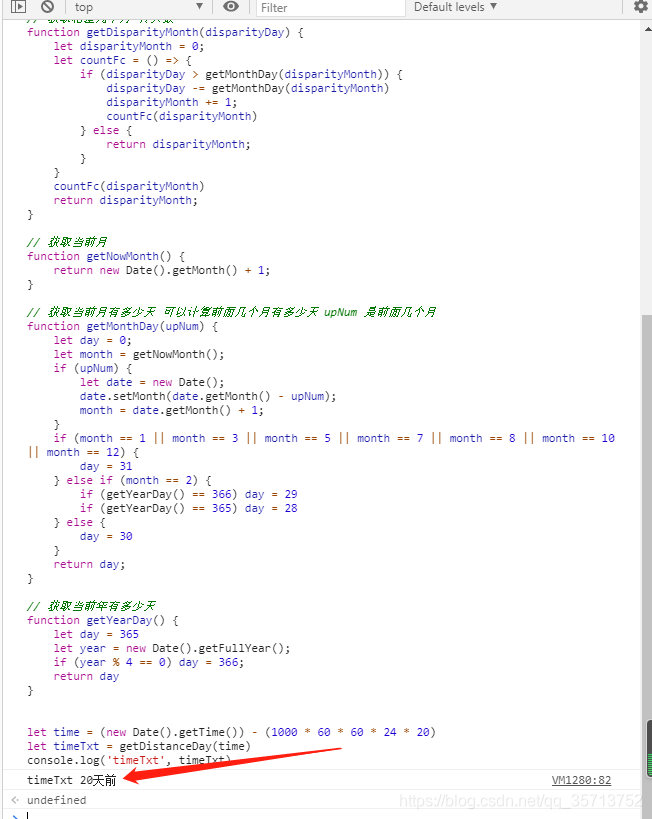
JS计算两个时间相差多久,相差年,月,日,小时,分钟
计算一个时间戳距离当前的时间,例如: 几年前,几个月前,几天前,几小时前,几分钟前,刚刚。 输出效果 代码: function getDistanceDay(time) {let stime new Date().getTime();let u…
replace 使用函数作为第二参数
var sToChange “The sky is red.”;var reRed /red/;var sResultText sToChange.replace(reRed, function(sMatch) { return “blue”;}); sMatch 指的是被匹配到到的对象, return 返回替换的对象 var reBadWords /badword|anotherbadword/gi;var sU…
如何在Visual Studio Code中编译C ++代码
PS: This was published on my Blog here. PS:这已发布在我的Blog 此处 。 C is a statically-typed, free-form, (usually) compiled, multi-paradigm, intermediate-level general-purpose middle-level programming language.C 是一种静态类型的,自由…

敏捷冲刺每日报告四(Java-Team)
第四天报告(10.28 周六) 团队:Java-Team 成员: 章辉宇(284) 吴政楠(286) 陈阳(PM:288) 韩华颂(142) 胡志权(1…
终止forEach的循环
上代码: let list[1,2,3] try {list.forEach(item > {if (item1) {console.log(等于1就跳出循环)throw new Error("EndIterative");}}) } catch (e) {}
大学可以学前端开发_所有开发人员在大学中应该学习的东西
大学可以学前端开发忘记“代码行” (Forget About "Lines of Code") Source资源 As a developer, youll hear a lot of crazy, unbelievable theories about what "lines of code" signify. Believe none of them. Lines of code is a ridiculous metric …
20162325 金立清 S2 W8 C17
20162325 2017-2018-2 《程序设计与数据结构》第8周学习总结 教材学习内容概要 二叉查找树是一棵二叉树,对于其中的每个结点,左子树上的元素小于父结点的值,而右子树上的元素大于等于父结点的值。 最有效的二叉树是平衡的,所以每次…
H5画布不显示图片的问题解决
在onReady 执行 <template><view class""><canvas style"" canvas-id"myCanvas" id"myCanvas"></canvas><!-- <view class"container"><img :src"tempFilePath" /></…
javascript十六进制数字和ASCII字符之间转换
var hex"0x29";//十六进制 var charValue String.fromCharCode(hex);//生成Unicode字符 var charCode charValue.charCodeAt(0);//获取指定字符的十进制表示. var hexOri"0x"charCode.toString(16);;//将int值转换为十六进制 alert("hex:&q…
html5编写网页代码_freeCodeCamp.org的未来-从向世界传授语言到编写代码的5年经验...
html5编写网页代码freeCodeCamp went live in October 2014. In the five years since, weve done quite a bit.freeCodeCamp于2014年10月上线。在此之后的五年中,我们做了很多工作。 In this article, well explore:在本文中,我们将探讨: …
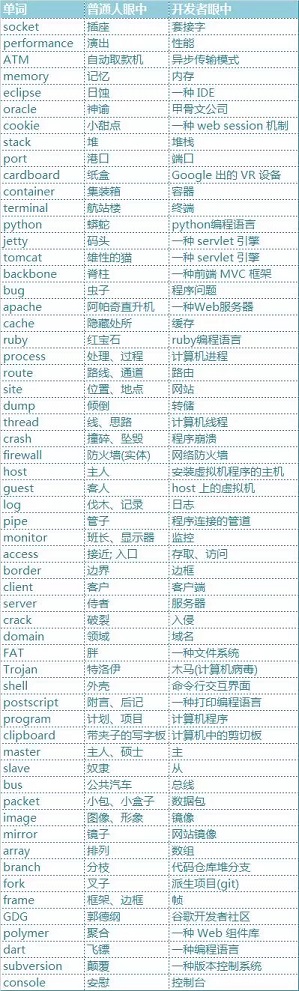
程序员眼中的英文单词是这样的
来源:Jackie Han英语中一个单词可能有很多不同的意思。很多中国开发者外语本来就不好,概念是往往先入为主。甚至在不清楚一般意义的情况下,先记住了特定环境中的意思。 转载于:https://www.cnblogs.com/agileai/p/5166982.html
linux系统无法挂载U盘
插上U盘 [ 2407.650440] usb 1-3.3: new high speed USB device number 7 using s5p-ehci [ 2407.887332] usb 1-3.3: New USB device found, idVendor0951, idProduct1666, bcdDevice0100 [ 2407.894249] usb 1-3.3: New USB device strings: Mfr1, Product2, SerialNumber3 […
小程序输入框上推页面不上推
样式问题,把样式去掉就行
面试:你了解中兴吗_HTTP简介:您需要了解的所有内容
面试:你了解中兴吗In this article, I will walk you through how the world wide web works at a fundamental level.在本文中,我将向您介绍基本的万维网工作原理。 The core technology is HTTP - Hypertext Transfer Protocol. Its the communication protocol …