python package_Python之package、module
一、模块:
1.简单的描述:一个.py文件
2.好处:大大提高代码的可维护性
3.模块三种:1.python标准库
2.第三方模块
3.应用程序自定义模块(*****)
4.import实质就是:1.执行对应文件 2.引入变量名
在内置函数中__import__导入文件的时候与import不同
import spam
spam = __import__('spam', globals(), locals(), [], 0)
5.导入模块其实就是告诉Python解释器去解释那个py文件
1 #!/usr/bin/env python
2 #-*- coding:utf-8 -*-
3
4
5 #import module_test
6 #from module_test import xx
7 #from module_test import xx as rename
8 #from module_test import * 不推荐 容易覆盖
二、包
1.避免模块名重复,组织模块的 init文件
2.导入一个包,就是告诉解释器解释该包下的 __init__.py 文件
<1>创建一个package_name的文件夹嵌套包web如图:

(1)创建一个cal.py文件代码如下
1 #!/usr/bin/env python
2 #-*- coding:utf-8 -*-
3
4
5 defadd(x, y):6 return x+y7
8
9 print(__name__)
(2)再创建test.py文件
导入模块cal.py方式:
三种常规导入:
1 #!/usr/bin/env python
2 #-*- coding:utf-8 -*-
3
4 importsys5 importos6 from web.web1.web2 importcal7 #from web.web1.web2.cal import add
8 #from web.web1 import web2 # 就是在执行web2的init的文件 不支持调用方式除非在web2下init文件里边添加cal的导入路径
调用模块的函数:在第三种导入方式就会报错
1 #print(cal.add(2, 3))
2 #print(add(2, 3))
3 #print(web2.cal.add(2, 3)) # 报错AttributeError: module 'web.web1.web2' has no attribute 'cal'
4 #print(web2.cal.add(2, 3)) # web2下在init文件下导入了模块cal
web2包下的__init__.py文件
1 #!/usr/bin/env python 2 #-*- coding:utf-8 -*- 3 from . import cal
解释器只认识sys.path里边的路径
1 #print(sys.path) # 解释器只认识sys.path里边的路径,看解释器路径
2 #['F:\\abc\\todostart\\package_name',.....] 打印一堆路径
3
4 #print(__name__) # __main__
5 #在cal文件下打印print(__name__) 执行文件test.py web.web1.web2.cal __main__
6
7 #if __name__ == '__main__':1.放在cal中测试文件功能1:用于被调用文件的测试
8 #2.在执行文件test.py中加上 可以调用我的程序 但是不能执行我的run_test()主函数
9
10 #print(__name__)放在调用文件中main 放在被调用文件中就是文件名


1 defrun_test():2 print('......')3
4
5 if __name__ == '__main__':6 run_test()7 print(__file__)8 print(os.path.dirname(__file__))9 print(os.path.dirname(os.path.dirname(__file__)))10 print(os.path.dirname(os.path.abspath(__file__)))11 """
12 dirname 拿到此文件的上一级目录13 abspath绝对路径14 web.web1.web2.cal15 ......16 F:/abc/todostart/package_name/test.py17 F:/abc/todostart/package_name18 F:/abc/todostart19 F:\abc\todostart\package_name20 """
又在扯把子玩法
三、Python内置的爆炸模块
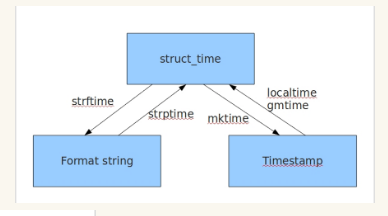
<1>time模块 看图说话

1 #!/usr/bin/env python
2 #-*- coding:utf-8 -*-
3 #import time
4 #import datetime
5
6
7 #时间戳 计算
8 #print(time.time()) # 从1970 1月 1日 0点年到现在目前的秒数 1970unix诞生
9
10
11 #结构化时间 -----当地时间------
12 #print(time.localtime())
13 #t = time.localtime()
14 #print(t.tm_year)
15 #print(t.tm_wday)
16 #结构化时间 ----UTC时间-----
17 #print(time.gmtime())
18
19 #1.将时间戳时间转换成结构化时间
20 #print(time.localtime())
21 #print(time.gmtime())
22 #2.结构化时间转化为时间戳
23 #print(time.mktime(time.localtime()))
24 #3.结构化时间转化为字符串格式化时间
25 #print(time.strftime("%Y-%m-%d %X", time.localtime()))
26 #4.字符串格式化时间转化为结构化时间
27 #print(time.strptime('2020-5-5 12:00:00', '%Y-%m-%d %X'))
28 #5.结构化时间转化为固定字符串模式的时间
29 #print(time.asctime())
30 #6.时间戳转化为固定字符串模式时间
31 #print(time.ctime())
32
33 #print(datetime.datetime.now())
时间模块扯犊子玩法
<2>random模块
1 #!/usr/bin/env python
2 #-*- coding:utf-8 -*-
3 importrandom4
5
6 ret = random.random() #0-1随机生成浮点型
7 ret = random.randint(1, 6) #[1, 6]
8 ret = random.randrange(1, 6) #[1, 6)
9 ret = random.choice([11, 22, 33]) #[11, 22, 33]随机选一个
10 ret = random.sample([11, 22, 33, 44, 55], 2) #随机选择两个
11 ret = random.uniform(1, 3) #随机生成1-3的浮点数
12 print(ret)13
14 item = [1, 2, 3, 4, 5]15 ret = random.shuffle(item) #随机打乱
16 print(item)17
18
19 defvcode():20 ret = ''
21 for i in range(5):22 num = random.randint(0, 9)23 alf = chr(random.randint(65, 122))24 s =str(random.choice([num, alf]))25 ret +=s26 returnret27
28
29 print(vcode())
随机模块扯把子玩法
<3>os模块
1 os.getcwd() 获取当前工作目录,即当前python脚本工作的目录路径2 os.chdir("dirname") 改变当前脚本工作目录;相当于shell下cd3 os.curdir 返回当前目录: ('.')4 os.pardir 获取当前目录的父目录字符串名:('..')5 os.makedirs('dirname1/dirname2') 可生成多层递归目录6 os.removedirs('dirname1') 若目录为空,则删除,并递归到上一级目录,如若也为空,则删除,依此类推7 os.mkdir('dirname') 生成单级目录;相当于shell中mkdir dirname8 os.rmdir('dirname') 删除单级空目录,若目录不为空则无法删除,报错;相当于shell中rmdir dirname9 os.listdir('dirname') 列出指定目录下的所有文件和子目录,包括隐藏文件,并以列表方式打印10 os.remove() 删除一个文件11 os.rename("oldname","newname") 重命名文件/目录12 os.stat('path/filename') 获取文件/目录信息13 os.sep 输出操作系统特定的路径分隔符,win下为"\\",Linux下为"/"
14 os.linesep 输出当前平台使用的行终止符,win下为"\t\n",Linux下为"\n"
15 os.pathsep 输出用于分割文件路径的字符串 win下为;,Linux下为:16 os.name 输出字符串指示当前使用平台。win->'nt'; Linux->'posix'
17 os.system("bash command") 运行shell命令,直接显示18 os.environ 获取系统环境变量19 os.path.abspath(path) 返回path规范化的绝对路径20 os.path.split(path) 将path分割成目录和文件名二元组返回21 os.path.dirname(path) 返回path的目录。其实就是os.path.split(path)的第一个元素22 os.path.basename(path) 返回path最后的文件名。如何path以/或\结尾,那么就会返回空值。即os.path.split(path)的第二个元素23 os.path.exists(path) 如果path存在,返回True;如果path不存在,返回False24 os.path.isabs(path) 如果path是绝对路径,返回True25 os.path.isfile(path) 如果path是一个存在的文件,返回True。否则返回False26 os.path.isdir(path) 如果path是一个存在的目录,则返回True。否则返回False27 os.path.join(path1[, path2[, ...]]) 将多个路径组合后返回,第一个绝对路径之前的参数将被忽略28 os.path.getatime(path) 返回path所指向的文件或者目录的最后存取时间29 os.path.getmtime(path) 返回path所指向的文件或者目录的最后修改时间
典型的几个玩稀巴烂
<4>sys模块
1 sys.argv 命令行参数List,第一个元素是程序本身路径2 sys.exit(n) 退出程序,正常退出时exit(0)3 sys.version 获取Python解释程序的版本信息4 sys.maxint 最大的Int值5 sys.path 返回模块的搜索路径,初始化时使用PYTHONPATH环境变量的值6 sys.platform 返回操作系统平台名称
哈哈哈
<5>json强大的交互模块爆炸pickle
#!/usr/bin/env python#-*- coding:utf-8 -*-
importjsonimportpickle#序列化:把对象(变量)从内存中变成可存储或传递的过程#json模块可以实现在不同编程语言传递对象
dic={'name': 'eric'}
ret= json.dumps(dic) #将字典对象转换为json字符串类型
print(ret)print(type(ret))
res= json.loads(ret) #将json字符串转换为字典
print(res)print(type(res))#dump 和 load 定制型太强只适用文件操作 并且在操作时候不需要添加read操作 参数传入句柄就行#f=open('序列化对象','w')#f.write(j) #-------------------等价于json.dump(dic,f)#f.close()##-----------------------------反序列化
#
#f=open('序列化对象')#data=json.loads(f.read())# 等价于data=json.load(f)#pickle模块只适用python语言
<6>shelve模块
1 #!/usr/bin/env python
2 #-*- coding:utf-8 -*-
3 importshelve4
5 f = shelve.open(r'shelve.txt')6
7 #f['sb1_info']={'name':'alex','age':'18'}
8 #f['sb2_info']={'name':'alvin','age':'20'}
9 #f.close()
10
11 print(f.get('sb1_info')['age'])
shelve模块
<7>xml模块java中更火爆 做金融这模块爆炸
创建xml文件
1 <?xml version="1.0"?>
2
3
4 1
5 2014
6 641100
7
8
9
10
11 5
12 2016
13 89900
14
15
16
17 53
18 2018
19 53600
20
21
22
23
xml文件
对xml文件操作
1 #!/usr/bin/env python
2 #-*- coding:utf-8 -*-
3
4 #xml是实现不同语言或程序之间进行数据交换的协议
5
6 importxml.etree.ElementTree as ET7
8
9 tree = ET.parse("modulexml")10 root = tree.getroot() #1.拿到根节点
11 print(root.tag) #根节点标签名字
12
13 ## 遍历xml文档
14 #for child in root:
15 #print(child.tag, child.attrib)
16 #for i in child:
17 #print(i.tag, i.text)
18 #19 ## 只遍历year 节点
20 #for node in root.iter('year'):
21 #print(node.tag, node.text)
22 ## ---------------------------------------
23 #24 #import xml.etree.ElementTree as ET
25 #26 #tree = ET.parse("modulexml")
27 #root = tree.getroot()
28 #29 ## 修改
30 #for node in root.iter('year'):
31 #new_year = int(node.text) + 1
32 #node.text = str(new_year)
33 #node.set("updated", "yes")
34 #35 #tree.write("modulexml")
36 #37 ## 删除node
38 #for country in root.findall('country'):
39 #rank = int(country.find('rank').text)
40 #if rank > 50:
41 #root.remove(country)
42 #43 #tree.write('output.xml')
xml
使用Python创建xml文件
1 #!/usr/bin/env python
2 #-*- coding:utf-8 -*-
3 importxml.etree.ElementTree as ET4
5
6 new_xml = ET.Element("namelist")7 name = ET.SubElement(new_xml, "name", attrib={"enrolled": "yes"})8 age = ET.SubElement(name, "age", attrib={"checked": "no"})9 sex = ET.SubElement(name, "sex")10 sex.text = '33'
11 name2 = ET.SubElement(new_xml, "name", attrib={"enrolled": "no"})12 age = ET.SubElement(name2, "age")13 age.text = '19'
14
15 et = ET.ElementTree(new_xml) #生成文档对象
16 et.write("test.xml", encoding="utf-8", xml_declaration=True)17
18 #ET.dump(new_xml) # 打印生成的格式
可牛逼啦
<8>logging模块
方式一:利用basicConfig,局限性太强
1 #!/usr/bin/env python
2 #-*- coding:utf-8 -*-
3 importlogging4
5
6 #logging.basicConfig(level=logging.DEBUG,
7 #format='%(asctime)s %(filename)s[line:%(lineno)d] %(levelname)s %(message)s',
8 #datefmt='%a, %d %b %Y %H:%M:%S',
9 #filename='logger.log',
10 #filemode='w')
11 #logging.debug('debug message')
12 #logging.info('info message')
13 #logging.warning('warning message')
14 #logging.error('error message')
15 #logging.critical('critical message')
局限版

参数:在logging.basicConfig()函数中可通过具体参数来更改logging模块默认行为,参数有filename:用指定的文件名创建FiledHandler,这样日志会被存储在指定的文件中。
filemode:文件打开方式,在指定了filename时使用这个参数,默认值为“a”还可指定为“w”。
format:指定handler使用的日志显示格式。
datefmt:指定日期时间格式。
level:设置rootlogger(后边会讲解具体概念)的日志级别
stream:用指定的stream创建StreamHandler。可以指定输出到sys.stderr,sys.stdout或者文件(f=open('test.log','w')),\
默认为sys.stderr。若同时列出了filename和stream两个参数,则stream参数会被忽略。
format参数中可能用到的格式化串:
%(name)s Logger的名字
%(levelno)s 数字形式的日志级别
%(levelname)s 文本形式的日志级别
%(pathname)s 调用日志输出函数的模块的完整路径名,可能没有
%(filename)s 调用日志输出函数的模块的文件名
%(module)s 调用日志输出函数的模块名
%(funcName)s 调用日志输出函数的函数名
%(lineno)d 调用日志输出函数的语句所在的代码行
%(created)f 当前时间,用UNIX标准的表示时间的浮 点数表示
%(relativeCreated)d 输出日志信息时的,自Logger创建以 来的毫秒数
%(asctime)s 字符串形式的当前时间。
%(thread)d 线程ID。可能没有
%(threadName)s 线程名。可能没有
%(process)d 进程ID。可能没有
%(message)s用户输出的消息
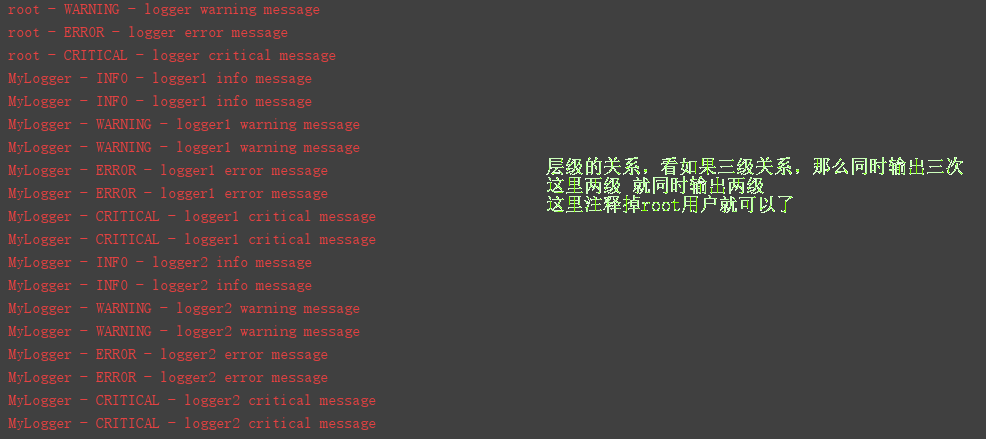
方式二:logger对象logger是一个树形层级结构
1 logger = logging.getLogger() #默认是root logger
2 logger.setLevel(logging.DEBUG)3
4 #创建一个handler,用于写日志文件
5 fh = logging.FileHandler('test.log')6 #输出控制台
7 ch =logging.StreamHandler()8
9 fm = logging.Formatter('%(asctime)s - %(name)s - %(levelname)s - %(message)s')10
11 fh.setFormatter(fm)12 ch.setFormatter(fm)13
14 logger.addHandler(fh)15 logger.addHandler(ch)16
17 logger.debug('debug message')18 logger.info('info message')19 logger.warning('warning message')20 logger.error('error message')21 logger.critical('critical message')
层级关系
1 logger =logging.getLogger()2
3
4 logger1 = logging.getLogger('MyLogger') #root用户下的子用户MyLogger
5 logger1.setLevel(logging.DEBUG) #------------logger1、logger2都指向MyLogger 最终按照logging.INFO级别走,都显示4条信息
6
7 logger2 = logging.getLogger('MyLogger')8 logger2.setLevel(logging.INFO) #------------要再加子对象 就MyLogger.LoggerTest
9
10 fh = logging.FileHandler('MyLogger.log')11 ch =logging.StreamHandler()12
13 fm = logging.Formatter('%(name)s - %(levelname)s - %(message)s')14
15 fh.setFormatter(fm)16 ch.setFormatter(fm)17
18 logger.addHandler(fh)19 logger.addHandler(ch)20
21 logger1.addHandler(fh)22 logger1.addHandler(ch)23
24
25 logger2.addHandler(fh)26 logger2.addHandler(ch)27
28 logger.debug('logger debug message')29 logger.info('logger info message')30 logger.warning('logger warning message')31 logger.error('logger error message')32 logger.critical('logger critical message')33
34 logger1.debug('logger1 debug message')35 logger1.info('logger1 info message')36 logger1.warning('logger1 warning message')37 logger1.error('logger1 error message')38 logger1.critical('logger1 critical message')39
40 logger2.debug('logger2 debug message')41 logger2.info('logger2 info message')42 logger2.warning('logger2 warning message')43 logger2.error('logger2 error message')44 logger2.critical('logger2 critical message')
注意输出重复日志信息
filter过滤日志
1 filter = logging.Filter('mylogger')2
3 logger.addFilter(filter)4
5 这是只对logger这个对象进行筛选6
7 如果想对所有的对象进行筛选,则:8
9 filter = logging.Filter('mylogger')10
11 fh.addFilter(filter)12
13 ch.addFilter(filter)
<9>re模块
常规一些规则:
1 字符:2 . 匹配除换行符以外的任意字符3 ^匹配字符串的开始4 $ 匹配字符串的结束5 \w 匹配字母或数字或下划线或汉字6 \W 匹配任何非字母数字字符7 \s 匹配任意的空白符8 \S 匹配任何非空白字符9 \d 匹配数字10 \D 匹配任何非数字字符11 \b 匹配单词的开始或结束 匹配一个特殊字符边界,比如空格 ,&,#等12 \ 转义符 可以把特殊字符转无意义 同时可以把无特殊的字符转成有意义13 大写与小写相反14 |简单的理解就是或 一般与其它操作15 ()分组 括起来做个整体16 匹配前面加r就等于匹配普通字符17
18
19 字符集:20 []21 在字符集里有功能的符号: -或 ^非 \22
23
24 次数:25 *重复零次或更多次26 +重复一次或更多次27 ? 重复零次或一次28 {n} 重复n次29 {n,} 重复n次或更多次30 {n,m} 重复n到m次
常用正则表达式
1 IP:2 ^(25[0-5]|2[0-4]\d|[0-1]?\d?\d)(\.(25[0-5]|2[0-4]\d|[0-1]?\d?\d)){3}$3 手机号:4 ^1[3|4|5|8][0-9]\d{8}$5 邮箱:6 [a-zA-Z0-9_-]+@[a-zA-Z0-9_-]+(\.[a-zA-Z0-9_-]+)+
常规的一些的方法操作
1 #!/usr/bin/env python
2 #-*- coding:utf-8 -*-
3 importre4
5
6 #1
7 re.findall('a', 'alvin yuan') #返回所有满足匹配条件的结果,放在列表里
8 #2
9 re.search('a', 'alvin yuan').group() #函数会在字符串内查找模式匹配,只到找到第一个匹配然后返回一个包含匹配信息的对象,该对象可以
10 #通过调用group()方法得到匹配的字符串,如果字符串没有匹配,则返回None。
11
12 #3
13 re.match('a', 'abc').group() #同search,不过尽在字符串开始处进行匹配
14
15 #4
16 ret = re.split('[ab]', 'abcd') #先按'a'分割得到''和'bcd',在对''和'bcd'分别按'b'分割
17 print(ret) #['', '', 'cd']
18
19 #5
20 ret = re.sub('\d', 'abc', 'alvin5yuan6', 1) #替换
21 print(ret) #alvinabcyuan6
22 ret = re.subn('\d', 'abc', 'alvin5yuan6') #匹配次数
23 print(ret) #('alvinabcyuanabc', 2)
24
25 #6
26 obj = re.compile('\d{3}')27 ret = obj.search('abc123eeee')28 print(ret.group()) #123
29
30 #7
31 ret = re.finditer('\d', 'ds3sy4784a')32 print(ret) #
33
34 print(next(ret).group())35 print(next(ret).group())36
37
38 print(re.findall("<(?P\w+)>\w+(?P=tag_name)>", "
hello
"))39 print(re.search("<(?P\w+)>\w+(?P=tag_name)>", "hello
"))40 print(re.search(r"<(\w+)>\w+\1>", "hello
"))re func
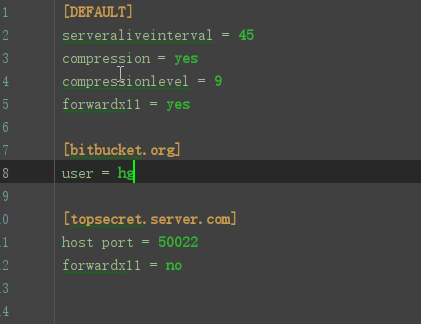
<10>configparser配置信息解析模块
先创建一个配置文件
1 [DEFAULT]2 ServerAliveInterval = 45
3 Compression =yes4 CompressionLevel = 9
5 ForwardX11 =yes6
7 [bitbucket.org]8 User =hg9
10 [topsecret.server.com]11 Port = 50022
12 ForwardX11 = no
生成配置文件以及操作
1 importconfigparser2
3 config = configparser.ConfigParser() #创建空字典
4 config["DEFAULT"] = {'ServerAliveInterval': '45',5 'Compression': 'yes',6 'CompressionLevel': '9'}7
8 config['bitbucket.org'] ={}9 config['bitbucket.org']['User'] = 'hg'
10 config['topsecret.server.com'] ={}11 topsecret = config['topsecret.server.com']12 topsecret['Host Port'] = '50022' #mutates the parser
13 topsecret['ForwardX11'] = 'no' #same here
14 config['DEFAULT']['ForwardX11'] = 'yes'
15 #with open('config.ini', 'w') as configfile:
16 #config.write(configfile)
配置文件操作
1 """
2 import configparser3
4 config = configparser.ConfigParser()5
6 # ---------------------------------------------查7 print(config.sections()) # []8
9 config.read('config.ini')10
11 print(config.sections()) # ['bitbucket.org', 'topsecret.server.com']12
13 print('bytebong.com' in config) # False14
15 print(config['bitbucket.org']['User']) # hg16
17 print(config['DEFAULT']['Compression']) # yes18
19 print(config['topsecret.server.com']['ForwardX11']) # no20
21 for key in config['bitbucket.org']:22 print(key)23
24 # 它要把默认的key拿出来25 # user26 # serveraliveinterval27 # compression28 # compressionlevel29 # forwardx1130
31
32 print(33 config.options('bitbucket.org')) # ['user', 'serveraliveinterval', 'compression', 'compressionlevel', 'forwardx11']34 print(config.items(35 'bitbucket.org')) # [('serveraliveinterval', '45'), ('compression', 'yes'), ('compressionlevel', '9'), ('forwardx11', 'yes'), ('user', 'hg')]36
37 print(config.get('bitbucket.org', 'compression')) # yes38
39 # ---------------------------------------------删,改,增(config.write(open('i.cfg', "w")))40
41
42 config.add_section('eric')43
44 config.remove_section('topsecret.server.com')45 config.remove_option('bitbucket.org', 'user')46
47 config.set('bitbucket.org', 'k1', '11111')48
49 config.write(open('i.cfg', "w"))50 """
增删改查操作
<11>hashlib模块
用于摘要算法相关的操作,3.x里代替了md5模块和sha模块,主要提供 SHA1, SHA224, SHA256, SHA384, SHA512 ,MD5 算法
#!/usr/bin/env python#-*- coding:utf-8 -*-
importhashlibimporthmac#这样如果一些常用的字符串,这样容易出现撞库的现象#md5是32位的#m = hashlib.md5()#m.update('hello'.encode('utf8'))#print(m.hexdigest()) 5d41402abc4b2a76b9719d911017c592#m.update('eric'.encode('utf8')) # 0a6957c3589d31e6d1aa7216de564d4b#m.update('helloeric'.encode('utf8'))# 0a6957c3589d31e6d1aa7216de564d4b 其实它是在之前两部合并处理加在一起处理#print(m.hexdigest())
#解决撞库的现象(key 加盐) 但是也不能说是完全解决 牛逼黑人也能搞啊#hashlib.md5('sb'.encode('utf8'))
s= hashlib.sha256() #64位
s.update('hello'.encode('utf8'))print(s.hexdigest()) #2cf24dba5fb0a30e26e83b2ac5b9e29e1b161e5c1fa7425e73043362938b9824
#python 还有一个 hmac 模块,它内部对我们创建 key 和 内容 再进行处理然后再加密:
h = hmac.new('eric'.encode('utf8'))
h.update('hello'.encode('utf8'))print(h.hexdigest()) #93fc3b5d4e8090496e1d92251ef15e1a
shlex模块
最常见的方法就是split方法
1 shlex.split("python -u a.py -a A -b B -o test")2 ['python', '-u', 'a.py', '-a', 'A', '-b', 'B', '-o', 'test']
shutil模块
就是对OS模块进行补充的一个模块,移动,复制,打包,压缩,解压进行操作
1.copyfileobj: copy一个文件的内容到另外一个文件
1 #先来看看其源代码。
2 def copyfileobj(fsrc, fdst, length=16*1024):3 """copy data from file-like object fsrc to file-like object fdst"""
4 while 1:5 buf =fsrc.read(length)6 if notbuf:7 break
8 fdst.write(buf)9
10 #注意! 在其中fsrc,fdst都是文件对象,都需要打开后才能进行复制操作
11 importshutil12 f1=open('name','r')13 f2=open('name_copy','w+')14 shutil.copyfileobj(f1,f2,length=16*1024)
2.copyfile: 不需要手动使用open函数打开文件,内部调用copydileobj
def copyfile(src, dst, *, follow_symlinks=True):"""Copy data from src to dst.
If follow_symlinks is not set and src is a symbolic link, a new
symlink will be created instead of copying the file it points to."""
if_samefile(src, dst):raise SameFileError("{!r} and {!r} are the same file".format(src, dst))for fn in[src, dst]:try:
st=os.stat(fn)exceptOSError:#File most likely does not exist
pass
else:#XXX What about other special files? (sockets, devices...)
ifstat.S_ISFIFO(st.st_mode):raise SpecialFileError("`%s` is a named pipe" %fn)if not follow_symlinks andos.path.islink(src):
os.symlink(os.readlink(src), dst)else:
with open(src,'rb') as fsrc:
with open(dst,'wb') as fdst:
copyfileobj(fsrc, fdst)return dst
实例
shutil.copyfile('name','name_copy_2')#一句就可以实现复制文件内容
还有很多方法
make_archive(base_name, format, root_dir=None, base_dir=None, verbose=0,dry_run=0, owner=None, group=None, logger=None) #压缩打包
shutil.move(src, dst) #递归的移动文件
shutil.rmtree(path, ignore_errors=False, οnerrοr=None) #递归地删除文件
tarfile.open(name=None, mode='r', fileobj=None, bufsize=10240, **kwargs)
返回一个TarFile类型的对象。本质上就是打开一个文件对象。
捕获异常并打印异常
namedtuple模块from collections import namedtuple
def namedtuple(typename, field_names, *, rename=False, defaults=None, module=None):"""Returns a new subclass of tuple with named fields.
>>> Point = namedtuple('Point', ['x', 'y'])
>>> Point.__doc__ # docstring for the new class
'Point(x, y)'
>>> p = Point(11, y=22) # instantiate with positional args or keywords
>>> p[0] + p[1] # indexable like a plain tuple
33
>>> x, y = p # unpack like a regular tuple
>>> x, y
(11, 22)
>>> p.x + p.y # fields also accessible by name
33
>>> d = p._asdict() # convert to a dictionary
>>> d['x']
11
>>> Point(**d) # convert from a dictionary
Point(x=11, y=22)
>>> p._replace(x=100) # _replace() is like str.replace() but targets named fields
Point(x=100, y=22)"""
实例
1 def _shell(self, cmd_args, stream=False, timeout=60):2 cmdline = list2cmdline(cmd_args) if isinstance(cmd_args, (list, tuple)) else cmd_args #yapf: disable
3 ifstream:4 return self._request("get", "/shell/stream", params={"command": cmdline}, timeout=None, stream=True)5 ret = self._request("post", '/shell', data={'command': cmdline, 'timeout': str(timeout)},6 timeout=timeout + 10, retry=False)7 if ret.status_code != 200:8 raise RuntimeError("device agent responds with an error code %d" %ret.status_code, ret.text)9 resp =ret.json()10 succeeded = False if resp.get('error') elseTrue11 #exit_code = resp.get('exitCode', exit_code)
12 shell_response = namedtuple("ShellResponse", ("output", "succeeded"))13 return shell_response(resp.get('output'), succeeded)
enum模块from enum import Enum 枚举模块
wraps模块 from functools import wraps
from typing import Union, Optional, List 类型检测模块
whichcraft 模块返回文件路径
from lxml import etree解析文档
postgresbar显示进度条的操作模块
相关文章:

C# Timer使用方法示例
实例化一个timer: // 每5分钟执行一次,每次执行的间隔毫秒时长 System.Timers.Timer timer new System.Timers.Timer(5*60*1000);为timer设置事件和任务循环回调方法: //到达时间的时候执行事件timer.Elapsed new System.Timers.ElapsedEventHandler(T…
[Educational Codeforces Round 16]A. King Moves
[Educational Codeforces Round 16]A. King Moves 试题描述 The only king stands on the standard chess board. You are given his position in format "cd", where c is the column from a to h and dis the row from 1 to 8. Find the number of moves permitted…
解读Go语言的2018:怎么就在中国火成这样了?
链客,专为开发者而生,有问必答! 此文章来自区块链技术社区,未经允许拒绝转载。 本篇文章是 Go 语言 2018 年终盘点,力求客观、深入分析 2018 年 Go 语言的技术发展现状,同时对明年可能的发展情况进行预测…
Io流的字节流与缓冲流
当我们队大量数据进行保存时可以用数组,当数据到达一定量时或给用户一个易懂得接口时就可采用IO流: IO流按进行的操作分输出流与输入流InputStream与OutputSteam 按操作的原理来分有2种常见的IO流字节流与缓冲流:这2种IO的的输入输出流都是对…
057 Insert Interval 插入区间
给出一个无重叠的按照区间起始端点排序的区间列表。在列表中插入一个新的区间,你要确保列表中的区间仍然有序且不重叠(如果有必要的话,可以合并区间)。示例 1:给定区间 [1,3],[6,9],插入并合并 [2,5] 得到 [1,5],[6,9]…
python3笔记_python3基础笔记(一)
1、就单个 python 文件来说在 python 中 python 的后缀可以是任意的。但如果这个 python 文件需要导入的时候如果不是 .py 会出错。所以一般情况下 python 文件的后缀为 .py 2、是 linux 中使用 ./文件.py 时候需要在文档的第一行注明解释器路径 # !/usr/bin/env/ python 3、声…
django中使用celery简单介绍
链客,专为开发者而生,有问必答! 此文章来自区块链技术社区,未经允许拒绝转载。 本章节我们重点在于实现,如何存储任务的结果. 我们将任务函数改为: from celery_demo.celery import app import time 加上app对象…

Node.js:路由
ylbtech-Node.js:路由1.返回顶部 1、Node.js 路由 我们要为路由提供请求的 URL 和其他需要的 GET 及 POST 参数,随后路由需要根据这些数据来执行相应的代码。 因此,我们需要查看 HTTP 请求,从中提取出请求的 URL 以及 GET/POST 参…
如何进行Web服务的性能测试?
随着浏览器功能的不断完善,用户量不断的攀升,涉及到web服务的功能在不断的增加,对于我们测试来说,我们不仅要保证服务端功能的正确性,也要验证服务端程序的性能是否符合要求。那么性能测试都要做些什么呢?我…

64位游戏找call_替换Unity可执行文件为64位,改善游戏性能
虽然Unity同时支持多种架构,但是总有些程序员选择只打包32位版本,既然我们没有办法手动给程序员的脑子抽水,那就自己动手替换一个64位版本吧以下面这个游戏为例右键目录内最大的可执行文件或dll,属性,查看版本显然这个游戏使用的是5.6.6版本的Unity打开Unity官网(https://unity…
Python数据分析学习文章归纳
链客,专为开发者而生,有问必答! 此文章来自区块链技术社区,未经允许拒绝转载。 数据分析如何入门学习How do I learn data analysis with Python? 虽然是英文的,不过看一遍很大收获(可以用百度翻译看一…
概率统计 —— 常犯错误
1. 患病的概率与医院的精度 已知某一种疾病在人群中的患病概率是万分之一(0.01%),某医院检查的精度为 99.9%,某人在该医院检查的结果显示自己患了这个病,那么此人确实患病的概率是多少? 也即在诊断出患病的…

python tcp不用循环监听_网络编程: TCP
1. IP 地址概念: 标识网络中设备的地址(需要联网才有没有联网, 是没有这个地址)表现形式:ipv4 目前主要使用的, 点分十进制的格式,(192.168.3.43)分为 4 段, 每段的范围是 0-255, 0.0.0.0 ~ 255.255.255.255公网 IP, 可以直接被别人使用访问的 ip(需要购买)局域网 ip(内网), 通…
WC2018集训 吉老师的军训练
WC2018集训 吉老师的军训练 #include<bits/stdc.h> #define RG register #define IL inline #define _ 200005 #define X 100000000 #define ll unsigned long long using namespace std;IL int gi(){RG int data 0 , m 1; RG char ch 0;while(ch ! - && (ch&…

一篇文章搞定Python全部基础知识
链客,专为开发者而生,有问必答! 此文章来自区块链技术社区,未经允许拒绝转载。 前言: 1、Python软件安装 第一章、字符串及数字变量 1、变量 要点提炼:Python变量为强类型动态类型。换言之,…
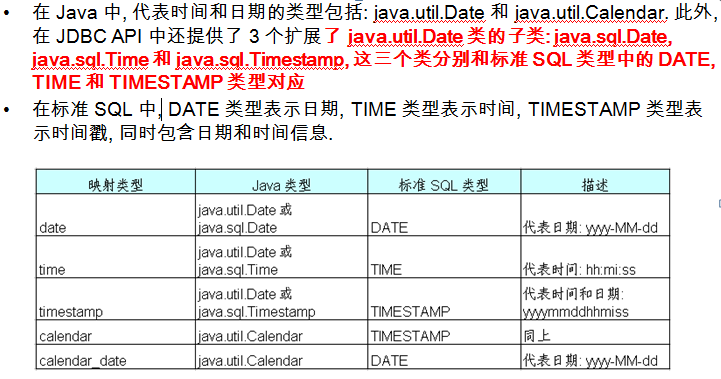
Java 时间和日期类型的 Hibernate 映射
以下情况下必须显式指定 Hibernate 映射类型一个 Java 类型可能对应多个 Hibernate 映射类型. 例如: 如果持久化类的属性为 java.util.Date 类型, 对应的 Hibernate 映射类型可以是 date, time 或 timestamp. 此时必须根据对应的数据表的字段的 SQL 类型, 来确定 Hibernate 映射…

idea springmvc_SSM三大框架使用Maven快速搭建整合(SpringMVC+Spring+Mybatis)
本文介绍使用SpringMVCSpringMyBatis三大框架使用Maven快速搭建一个demo,实现数据从数据库中查询返回到页面进行展示的过程。技术选型:SpringMVCSpringMyBatisMySqlMavenJSPIDEATomcat7JDK1.8Navicat for MySql下面开始搭建项目:一、数据库环…
欧拉函数+素数筛
欧拉函数,就是欧拉发现的一个关于求素数的的公式,然后我们编个函数实现这个公式。 欧拉发现求小于等于n的正整数中有多少个数与n互质可以用这个公式: euler(x)x(1-1/p1)(1-1/p2)(1-1/p3)(1-1/p4)…(1-1/pn),其中p1,p2……pn为x的所有素因数&a…

对 Python 开发者而言,IPython 仍然是 Jupyter Notebook 的核心
链客,专为开发者而生,有问必答! 此文章来自区块链技术社区,未经允许拒绝转载。 Jupyter 项目提供的魔法般的开发体验很大程度上得益于它的 IPython 基因。 最近刚刚写过我为什么觉得觉得 Jupyter 项目(特别是 Jupy…
LintCode 249. 统计前面比自己小的数的个数
给定一个整数数组(下标由 0 到 n-1, n 表示数组的规模,取值范围由 0 到10000)。对于数组中的每个 ai 元素,请计算 ai 前的数中比它小的元素的数量。 注意事项 We suggest you finish problem Segment Tree Build, Segm…

springboot过滤器排除掉一些url_理解这9大内置过滤器,才算是精通Shiro
小Hub领读:权限框架一般都是一堆过滤器、拦截器的组合运用,在shiro中,有多少个内置的过滤器你知道吗?在哪些场景用那些过滤器,这篇文章希望你能对shiro有个新的认识!别忘了,点个 [在看] 支持一下…
安装APK,启动系统Activity
要同时设置data和type的话只能用函数setDataAndType private void installApk(File file) {Intent intent new Intent("android.intent.action.VIEW");intent.addCategory("android.intent.category.DEFAULT"); // intent.setData(Uri.fromFile(fi…

EOS能不能囤?一篇文章搞懂EOS优缺点
链客,专为开发者而生,有问必答! 此文章来自区块链技术社区,未经允许拒绝转载。 EOS是一个基于区块链的开发平台,专为构建去中心化应用程序(dApp)而设计。EOS是一个开源项目,其源代…

JS 中的事件设计
看懂此文,不再困惑于 JS 中的事件设计 原文出处: aitangyong 抽空学习了下javascript和jquery的事件设计,收获颇大,总结此贴,和大家分享。 (一)事件绑定的几种方式 javascript给DOM绑定事件处理函数总的来说有2种方式…

‘百度杯’十月场web ---login
首先一看的题,既然是是web类的,就要查看源码,一看,最先有一行注释,估摸着是用户名和密码 果然登录上去了,显示一段乱码,源码也没有什么东西, 那就抓一次包吧 发现响应头里边有个sho…
oracle 与 client端执行结果不一致_不同模式下Spark应用的执行过程
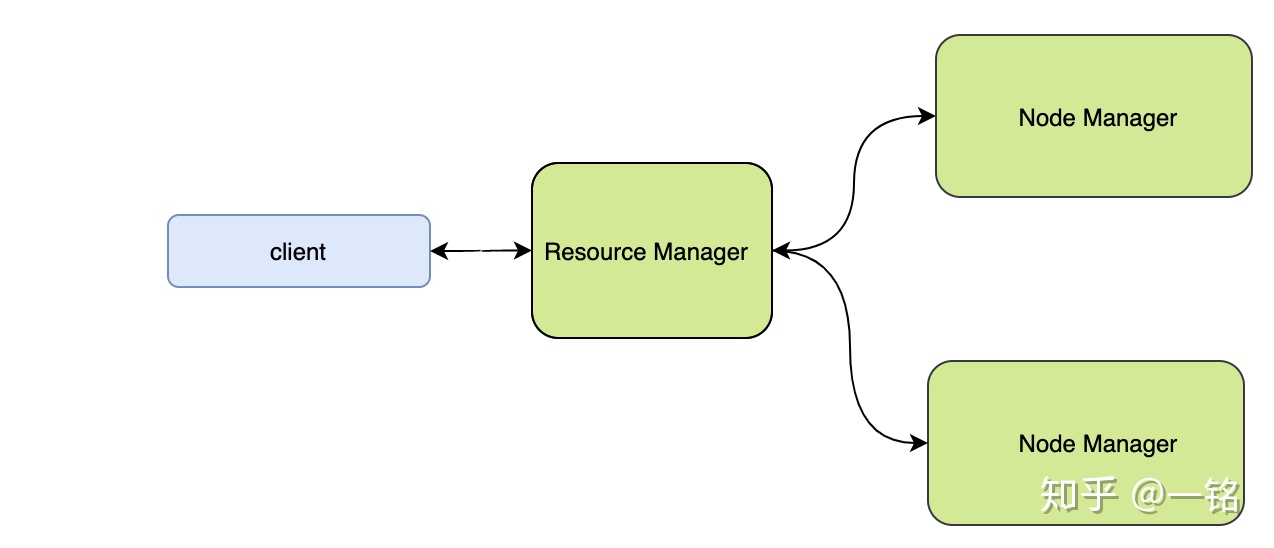
根据应用执行的3个阶段,不同执行模式下各个阶段的执行逻辑不相同,本文分析不同模式下的执行逻辑。Yarn-Client模式的执行流程Yarn的组成Yarn是hadoop自带的资源管理框架,它的设计思想是:YARN的基本思想是将资源管理和作业调度/监视…

分享EOS加拿大的文章《REX——从源代码做技术解析》
链客,专为开发者而生,有问必答! 此文章来自区块链技术社区,未经允许拒绝转载。 已提议将丢失密钥恢复系统部署到EOS主网。 丢失密钥解决方案的最后一步已经在链上提出。最后一步是将丢失密钥解决方案智能合约部署到为此目的创建…
16.QT鼠标
头文件 1 #include <QMouseEvent> 2 #include <QStatusBar> 3 #include <QLabel> 1 protected: 2 //鼠标按下 3 void mousePressEvent(QMouseEvent *e); 4 //鼠标移动 5 void mouseMoveEvent(QMouseEvent *e); 6 //鼠标释放 7 void …
c++ windows获得当前工作目录文件_基于linux下Python文件操作
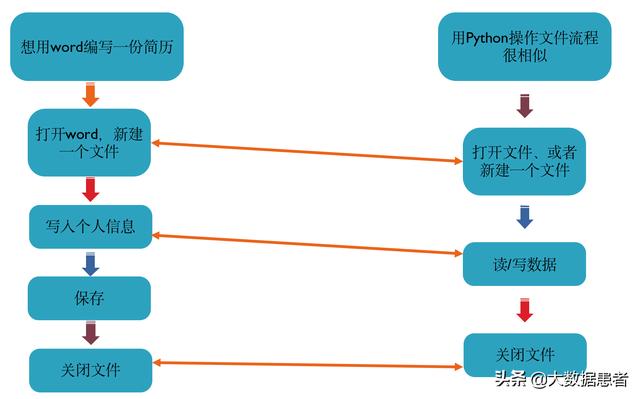
Python中的文件操作1、文件的打开与关闭想一想:如果想用word编写一份简历,应该有哪些流程呢?1、打开word软件,新建一个word文件2、写入个人简历信息3、保存文件4、关闭word软件同样,在操作文件的整体过程与使用word编写…
maven 插件
maven-enforcer-plugin https://maven.apache.org/enforcer/maven-enforcer-plugin/ https://maven.apache.org/enforcer/maven-enforcer-plugin/enforce-mojo.html http://maven.apache.org/enforcer/enforcer-rules/index.html转载于:https://www.cnblogs.com/SamuelSun/p/58…